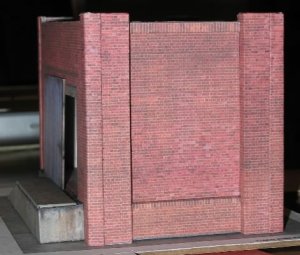
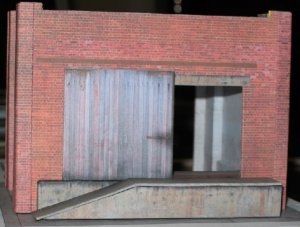
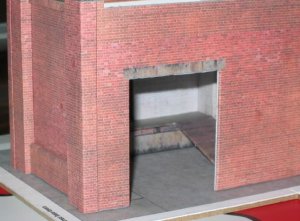
Ocalicreek builds a scalescenes.com card structure!

ocalicreek

Member
May 4, 2005
824
0
16
48
Puyallup, WA
groups.yahoo.com
Wall Covers and Cool Tool #2
P1040381.JPG

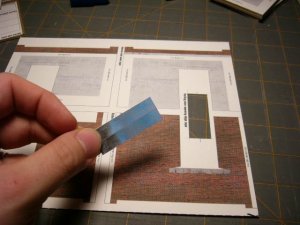
First, to make cutting the wall covers easier I trimmed out the little blue bit in between the doors on that sheet. I think those are door edge caps for the street level entry.
P1040382.JPG

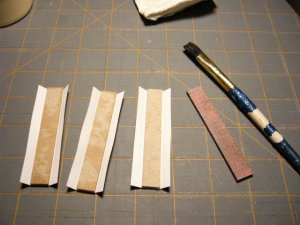
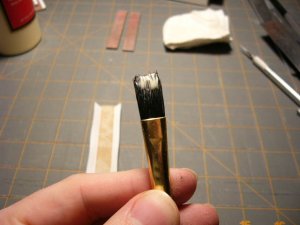
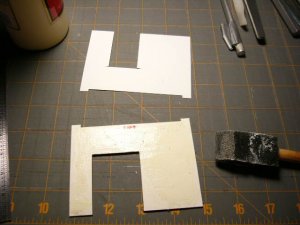
Next, I applied yellow glue to the cardstock piece, not the cover layer. Reason being, I didn't think the cover would hold up as well to brushing around the glue, and would probably curl up or warp on its own. I used a spongy brush here, but switched to a stiff bristle brush after that. Just a personal preference.
P1040383.JPG

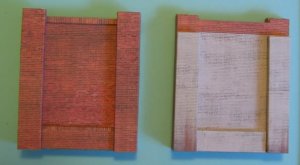
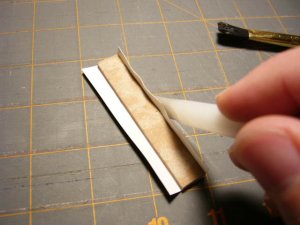
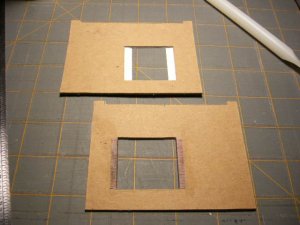
Here are two wall sections, the lower one with the doorway edges wrapped and glued. I just dribbled a little yellow glue on here and let it smush out as I folded the wrapped section around...messy.
P1040384.JPG

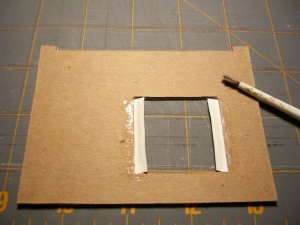
TIP #4: Use a little brush to apply the glue in these spots in a thin, even coat. Then when you fold the wrapped bit around the edge, it'll stick right away with very little mess. Some modeling is messy by nature. This doesn't need to be, IMO.
P1040385.JPG

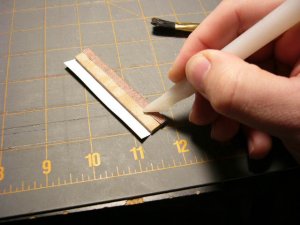
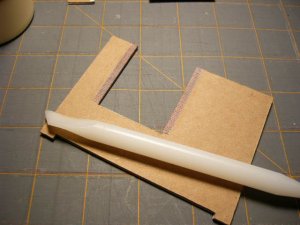
Finally, the second cool tool of the night - my Woodland Scenics dry transfer burnisher. This is made from some slick, dense vinyl or plastic. Excellent for its intended purpose, it is also quite adept here in this application.

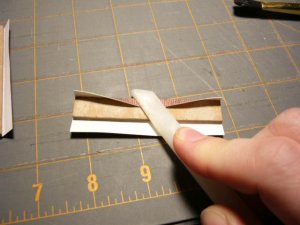
I found if I made the first wrap around bend with my finger gently, then laid it on the table face down and used the tool to crease it, I would get a very clean fold. Not exactly creased, but still very even. This is done dry, without any glue applied yet.

Then, using the flat edge/side of the tool, I made the second bend around to the back of the wall, working from the middle out to each edge. Once I had creased it down, I opened the fold and applied glue. Letting it sit for a second softened the paper ever so slightly.

Once the wrap was made I used the burnisher to push it firmly into place, running it up and down the inside edge of the opening as well as each side - front and back. This made the crease even cleaner as the softened paper shifted under the steady, gentle pressure of the tool.

TONIGHT - cutting the buttress layers. We'll see how far I get. It's been a long day and there's some good television I've DVR'd that I'd like to watch...and I'm not all that good at doing both. Thanks again for following along!
 

Wabash Banks

Member
Mar 11, 2005
115
0
16
52
Indiana
ocalicreek said:
Dan,

Thanks for the great link! Outstanding work over there on that forum. I'm looking forward to seeing your revised effort. And the kitbashed scissors place - wow! It's enough to almost make me want to modify this little beastie right away! BUT...I will stick with the plan to build it as is this time around.

That is exactly what we thought when he posted it. It has lots of application as an add on.

What I also noticed about the kitbashed scissors place was the great family resemblance by using the same material. SO, this first kit could be part of a larger complex quite easily without having to match paint, brick size, etc. Hmmm....

Yes, the texture sheets are great if you are going to be doing some paper covering. Pretty cheap too. I think they are something like 2.50 a download and again you can print all you want. Not a bad deal if you ask me. It also makes it VERY easy to bash something together. I think they have a texture sheet for every surface in thier models so you can bash any element of a model.

You are doing a great job on the that building. Getting the doors really crisply folded isn't as big of a deal in the end just because anything less than crisp isn't noticable. The buttresses on the other hand will REALLY benefit from your technique. I will be using it when I do my second build.

If you really like this model and want to try another before buying one, on the top of the page is a UK flag. If you click on it you are taken to UK types of models. They have another free model there that is pretty interesting too.
Keep up the good work!
 

scottcn

New Member
Jul 8, 2006
75
0
6
coastal SC
So last night my wife says, "So how long can that thing take you? It's only got 4 walls and a roof." Yea, that and 9 pages of directions to follow.

Thanks for the link to the other forum, Dan. That's some nice work over there. I didn't think that your first attempt looked that bad, but ultimately, you (not me) need to be happy with what you put on your layout. Hope the next attempt works better for you.

Looking good, Galen. That corner punch tool looks quite handy. I just used my handy knife and did a reasonable job. I've been out of the hobby for ~15 years so I don't have a cool collection of tools like that (and the wife won't let me buy them all at once).

As for my own freight house, I got a little bit done last night and some more this morning. Unfortunately, when I looked at my buttresses last night, I decided that I needed to redo the cover layer. The bubbles from the night before had pretty much disappeared but some of the ink on the cover layer had run a bit (printed on an inkjet printer - maybe wouldn't have been a problem had I used a laser printer).

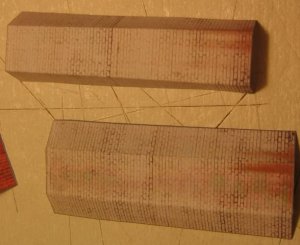
The splotchy buttresses. The one on the bottom has pink/green splotches where I applied too much glue. The one on the top has not yet been glued down.
glue splotches.jpg

Fortunately, I was able to peel the cover layers off the buttress base layers, printed out new cover layers and glued on the new cover layers (with a glue stick this time). After letting everything dry overnight, this morning I glued the internal and external buttresses to the side walls and also attached the ledges and plinths. Everything is drying now under a thick stack of used textbooks (I knew they would come in handy sometime!).
side walls.jpg

Might not get much done on this project tonight or tomorrow - need to clean the house (tonight) in preparation for my soon-to-be-5 year old's birthday on Friday.

- Scott
 

Wabash Banks

Member
Mar 11, 2005
115
0
16
52
Indiana
scottcn said:
So last night my wife says, "So how long can that thing take you? It's only got 4 walls and a roof." Yea, that and 9 pages of directions to follow.

Thanks for the link to the other forum, Dan. That's some nice work over there. I didn't think that your first attempt looked that bad, but ultimately, you (not me) need to be happy with what you put on your layout. Hope the next attempt works better for you.

Tell me about it! This is a very simple looking little model made from paper! How long can it really take??? The issue is how the maker put the thing together. Those end walls are VERY strong and do not behave like paper when laminated together per the instructions. All the building up takes time. Throw in the fact that all the surfaces are very well covered so that you don't see white paper anywhere and there is only one step that requires the use of a marker... it adds up to a lot of time consuming steps, but the model is very worthwhile of that time when it is finished.

As for my own... the camera made it look better than it is. It wasn't horrible and for a back scene that was covered up a bit and all it would have worked fine. I just knew that I didin't do the model justice and I would like to have it a little more foreground. Truth is I also enjoyed putting it together and know that I have done it once I am convinced I can do MUCH better on a second go around. Thanks for the kind words though.

scottcn said:
The splotchy buttresses. The one on the bottom has pink/green splotches where I applied too much glue. The one on the top has not yet been glued down.

Fortunately, I was able to peel the cover layers off the buttress base layers, printed out new cover layers and glued on the new cover layers (with a glue stick this time). After letting everything dry overnight, this morning I glued the internal and external buttresses to the side walls and also attached the ledges and plinths. Everything is drying now under a thick stack of used textbooks (I knew they would come in handy sometime!).

Yeah, that too much glue thing doesn't do inkjet prints any benefit at all. It is so nice to be able to print off a messed up section again when you need it.

scottcn said:
Might not get much done on this project tonight or tomorrow - need to clean the house (tonight) in preparation for my soon-to-be-5 year old's birthday on Friday.

- Scott
My daughter turned 5 last weekend. Modeling time just didn't make the cut. We had a birthday party on Saturday and celebrated her actual birthday on Sunday with just the three of us. Congrats on surviving through 5!! sign1

I don't think I will get much modeling done this weekend. It is pretty packed and includes my wife's birthday on Saturday.
 

ocalicreek

Member
May 4, 2005
824
0
16
48
Puyallup, WA
groups.yahoo.com
buttresses...ugh!

Well, happy birthdays to everyone to whom it applies...5 still seems like a long way off for my 2-1/2 year old, and already he's into trains in a big way (not just Thomas, either). It certainly is a challenge raising kids but if there's anything that I'd let distract me from modeling (occasionally), it'd be my kiddo.

ANYWAY, I did a little measuring and test fitting last night with the buttresses. Seems my cardstock is just a little thick. I'll post pictures later to better explain.

That corner punch tool looks quite handy. I just used my handy knife and did a reasonable job. I've been out of the hobby for ~15 years so I don't have a cool collection of tools like that (and the wife won't let me buy them all at once).

Yes, it's a bit pricey in the Micro-Mark catalog, but giving my inlaws a list of things from that catalog made it easier for them to know what to get me. I had meant it as a list to choose from, you know, to give an idea of the sorts of things I might like, but I was floored when the box contained almost everything on the list!

My usual m.o., however, is to pick up the occasional cool tool when its on sale...speaking of which, I just got an email from Micro-Mark today with several items all 50% off! Check this out:

http://www.ares-server.com/Ares/Ares.asp?MerchantID=RET01229&Action=Catalog&Type=Product&ID=20123A

Could be handy in this sort of project.

I suppose frugality is one of the chief benefits of working with paper. I've got folks here in the office where I work on cardboard alert to snatch up any good looking candidates. They're aware of my affliction...er, hobby... and sympathetic to the cause. You can't beat free!

But, then again, glue isn't all that cheap sometimes. And then there's hobby blades. I like the comment over on the other forum about buying stock in #11 blades. (MM also had a great deal on 100 of these way back when...but shop around...they get cheaper in bulk!)

Thanks also, guys, for all the great discussion on this thread!
 

ocalicreek

Member
May 4, 2005
824
0
16
48
Puyallup, WA
groups.yahoo.com
Elmers can be thinned about 15% without losing adhesion, and spreads thinner and more easily than straight from the bottle.

I noticed earlier today when I was home for lunch, as I was working on the buttresses, that I could spread the yellow glue pretty thinly, but only use so much at a time or it would dry quickly once it was applied. A little water would rejuvenate it, but I decided to work on smaller sections (one side of one buttress wraparound at a time) to maintain thickness. Good to know that thinning it won't hurt all that much.

Oh, and welcome to The Gauge, elliotthomas! A special thanks for choosing my thread to be your first post!
 

Glen Haasdyk

Active Member
Feb 2, 2004
1,283
0
36
53
Kelowna, BC
Visit site
Thanks for starting this thread Galen. I didn't even know about Scalescenes until this morning. it took me about an hour to download all the programs I needed but I've got to try this out.
 

ocalicreek

Member
May 4, 2005
824
0
16
48
Puyallup, WA
groups.yahoo.com
Gluing Buttresses

Here are the images from gluing the buttresses, showing the technique I use with the burnisher.

P1040386.JPG

One buttress down, three more to go! I let the glue on the face set for a minute or two before proceeding with the flaps.

P1040387.JPG

This is about how much glue I used on one side flap, spread evenly with this brush. It's thin enough on the paper that it shouldn't come squishing out when its folded over.

P1040390.JPG

Here I'm raising the flap and pushing it onto the side of the buttress with the burnisher. Once it's well adhered the waviness goes away somewhat, not like in this photo.

P1040391.JPG

Now using the side of the burnisher, I pull and fold, basically folding it over with pressure to keep the side tight. I start in the middle, then work my way out to each end.

P1040392.JPG

Finally, I press down firmly but gently to work out any air bubbles. However, brushing on the glue evenly goes a long way to eliminate this.

Then I repeated these steps for the other side.
 

ocalicreek

Member
May 4, 2005
824
0
16
48
Puyallup, WA
groups.yahoo.com
Thanks for starting this thread Galen. I didn't even know about Scalescenes until this morning. it took me about an hour to download all the programs I needed but I've got to try this out.

Likewise, it took me forever on my 26.4 dial-up connection. I heard about this from a member of the club to which I used to belong. It's been a great project so far. Just looking back at what I've learned in only the first few pages of instructions, I feel more confident to take on some cardstock scratchbuilding and maybe utilizing more of the techniques from this project like printed overlays.

I've always wanted to build a station resembling the Santa Fe station along the elevated tracks through Oklahoma City...the art deco styling is just great. Now I think I know how I'll do it! (Someday, of course...)
 

Glen Haasdyk

Active Member
Feb 2, 2004
1,283
0
36
53
Kelowna, BC
Visit site
I went looking for the light, medium and heavy card today. The local staples carries the 65 lb light card so I bought some of that but I couldn't find the medium or heavy stuff. two peices of cereal box cardboard equals the 2 mm so that would mean that 4 would make 4mm for the heavy but I don't want to l;aminate that many peices of card together. I was going to use foam board for the 4mm but it's 5.5mm thick. Any suggestions?
 

Glen Haasdyk

Active Member
Feb 2, 2004
1,283
0
36
53
Kelowna, BC
Visit site
Opps I just re-read the instructions. The light card is 1mm and the heavy card is 2mm I shouldn't have any trouble now since I just made my 2mm heavy card from 2 peices of 1mm cereal cardboard.
 

scottcn

New Member
Jul 8, 2006
75
0
6
coastal SC
Glen - I also bought 65 lb paper at our local office supply store. For the medium card (1 mm thick, for HO structure) I used cereal box cardboard (actually, from a mitre box but same kind of card). For the heavy card, you only need a 2 mm thick layer (not 4 mm) so 2 layers of cereal box cardboard should be fine. You could also use the sheathing I mentioned in an earlier post - no problems with it yet. I think you'll run into major problems if you try to use 4 mm thick stuff for the heavy card (unless you're scaling everything up to O scale).

Galen - your shed is coming along really nicely. When I cut out the buttresses, my blade wasn't perfectly vertical so the sides of my buttresses aren't as smooth as your appear to be. Some of that "slop" in the base layers is hidden under the cover layers, but upon close inspection my corners are a bit rounded. I'll have to be more careful next time I build one of these structures. Fortunately, even with the not-quite-crisp corners, my shed looks better than "good enough" from a reasonable viewing distance so I'm happy with it. (It also helps that I wasn't wearing my glasses when I last looked at the model :)).

I was finally able to get back to the modelling after a weekend of birthday partying for my 5 year old. Another couple months and our other daughter will be turning 7 (Already? It can't be!). Anyway, I got the walls glued to each other so the building is actually starting to look like, well, a building. It's no longer just a collection of unassembled pieces. My wife actually said that it is starting to look really nice :). No photos tonight, but I should be able to post something tomorrow.

Hope everyone had a good, productive weekend.

- Scott
 

ocalicreek

Member
May 4, 2005
824
0
16
48
Puyallup, WA
groups.yahoo.com
I did, in fact, have a great, productive weekend. I'm now at the bottom of page 6!!!:) Next step, the sliding door. I got a bit worried about the height of the exterior platform + cover layer vs. the back of the exterior platform that goes between the platform itself and the wall/door. Then I got over to the next page and discovered the note with the thumb :thumb: beside it that informs you that the height difference is all part of the plan. Gee, that woulda been helpful a little sooner, for us folks who use a ruler AND common sense, or at least try to.

I've been taking pictures along the way, so hopefully later tonight or early tomorrow morning I'll get around to posting a few.

Glen - just be careful on the thickness of the board. I know I made my side walls too thick, but was able to compensate by adjusting the thickness of the buttresses, plinth, etc. I did this by working slowly and carefully and testing the fit long before the instructions recommend. The buttress bits that stick up on the longer walls are the desired width/depth for the buttress+wall on the side walls. I've got some pictures that'll explain this better...

Alright...back to lunch!
 

Wabash Banks

Member
Mar 11, 2005
115
0
16
52
Indiana
It is easy to get the end walls to thick. If you do it can lead to other problems when you start glueing the walls together. A little on the thick side is fine. Mine were a lot too thick and it wasn't good.
 

ocalicreek

Member
May 4, 2005
824
0
16
48
Puyallup, WA
groups.yahoo.com
As you'll see later, I had to thin my buttresses by half to make them fit! I'm wondering how I got so far off on the thickness. I know I used a thicker (than most printer paper) paper to print the images on, but that shouldn't have accounted for the discrepency. We'll see!

Glen - glad to hear you're ready to proceed. Please share pictures when you can.

Scott - congrats on surviving the birthday party, and for impressing your wife! (Mine is also impressed with my progress, btw. She's a good sounding board for any problems I may encounter also, just because her head isn't stuck in the instructions like mine!)

Okay, break's over!
 

scottcn

New Member
Jul 8, 2006
75
0
6
coastal SC
Galen - I also ran into the issue of the buttresses/end walls being a bit too thick. Unfortunately, I don't plan ahead and measure like you do. I cut out and test-fitted the roof today and found out that it doesn't fit! Since I don't see any way to thin the buttresses once they are installed, I'm going to have to shorten the roof (the width is fine, fortunately).

Installed the interior and exterior platforms today - this thing is looking better and better.

The sliding door isn't attached yet, just leaning against the building. Shhhh! Don't tell building inspector or the local thieves guild. Both would be interested in knowing this, although for different reasons.

shed end wall 12Mar.jpg

The view from the other side shows that the shed is quite empty. Business must be slow. (OK, the criminal element is no longer interested).

shed freight door 12Mar.jpg

And a final shot from the end of the building...

shed thru back door 12Mar.jpg

This daylight savings time is great for extending my hobby hours later into the evening for these first few days, but the payback is sure to come when that alarm goes off early in the morning.

- Scott
 

ocalicreek

Member
May 4, 2005
824
0
16
48
Puyallup, WA
groups.yahoo.com
Great work, Scott! I notice that your plinth and corner caps seem thinner than mine. I suppose it's good that there's some allowance for different materials in the base construction methods.

I cut out and test-fitted the roof today and found out that it doesn't fit! Since I don't see any way to thin the buttresses once they are installed, I'm going to have to shorten the roof (the width is fine, fortunately).

Hey, at least the roof isn't too small! Cutting it down to size is a whole lot easier than figuring out how to lengthen it...I'd guess. I haven't gotten to the roof yet, but I'm worried that mine may be too small. We'll see. Thanks again for sharing your pics and progress.