NU-B requesting layout suggestions.....

BTJ

New Member
for an unusual table shape.

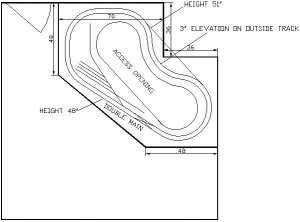
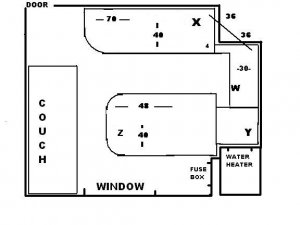
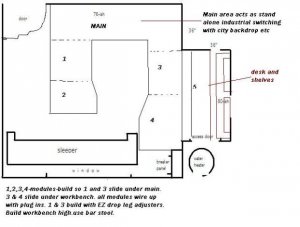
First of all, Howdy all! (since I didn't see an intro thread) Been lurking, reading & studying for a little while here. Since I have no train background, I'm trying to learn layout functionality, so I'm gonna leave this to you'all with only a few parameters.
thumbsup.gif


HO scale, modern era, my wife requests a helix maybe where the Y is (which is great for me that she wants to participate. loosens up the purse strings
wink.gif
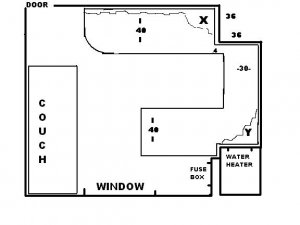
), to gain elevation against the 70" wall, a tressle maybe across a canyon at the XXs leading to the now authorized
biggrin.gif
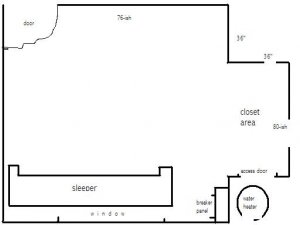
tunnel thru the back corner of the master bath closet. So this 'left' side of the table being mountainous country.

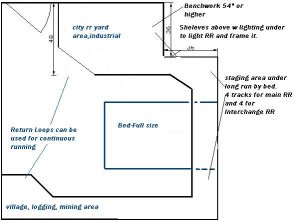
The 'right' side (which is actually taking up most of this rooms closet) is open for industry?, yard? pretty much anything!

I want a mainline loop so I can sometimes just sit back, relax and watch her run.

So many options! Waddaya think?
 

Russ Bellinis

Active Member
Feb 13, 2003
4,501
0
36
78
Lakewood, Ca.
Visit site
Are the two interconnected squares the benchwork? the reason I ask is that you have a few spots where tracks near the back of the layout will be out of reach. I don't see any way you could reach anything in the closet the way it is drawn right now. Is the entire room available for a layout? You mentioned modern era, what sort of trains do you want to run? What minimum radius? Would an around the walls shelf type layout work for you?
 

BTJ

New Member
The two interconnecting squares are the table, (already built) so the reach is 4 feet to the walls. Is that too much? I figured I'd need about 20" radius turns, so that don't leave much extra space on a 48" wide table.

Sorry, my computer drawing capability is pretty limited here so it may not be very clear.

The rooms wall is the line starting at the door, (upper left) squared around the back side of the 36"X36" closet (this closet is in another room) and then down the right side of the drawing. (which is the closet for this room)

The two interconnected squares are drawn pulled out from the wall some and certainly not to scale.

It's not a very big room and I'm only authorized to take up this much space! :rolleyes:
 

Russ Bellinis

Active Member
Feb 13, 2003
4,501
0
36
78
Lakewood, Ca.
Visit site
Are you limited to those tables because they are already built, or is there another use for the room that would preclude model railroad expansion? You can get a lot more railroad on a shelf type around the walls layout than you can on a central table. If you need to use the room for other uses, book shelves or/and an entertainment center 4 feet tall would make a nice base for a 2 foot wide shelf around the room. With a 22" minimum radius, you would need a 4' x 4' table at each end, but you could put a 2' x 4' drop leaf on each end that would fold out of the way when not in use. Your railroad would then start at the end of where the door swings, go all the way around the room hugging the walls as a 2'wide shelf, and then end at the other side of the doorway with another 4' x 4' that could again have a drop leaf to keep the width to 2' all the way around when not in use.
 

Tileguy

Member
Apr 28, 2003
766
0
16
64
Northern Mn
Visit site
Good Plans take time to develop and knowing needs desires etc help alot.

Russ's shelving idea for example is great if you can make it work.
Is Something like this possible for benchwork??
 

Attachments

  • LAYOUT1.jpg
    LAYOUT1.jpg
    34.1 KB · Views: 41

BTJ

New Member
Thanx alot you'all for taking the time to input suggestions. :thumb:I'm on the road this weeknd, but when I get back, I'll draw out the whole room. The table framework is built as shown, but if it's not gonna work (and I can now see the 4 foot reach is a bit much) it can certainly be redone as it's just screwed together 1X3s. That's why I came to you'all for help! :)

The 'round the room' idea would certainly give me more track (which is cool!), but I'm not sure I have the :confused: to figure out the drop leaf idea.

Happy Thanksgiving all! Lemme think on this some more and I'll get a wider pic posted soon. Keep those ideas coming!
 

BTJ

New Member
Here's the room. The window goes nearly to the ceiling. The water heater access needs about 24" clearance and also goes almost to the ceiling. Then the breaker box adds more annoyances. I really like Tileguy's design, but stuff gets kinda complicated around that water heater/fuse box access. That's why my original 'double square' idea ends a couple feet short of the water heater access. I don't think I want to run track at nearly ceiling level cuz the view would be poor.

and to catch a question I missed earlier, I have more modern diesels, no steamers and no passenger cars when it comes to figuring curve radius'.

Well...time for dessert! :sleeping:
 

Attachments

  • brian train room.JPG
    brian train room.JPG
    15.5 KB · Views: 39

Russ Bellinis

Active Member
Feb 13, 2003
4,501
0
36
78
Lakewood, Ca.
Visit site
The drop leaf is easy. It gets more complicated to have the leaf raise up because to raise up without track problems the hinge has to be above the top of the track. A piano hinge under the main table and leaf with the track ends cut right at the joint will work as a drop leaf. Just put a swivel bracket to swing out to support the leaf when it is up. For the water heater access and the access to the electric panel, you would not need to access those areas that often. A duck under would not be a problem. Just keep a good flashlight handy in case you have to access the electric panel in the dark. Where the sleeper is or if there are any other obstacles that cause problems with a 2 foot wide shelf, the railroad could narrow down to one or two tracks and fit on a shelf only 6 inches wide. If the window behind the sleeper goes from floor to ceiling, put some 2x4 legs to the floor under the shelf. If the shelves are anchored to shelves that are mounted to the wall on each side, the legs will keep the long shelf from sagging and the ends will keep it in alignment. Regarding rolling stock, if you keep your cars below 60' length, you won't have a problem with 22 inch radius. You should use larger radius curves for scenic reasons on your mainline, but the 22 will work for the turn back curves.
 

Triplex

Active Member
Aug 24, 2005
1,719
0
36
38
Calgary, Alberta, Canada
Definitely change the benchwork. Don't make it more than 30" wide against walls. And don't build tables before you have a track plan.
and to catch a question I missed earlier, I have more modern diesels, no steamers and no passenger cars when it comes to figuring curve radius'.
But do you have very large 6-axle diesels? Or autoracks, or long piggyback flats?
I don't think I want to run track at nearly ceiling level cuz the view would be poor.
Definitely don't put your layout above eye level, but 54" is fine. Ignoring the constraints you specified in the first post, what kind of scenery do you want?
 

BTJ

New Member
Back home now.
wave.gif
Put on my tape measure & thinking cap and redrew the plan. The 'round the room' plan just won't work unless I put the track on plexiglass so I can see it from below.
tongue.gif
I moved the couch. I discovered I can lower the water heater access door to 51", so at Y, track elevation will hafta be about 56".
frown.gif
I'm a tall guy, but that's pretty high. Still doable tho. Everything else will hafta be lower and climb to that point. The plan to alleviate the reach at X is mountains. I just won't install track that far back. Same with Y. Just fill that corner in with some landscape. As much as I'd like to have no more than 30" reach, I just can't see running 15" radiuii turns even tho I have no extra long engines or cars.

It just occurred to me that I could put the helix (which I like the idea of) at X to climb to that 56" height and leave the 'door' area much lower. My wife is pretty short and was afraid I would end up with a layout that only I can see!

I didn't mind reworking the table framework. I only built the door section so far. It's just a few screws and a little wasted lumber and it's way easier for me to pontificate if I can actually sit and study it.

I appreciate everyones input. I'm sure you experienced folks are pretty sick of these "newby needs layout help" threads!
 

Attachments

  • trainandroom.jpg
    trainandroom.jpg
    21.7 KB · Views: 37

60103

Pooh Bah
Mar 25, 2002
4,754
0
36
Brampton, Ontario, Canada
Visit site
Can I suggest that you have some sort of access to the water heater? You don't need to get at them very often, but when they go, you need to get in there FAST.
The 4" shelf just below X will get you barely 2 tracks.
I don't know how the helix is going to work for you. It's going to occupy most of a 40" shelf (at 18" radius!) and I'm not sure where you go from there. You could start it by having a grade around the upper peninsula.
 

Russ Bellinis

Active Member
Feb 13, 2003
4,501
0
36
78
Lakewood, Ca.
Visit site
For water heater access, you could make the part of the layout at "Y" a separate benchmounted on rollers and fastened to the rest of the benchwork by screws with short joiner tracks between that removable bench and the rest of the layout. Use some sort of multipin plug for electrical connections to the rest of the layout. If you need access to the water heater, just unfasten the screw connections, remove the joiner tracks, unplug the electrical connections and roll that bench out of the way. Regarding the helix at "X". I've reread the thread a couple of times, and am not sure why you need to gain the extra elevation there. Because you need to gain enough altitude in each circuit of a helix to provide plenty of clearance for a train and the benchwork making up the helix, you generally need a much bigger radius than 18 inches for a helix. If you don't go with a bigger radius, you end up with impossibly steep grades. I think the minimum radius for a helix in ho to gain 4" of elevation in one circuit is about 30", maybe a little less. I don't think you can do it in less than a 54" diameter circle. Also 4" in difference only allows for a thin benchwork and support system. One thing about a helix, unless you are modeling one like the Tehachapie Loop, it is hidden, so you could save some space by not using a roadbed, just fasten your track to the subroadbed.
 

BTJ

New Member
Water heater access will be done from under the bench at Y which is why it needed to be so high right there. I mocked it up this morn and the access works fine. I can even R&R the tank if ever needed without tearing out the track. It's only a 50" high tank with no fittings on top. The reason I need regular access in there is there is a power saver timer which is in there that needs to be adjusted if power goes out and such. (which it does!)

I'll do more helix research, but I thought I read a 40" diameter loop with 3" clearance is 3% grade.? Grabbing my trusty calculator, a 40" diameter circle is 126" around and a 3" climb within that circle would be 2.4% grade. A 4" climb would be 3.2%. I like the thought of challenging grades. I also read the helix road bed has to be minimized for maximum clearance. No foam or road bed. Just plywood & track. My visual is for it to go in and out of a mountainside (accessable from below) as it circles around with a section of exposed trestle half way up. Just a little over one loop around.

Beyond my desire to build a helix for the challenge and my mental picture, I'll have a pretty good climb (yet undetermined) from the 'entrance door table', which will be much lower for my vertically challenged wife's enjoyment
tongue.gif
, up to the water heater door table.

I'll see if I can edit my latest pic to better I.D. the 4 tables I have mocked up and address the appearance that there is only a 4" strip between two of the tables.
 

BTJ

New Member
Hopefully this one is a bit more clear. The 4" strip from table X to table W is not a worry cuz I plan on tunneling thru the 36X36 corner wall as shown by the drawn line.

as mocked up: Y is the tallest table at 54". Z is about 50". X is about 40" and W is about 46". All tracks can be foamed/raised up from the tables as needed, but I'll hold Y to table height. (54" + plywood + track bed)

This drawing is getting too busy for showing track, so I'll try to explain my thoughts:

I could run a 'spur' across the lower edge of X, across the 4" 'bridge' to a dead ended yard covering most of W. I now see the helix will need to be on the left side of X, climb the upper side of X, continue to climb thru the '36X36' corner wall tunnel, climb across the right side of W and up on to Y. Drop down on to Z and turn around for the return trip.

The newest prob I see is with the helix taking up most of X, there won't be room for track to turn around also! Hmmmm. Guess I'll stew on that a while.
 

Attachments

  • trainandroom.jpg
    trainandroom.jpg
    22.7 KB · Views: 36

Russ Bellinis

Active Member
Feb 13, 2003
4,501
0
36
78
Lakewood, Ca.
Visit site
I looked over this thread some more but didn't see a specific mention of your wife's height other than "pretty short." One thing that might solve the whole problem is to build a 12 inch platform in front of the layout all the way around, so that you both step up to the railroad. Then, you won't need steep grades or a helix to get over the water heater. Make the step section in front of the water heater removable for access ot the heater. What is her eye level? Model railroads often look best when viewed at eye level. If a 48 inch track level would not be too high for her to view the layout, You could easily get the necessary elevation to get to 52-54" over the water heater without monster grades I think.
 

BTJ

New Member
I'm gonna guess her eye level is about 50", but what do I know. I've only been married to her 21 yrs! :sleeping: LOL! Typical guy that I am.

I'm not sure I agree that the layout should be 'actual eye level' tho. Shouldn't it be about chest level so one can kinda look a little downward in order to see all the way to the back?

My gears turn pretty slow, but as I stew about this, taking in everyone's much appreciated help, I'm slowly coming to a couple conclusions:

1) The helix is a space hog pain and in order to loop the layout, I hafta have two! NOT! The helix is a dying idea.

2) I need to do what's necessary to get my four tables closer to the same level. Then I don't need the helix! I can still have my grades without doing Pikes Peak.

The step idea is a good one. I'll see what the boss thinks! ;)

or... Being able to tip/remove Y would allow me to lower it but I don't get how to do that stuck in a corner like it is. Would I hinge it toward W? and the landscape relatively close to the hinge seam would hafta be nil on at least one side, right?

Hmmm. more food for thought!
 

Russ Bellinis

Active Member
Feb 13, 2003
4,501
0
36
78
Lakewood, Ca.
Visit site
If you made bench "Y" separate on rollers like I mentioned in a previous post, you could scenic both sides of the joint. For joiner tracks, lay stained wooden ties to the edge of both benches for each track, and make two rails for each track about the length of 2 rail joiners end to end, then you can push the two rail joiners together on each rail to remove the rail. You can ballast up to the edge of the benchwork. If you put a piece of waxed paper between the two benches while ballasting the track, once the glue dries on the ballast, separate the bench enough to remove the wax paper and when it is put back together, the line will almost disappear in the ballast. The rest of the scenery break can be filled in with a bit of ground foam left loose and kind of pushed into the crack. When you need to move the bench to get to the water heater, you would simply sweep up the spilled ground foam and throw it away. When you put it back together, put in a bit of fresh foam. You could also have structures that straddle the joint, but that would be more items to remove before separating the benches to get to the water heater.
 

Tileguy

Member
Apr 28, 2003
766
0
16
64
Northern Mn
Visit site
An additional option to consider is a Permanent + Modular buildup over time.

In this rendition, the closet becomes a Hideaway work bench with shelves for storage. a Stand alone RR could be built where it says MAIN. the other sections built as modules. Each Module gets built with drop positionable legs(this could be managed with simple 2x2 construction running main 12" short of floor with a simple caster wheel installed, and a second 24" section of 2x2's with carriage pins for final positionand a fine adjust T bolt footer. When the pins are pulled the module is lowered to its caster position and rolled into its storage position.
Several of these modules could be built as time marches on to bomplete entire area shown.
Main would be built followed by Modules 1 and 2, then finally 3 and 4. In the meantime you have a workbench in the closet (build to a height high enough that modules can slipunderneath for storage) and shelves above.
This all can be shut off simply by closing the door.
Eventually an Accordian door would work best once 3 and 4 are added.

This room plan makes excellent use of space while giving the potential for many s/f of operations. It also breaks the RR down into manageable /buildable modules while maintaining the rooms ability to house guests as needed.

This is how I would build a Model railroad with the conditions and situation you have :)
 

Attachments

  • brian train room.JPG
    brian train room.JPG
    31.6 KB · Views: 16