New w-40k chimera

silveroxide

Senior Member
Aug 22, 2007
2,036
525
113
Fayetteville NC
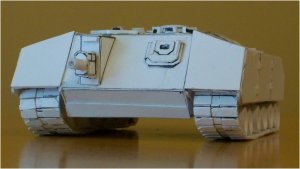
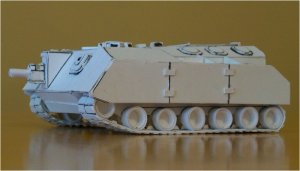
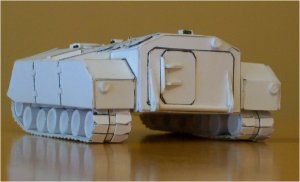
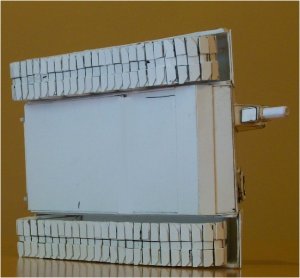
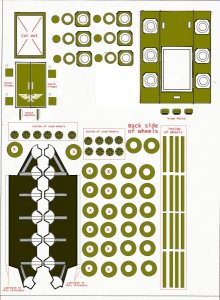
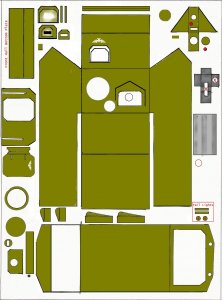
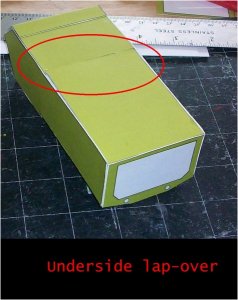
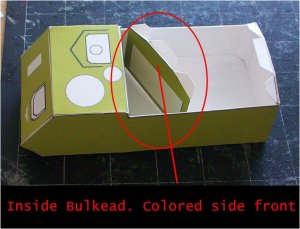
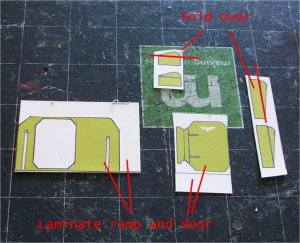
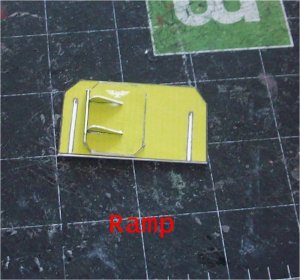
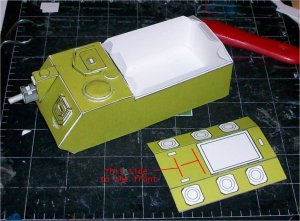
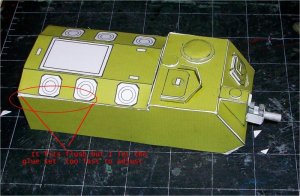
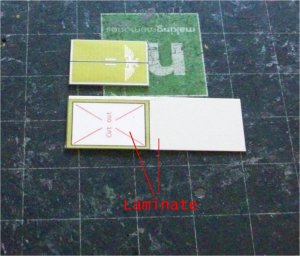
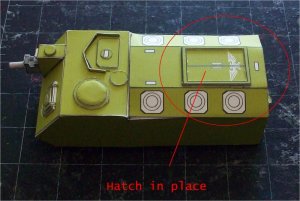
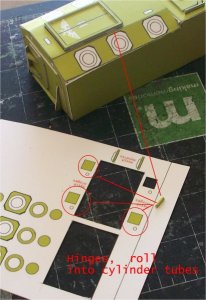
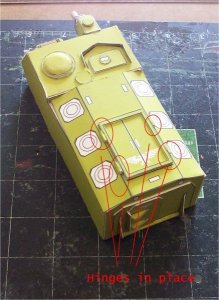
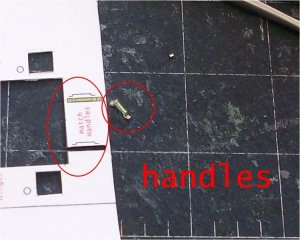
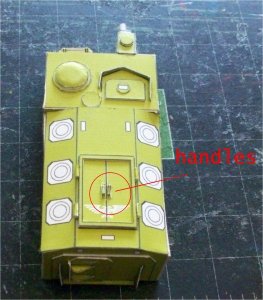
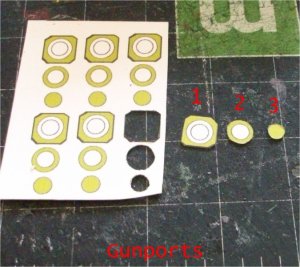
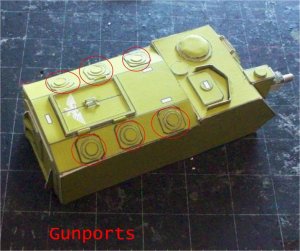
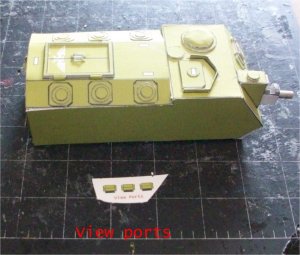
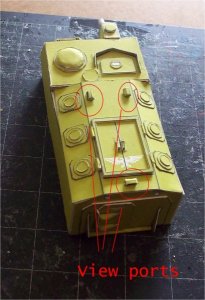
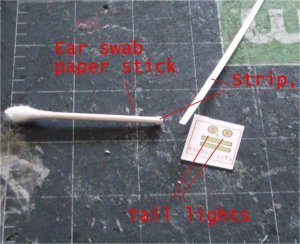
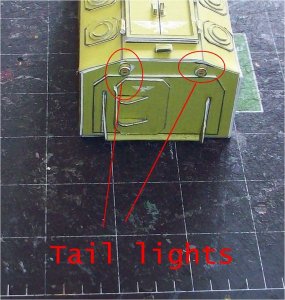
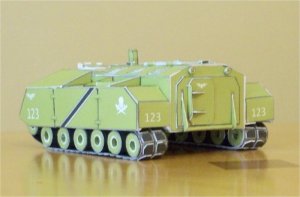
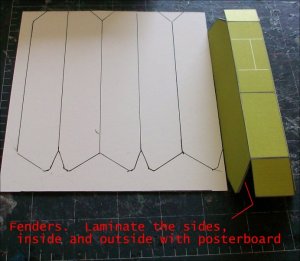
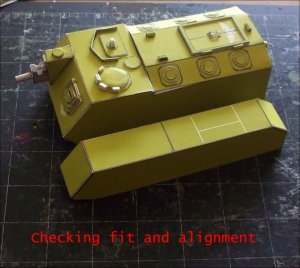
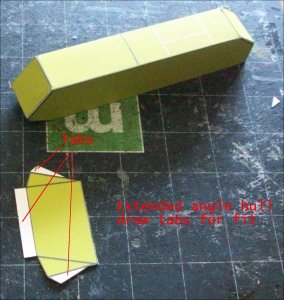
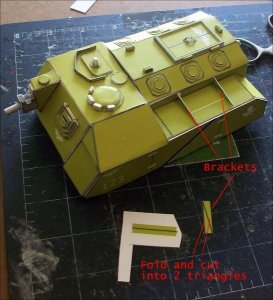
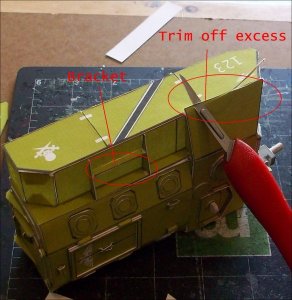
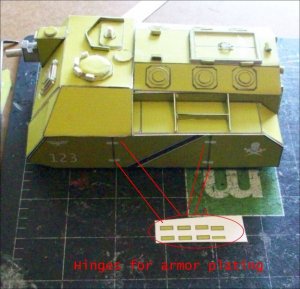
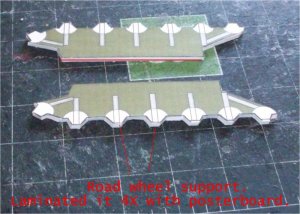
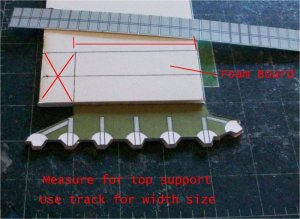
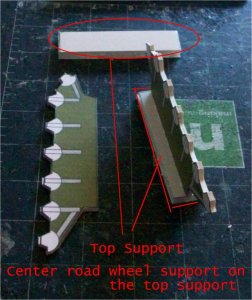
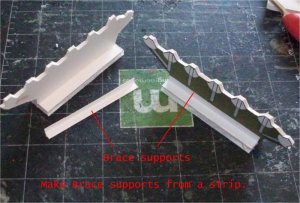
I Know that I was to build the The Thunderbolt next but I Decided to bring up a Chimera I designed over ten years ago out of styrene sheet. I am now in the process of making and drawing the plans out and doing a build sequence for it.

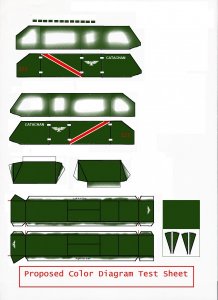
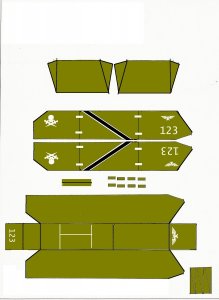
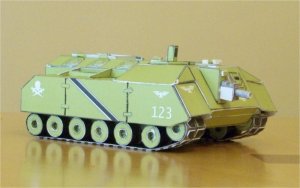
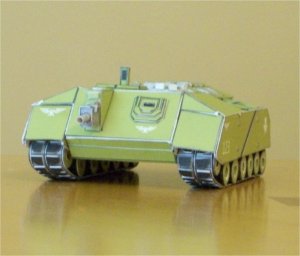
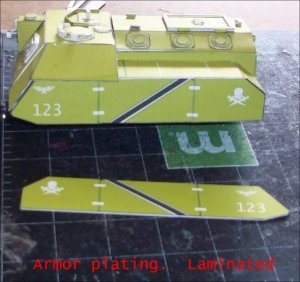
The last pic is a proposed color scheme. There are other variations of this model as well. It lends itself out to become a self propelled anti tank killer, as well a turret mounted las cannons like the Games workshop Chimera. I will try to do the build sequence as soon as possible for your enjoyment.

Strength and Honor
Silveroxide
 

Attachments

  • 100_1140.jpg
    100_1140.jpg
    102.2 KB · Views: 74
  • 100_1141.jpg
    100_1141.jpg
    97.3 KB · Views: 39
  • 100_1142.jpg
    100_1142.jpg
    100.3 KB · Views: 30
  • 100_1143.jpg
    100_1143.jpg
    113.4 KB · Views: 93
  • 100_1144.jpg
    100_1144.jpg
    130.6 KB · Views: 33
  • Image1.jpg
    Image1.jpg
    72.4 KB · Views: 55

silveroxide

Senior Member
Aug 22, 2007
2,036
525
113
Fayetteville NC
Diagrams

Here are a some diagrams of the plans. I am now working on the tracks. As soon As I am Done I will initiate a build Thread
 

Attachments

  • Cadia 1.jpg
    Cadia 1.jpg
    117.5 KB · Views: 48
  • Cadia 2.jpg
    Cadia 2.jpg
    72.6 KB · Views: 40
  • Cadia 3.jpg
    Cadia 3.jpg
    53.2 KB · Views: 75

silveroxide

Senior Member
Aug 22, 2007
2,036
525
113
Fayetteville NC
And so it begins

I printed the plans on 120 lbs weight paper. In addition to this, I also laminate the Schematics. I like the feel of my models being sturdy. This is a tab less design, so you will have to make your own tabs. There are a few flaws but nothing big that cannot be fixed.

I know that there are white edges on the build but that will be taken care off later at the end of the build. I paint and weather my projects at the end and that takes care of the white edges. You can color them in if you are not going to weather the project.

A las-cannon turret is the works for the future. In the mean-time, enjoy the build.

At present there is no download, but as soon as I finish this build and find and fix further problems, I will submit it for a free download.
 

Attachments

  • 001.jpg
    001.jpg
    157.8 KB · Views: 28
  • 002.jpg
    002.jpg
    98.3 KB · Views: 31
  • 003.jpg
    003.jpg
    107.3 KB · Views: 55
  • 004.jpg
    004.jpg
    133.7 KB · Views: 17
  • 005.jpg
    005.jpg
    107.3 KB · Views: 20
  • 006.jpg
    006.jpg
    103.7 KB · Views: 71

silveroxide

Senior Member
Aug 22, 2007
2,036
525
113
Fayetteville NC
Troop compartment

I had to separate the front of the compartment, it was a bit too long. This was a bonus, because it help to cover a gap where the compartment and the front of the vehicle met. It blended the bottom of the hull well.
 

Attachments

  • 007.jpg
    007.jpg
    97.7 KB · Views: 19
  • 008.jpg
    008.jpg
    101.9 KB · Views: 17
  • 009.jpg
    009.jpg
    92 KB · Views: 75
  • 010.jpg
    010.jpg
    97.6 KB · Views: 26
  • 011.jpg
    011.jpg
    88.8 KB · Views: 11
  • 012.jpg
    012.jpg
    151.1 KB · Views: 18

silveroxide

Senior Member
Aug 22, 2007
2,036
525
113
Fayetteville NC
Still more to come

In this set of pics, you can see why I separated the front bulkhead. It help to cover the gap that was in the beta-build. make sure that when you place the front bulkhead, the colored section is facing front.

On the ramp door, you have to bend the edge and fold it to get the color part on both side of the hinge area. You will also have to do the same for the edge hinge support brackets.
 

Attachments

  • 0013.jpg
    0013.jpg
    105.6 KB · Views: 19
  • 014.jpg
    014.jpg
    152.1 KB · Views: 20
  • 015.jpg
    015.jpg
    199.2 KB · Views: 19
  • 016.jpg
    016.jpg
    145.7 KB · Views: 17
  • 017.jpg
    017.jpg
    124.5 KB · Views: 17
  • 018.jpg
    018.jpg
    146.9 KB · Views: 24

silveroxide

Senior Member
Aug 22, 2007
2,036
525
113
Fayetteville NC
continuation

Pix #1. Rolled the strip into a tube and place it at the bottom of the ramp to simulate the hinge bar.

Pix #2. Laminated the hatches. the round hatch you can laminated it one or two ply to simulate depth.

Pix #3. With a blunted round end, rounded the edges of the hatch to give it that raised dome look. You can leave it flat if you wish.

Pix #4 This is the result of that raised domed hatch.
 

Attachments

  • 019.jpg
    019.jpg
    140.9 KB · Views: 19
  • 020.jpg
    020.jpg
    174.7 KB · Views: 28
  • 021.jpg
    021.jpg
    184.7 KB · Views: 14
  • 022.jpg
    022.jpg
    129.4 KB · Views: 15

silveroxide

Senior Member
Aug 22, 2007
2,036
525
113
Fayetteville NC
continuation

More details. So far it is coming along very well.
 

Attachments

  • 023.jpg
    023.jpg
    143.6 KB · Views: 12
  • 024.jpg
    024.jpg
    117.2 KB · Views: 16
  • 025.jpg
    025.jpg
    130.4 KB · Views: 15
  • 026.jpg
    026.jpg
    151.8 KB · Views: 45

silveroxide

Senior Member
Aug 22, 2007
2,036
525
113
Fayetteville NC
still alot more to come

Here is the frontal cannon build. There is an error in the barrel casing. :cry:

I will redo it on the misc. sheet, since the diagram page is too cluttered. I forgot to open a hole for the barrel on the frontal slope so I used my dremel to drill a hole into the front.:wave::wave::wave::wave:
 

Attachments

  • 027.jpg
    027.jpg
    189 KB · Views: 17
  • 028.jpg
    028.jpg
    175.5 KB · Views: 15
  • 029.jpg
    029.jpg
    111.9 KB · Views: 15
  • 030.jpg
    030.jpg
    167.1 KB · Views: 62

silveroxide

Senior Member
Aug 22, 2007
2,036
525
113
Fayetteville NC
continuation

Closing up the troop compartment. Make sure the eagle is to the rear. the fit is good, but I glued it in place too quickly and the glue started to set before I could adjust. :cry::cry::cry:
 

Attachments

  • 031.jpg
    031.jpg
    195.8 KB · Views: 12
  • 032.jpg
    032.jpg
    190.9 KB · Views: 11
  • 033.jpg
    033.jpg
    109 KB · Views: 23

silveroxide

Senior Member
Aug 22, 2007
2,036
525
113
Fayetteville NC
Still more to come

Laminated the rear top hatch and frame

rolled the small rectangles into small cylinders and simulated the hatch hinges.
 

Attachments

  • 034.jpg
    034.jpg
    143 KB · Views: 13
  • 035.jpg
    035.jpg
    155.4 KB · Views: 15
  • 036.jpg
    036.jpg
    118.8 KB · Views: 72
  • 037.jpg
    037.jpg
    163.4 KB · Views: 28
  • 038.jpg
    038.jpg
    103.1 KB · Views: 71
  • 039.jpg
    039.jpg
    122.1 KB · Views: 20

silveroxide

Senior Member
Aug 22, 2007
2,036
525
113
Fayetteville NC
topside

Handles view ports and gun ports. This parts are not laminated..:twisted::twisted:..
 

Attachments

  • 040.jpg
    040.jpg
    143.3 KB · Views: 15
  • 041.jpg
    041.jpg
    129.6 KB · Views: 12
  • 042.jpg
    042.jpg
    155.8 KB · Views: 62
  • 043.jpg
    043.jpg
    174.2 KB · Views: 34
  • 044.jpg
    044.jpg
    158 KB · Views: 19
  • 045.jpg
    045.jpg
    108.2 KB · Views: 19

silveroxide

Senior Member
Aug 22, 2007
2,036
525
113
Fayetteville NC
Tail lights and periscopes

The tail lights are made using a small section of the paper ear-swab. The periscopes at this time are scratch built but I will have a template for them later.
 

Attachments

  • 046.jpg
    046.jpg
    170 KB · Views: 15
  • 047.jpg
    047.jpg
    155.3 KB · Views: 36
  • 048.jpg
    048.jpg
    138.7 KB · Views: 15
  • 049.jpg
    049.jpg
    114 KB · Views: 18

silveroxide

Senior Member
Aug 22, 2007
2,036
525
113
Fayetteville NC
Where I am At

The following pics are where I am at at this time. The model is almost finished. I am still in the process of doing the build commentaries as well as the weathering and going over the white edges. I am pleased as to the results of this build. it came out better than the styrene model.

The only drawback is that the scale is about 1/35. You may have to adjust the printer to a 75 or 85 percent to get the warhammer scale.

Now to get back to the build preparation so I can post the rest of the build process....:wave::wave::wave::wave:
 

Attachments

  • 100_1286.jpg
    100_1286.jpg
    115.6 KB · Views: 65
  • 100_1287.jpg
    100_1287.jpg
    108.4 KB · Views: 21
  • 100_1288.jpg
    100_1288.jpg
    100.2 KB · Views: 60

silveroxide

Senior Member
Aug 22, 2007
2,036
525
113
Fayetteville NC
The Beast

The beast is taking shape. At this time this is just the basic body, Later I will construct a turret and a hunter killer version.
 

Attachments

  • 050.jpg
    050.jpg
    126.5 KB · Views: 18
  • 051.jpg
    051.jpg
    140.3 KB · Views: 15
  • 052.jpg
    052.jpg
    138.9 KB · Views: 57
  • 053.jpg
    053.jpg
    112.4 KB · Views: 19
  • 054.jpg
    054.jpg
    139.3 KB · Views: 18
  • 055.jpg
    055.jpg
    144.1 KB · Views: 21

silveroxide

Senior Member
Aug 22, 2007
2,036
525
113
Fayetteville NC
Continuation

Hull and fender construction:wave::wave::wave::wave:
 

Attachments

  • 056.jpg
    056.jpg
    147.1 KB · Views: 23
  • 057.jpg
    057.jpg
    134.4 KB · Views: 14
  • 058.jpg
    058.jpg
    137.7 KB · Views: 18
  • 059.jpg
    059.jpg
    129.2 KB · Views: 13
  • 060.jpg
    060.jpg
    142.1 KB · Views: 16
  • 061.jpg
    061.jpg
    116.6 KB · Views: 74

silveroxide

Senior Member
Aug 22, 2007
2,036
525
113
Fayetteville NC
Fender and road wheel support

Fold the triangle piece and cut out two sections of triangle brackets and place them on the marked section of the fender housing.

The road wheel support are laminated to the indicated edge marking, or 4X posterboard.

Using the track as a guide. cut a section of foam board for the top support of the road wheel pylon. Using the pylon, measure off the length of the top of the pylon. Glue and set aside, you will be making some strips for support later.:wave::wave::wave::wave:
 

Attachments

  • 062.jpg
    062.jpg
    144.5 KB · Views: 16
  • 063.jpg
    063.jpg
    138.5 KB · Views: 10
  • 065.jpg
    065.jpg
    159.2 KB · Views: 33
  • 066.jpg
    066.jpg
    183.1 KB · Views: 9
  • 067.jpg
    067.jpg
    173.1 KB · Views: 18
  • 068.jpg
    068.jpg
    126.9 KB · Views: 40

silveroxide

Senior Member
Aug 22, 2007
2,036
525
113
Fayetteville NC
Support and road wheels

Cut strips and make a support tab for the road wheel pylons.

Use a regular marker instead of the sharpie, it is less glossy. Color the road wheel tops if you did not use a construction paper or colored in the extensions.

Use the tools needed for rolling the road wheels. I used a 1/4 inch drill bit.

Use colored strips for The road wheel. Black for the extensions and a suitable green or color for the main road wheels, or leave then white.

I used the track as a guide to determine the width of the road wheels.
 

Attachments

  • 069.jpg
    069.jpg
    176.3 KB · Views: 62
  • 070.jpg
    070.jpg
    117.2 KB · Views: 44
  • 071.jpg
    071.jpg
    151.8 KB · Views: 16
  • 072.jpg
    072.jpg
    170.6 KB · Views: 14
  • 073.jpg
    073.jpg
    166.4 KB · Views: 16
  • 074.jpg
    074.jpg
    121 KB · Views: 17

silveroxide

Senior Member
Aug 22, 2007
2,036
525
113
Fayetteville NC
Road wheels

For the road wheels, you will need 14 strips for the body as well as 14 for the outside extensions.

The best way is to cut them out of black cardstock for the extension and green or vehicle color for the body of the road wheels. If you do not have these, then you can color the extensions and body of the road wheel.

Sometimes while rolling the strips for the road wheels, you may have it angle out as shown. If this happens, use you finger or a flat edge to bring the cone down. You must do this immediately after rolling the wheel before the glue sets :wave::wave::wave::wave:
 

Attachments

  • 075.jpg
    075.jpg
    156.9 KB · Views: 37
  • 076.jpg
    076.jpg
    183.1 KB · Views: 12
  • 077.jpg
    077.jpg
    145.6 KB · Views: 75
  • 078.jpg
    078.jpg
    146.5 KB · Views: 53
  • 079.jpg
    079.jpg
    154.8 KB · Views: 63
  • 080.jpg
    080.jpg
    115.1 KB · Views: 15

silveroxide

Senior Member
Aug 22, 2007
2,036
525
113
Fayetteville NC
It is coming along rather well. The devil is in the details. As of this time, the model is semi finished. I am just working on the build process pictures.