

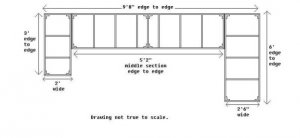
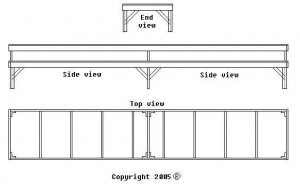
Well, after giving it some thought I redesigned the bench work drawing. There will be a "copy cat" of this bench work to create two levels when it is built. However with the lower and upper bench work it was kept in mind to keep them to where a train could travel to the upper level without much grade and visa versa. The idea I really like is that if the track design is laid out just right the top level could be taken down and bolted directly together (which would make it hard to crawl under) or a set of bridges of the same length could be fitted between the sections. The 5'2" section will be two pieces so it can be taken apart to move easily. All of the sections will be bolted to gather but the bench work will consist of the typical 1x4 frame bracing and 1/2" ply wood base. I already have the screw's, nut's, bolt's, and wing nut's of size in mind but I can't name the sizes right off the top of my head. I see a bit of a problem for the expanded setup but I don't know if it's a problem to even bother worrying about. Other than that I see no problems. It can be added to from any direction after the top level has been expanded down the main level to create a single main constant running loop or a more "variety" P2P run like the origianal plans are starting. All I know is that it's going to make the track designing a lot harder than when I first tried. I just hope this turns out to be more than a big waste of time. Back to the drawing board.......
New plans.
- Thread starter KCS
- Start date
You are using an out of date browser. It may not display this or other websites correctly.
You should upgrade or use an alternative browser.
You should upgrade or use an alternative browser.
You cannot get between levels in a layout this size, whether HO or N, without a helix. Since you're in HO, there's no room for a helix.
Well, I am going to try a test to see how much of a grade can be taken in a short amount of distance. I'm only going to be using small switchers and what not on this layout. I've got some old track and wood lying around so I'm going to throw some things together and try to find out how close the two levels would need to be without getting in the way of structures or reaching to the back. I've seen some engines take some pretty steep grades under a load around 20oz's give or take. Between 10-15 cars but if it's carefully planned out I believe I can run a grade at the very back of the bench work against the wall going up threw the bench work of the top level. The area will have to have part of the cross supports cut out so clearance can be allowed for trains coming out. It may not work though do to the lack of space because the cut out would be a bit long reducing the length of the track right above it thus leaving the grade coming out into a curve along with any electronics that might be mounted under the top level. I may try to fit in a helix in the closet maybe even though I don't like them. I came up with a track plan I like but a couple of the curves are REALLY tight which concerns me with the rest of the arrangement. The first drawing is color marked to make it easier to explain how it's set up. The second is the same drawing except in black and white and showing the ends of the top and bottom level connected to form a constant single main with lot's of switching in between. I'm trying to fit as much as I can into the space I have with a nice scenic look but with a lot of switching without having to reduce anything. Any comments and suggestions would be great. I'm going to need all the help I can get sense this is the first time to build bench work. If these a problem in the track plan, tell me about it and what I can do to fix it. Thanks.
Attachments
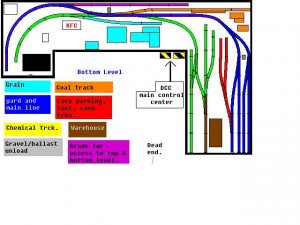
Small switchers can only handle 10-15 cars on level track. They're just not heavy enough. That grade is completely unreasonable for any engine. The magenta section appears about 5 feet long. If it has to climb 18 inches (providing <13.5" clearance between levels; good enough), that's a 30% grade.  Nothing can climb that. Even if you reduce the separation and continue the grade into the green track in the corner, you cannot make the slope climbable. Remember, in any multideck plan, you have to expect the transition to be a major part of it (as long as it has to be continuous - I'll explain in a minute.) Whether N or HO, don't expect two decks on a layout less than 10x10 feet. The only double-deck switching layouts I've ever seen use something resembling a vertically-sliding transfer table.
Nothing can climb that. Even if you reduce the separation and continue the grade into the green track in the corner, you cannot make the slope climbable. Remember, in any multideck plan, you have to expect the transition to be a major part of it (as long as it has to be continuous - I'll explain in a minute.) Whether N or HO, don't expect two decks on a layout less than 10x10 feet. The only double-deck switching layouts I've ever seen use something resembling a vertically-sliding transfer table.Hi Charles.
One way to overcome your elevation ptoblem without using a helix might be to use either a single switchback or a pair of them on the back wall. They could use as much of the length of your benchwork as needed to get an acceptable grade.
One way to overcome your elevation ptoblem without using a helix might be to use either a single switchback or a pair of them on the back wall. They could use as much of the length of your benchwork as needed to get an acceptable grade.
A switchback would be good for a logging or mining line. In an urban area, it's unlikely. How can you scenically justify the climb?
Well, the idea was to hide the grade completely. I take it the meaning of "switch back" is starting from the bottom level going up in one direction then leveling out, then switching to another track going up back in the other direction? Would look somewhat like a "Z" from a side view? I'm thinking I'm going to go with this http://members.aol.com/PWhiteMR/ateton.html layout design but I'll have to recreate it and change some things making his track plan fit my work space but with the other part of the bench work to make a "U" rather than an "L" maybe by knocking down one or two yard tracks for the extra switching. Then there be the "U" completing portion that I would have to design a track plan for coming from the other section. I'm finding the two level layout to complicated for such a small space. From the way it was turning out, I would be spending more time building the bench work and frame for the elevated track than I would hand laying all the track. I've ran out of ideas and gained a serious case of designers block.
This would be PERFECT for one of those train elevator things!! I have seen them, but can;t remember what they are called. They are pretty pricey, but appear to work very well. This situation is ideal because they work best with short trains and would even allow for vertical staging!! (something this design is missing)
If you have never seen one of these, picture a set of closely spaced shelves with no left or right ends on them that can move up and down vertically. The trains roll onto a shelf, you then raise the shelf to the next level. Several shelves provide the staging!
Sean
If you have never seen one of these, picture a set of closely spaced shelves with no left or right ends on them that can move up and down vertically. The trains roll onto a shelf, you then raise the shelf to the next level. Several shelves provide the staging!
Sean
A MRR layout doesn't have to be justified, it hust has to be fun. :thumb: Not all MRRs are prototypical. An oval on a piece of plywood isn't prototypical, but if the operator enjoys running it like that it has accomplished it's goal.Triplex said:A switchback would be good for a logging or mining line. In an urban area, it's unlikely. How can you scenically justify the climb?
You're correct KCS. It would look like a Z with extensions on the two middle points to accomadate the train.KCS said:Well, the idea was to hide the grade completely. I take it the meaning of "switch back" is starting from the bottom level going up in one direction then leveling out, then switching to another track going up back in the other direction? Would look somewhat like a "Z" from a side view? I'm thinking I'm going to go with this http://members.aol.com/PWhiteMR/ateton.html layout design but I'll have to recreate it and change some things making his track plan fit my work space but with the other part of the bench work to make a "U" rather than an "L" maybe by knocking down one or two yard tracks for the extra switching. Then there be the "U" completing portion that I would have to design a track plan for coming from the other section. I'm finding the two level layout to complicated for such a small space. From the way it was turning out, I would be spending more time building the bench work and frame for the elevated track than I would hand laying all the track. I've ran out of ideas and gained a serious case of designers block.
The plan you have chosen looks like a good one, and yes you may need to alter it to fit the space available. That's part of the enjoyment (for me anyway) of building a layout. Don't give up!
If it does what you want it to then you can be proud of your accomplishment. If it doesn't, then you have the opportunity to figure out where the changes need to be and adjust it; or start all over again. I don't know how many times I've heard of someone with a fantastic layout tearing it down and starting all over.
That's part of the hobby, and why a layout is never really "done." :thumb: :thumb: Hi Charles,
I like the plan for the bottom level and think it would make an excellent switching layout on its own, especially if you extended the magenta colored track and then found a way to hide it behind, say a building front or something so it could serve as a staging track. Trains could come "on layout" from there, roll onto the blue track and then back cars into your various sidings and leave some in the yard.
I think it has a lot of operational possibiities.
Ralph
Go to the "Help needed for operational layout design." thread. That was the first drawing I made of the whole room using RTS for the grid and bench work the moved it to paint shop to create the room. I like the bottom level also but it need's something else on the left side of the picture as far as the track plan goes and it has left me stumped. I might try to fit the gravel unload tracks (gray) where the grain (light blue) is. But the left side of the design is dull.
I'm just wondering how I can get some switching in that area because if the curves that has to be fitted around. I'm wondering if I can put a two track yard under the layout just low enough to get my hands over the tops of the cars to the inner track for uncoupling or any derails and run it at a very low grade to around to the inner edge up to the top of the layout deck so no holes have to be cut in the main bench work for a train to come threw loosing trackage up top anywhere. I may add another switch to the orange track to make a run around for push and pulling cars which ever way they need to go. I still say that the middle and left side of the layout need's more switching to fill that empty space.
I'm going to try and stay with smaller buildings rather than the big ones as they take up more space and block the view of some switch's. Also the middle section of the layout is only going to be 2 feet wide maybe 2 1/2 depending on what the space is looking like. Sometime this week I'm going to tear down my drums and use a roll of safety orange construction tape I got from my old job and cut strips to make an online of the bench work on the floor to see how much room it will actually take up because I'm sure somewhere along the way I've miss calculated something. I don't want to go and purchase to much material or not enough material when it comes time to start building, plus I want it all setup from the get go. All the other layout work I've done for my club and others the bench work and/or modules was already built. All I've had to do was lay track and landscape and build things to put with it.
Hi,
One thing that you may have missed is that you HAVE a switchback right now. When your train comes up to the second level, it must stop, and reverse itself to get to the rest of your layout. Also the maximum length of the trains is limited by the length of that siding. It looks like your train length would be 27" or 3-nine inch pieces of track. You could move the switch to give you 45" or 5-nine inch pieces of track which is the same as your lower level.
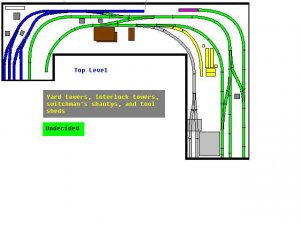
If you can widen the right (should be easy) upper level so that it can take a loop, then you can come up to the top, curve over to the left, then back counterclockwise to your layout (1/2 a figure eight). The bottom doesn't look like you have much room to work with on the left side.
One thing that you may have missed is that you HAVE a switchback right now. When your train comes up to the second level, it must stop, and reverse itself to get to the rest of your layout. Also the maximum length of the trains is limited by the length of that siding. It looks like your train length would be 27" or 3-nine inch pieces of track. You could move the switch to give you 45" or 5-nine inch pieces of track which is the same as your lower level.
If you can widen the right (should be easy) upper level so that it can take a loop, then you can come up to the top, curve over to the left, then back counterclockwise to your layout (1/2 a figure eight). The bottom doesn't look like you have much room to work with on the left side.