WOW! that must be the prototype for walther's Valley citrus packers! http://www.walthers.com/exec/productinfo/933-2926
new layout photos
- Thread starter jcrowell
- Start date
You are using an out of date browser. It may not display this or other websites correctly.
You should upgrade or use an alternative browser.
You should upgrade or use an alternative browser.
Building Del Monte 2
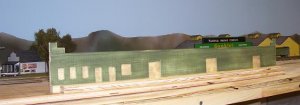
The hardest part was deciding how to "compress" the original building. The length was determined by the length of the sheetwood I had, in this case, 24 inches, which was pretty close to the prototype's actual length. The width would have been about 20 inches wide, and if I had been in the planning stage of the layout, I would have built it "full size", but I had already put down tracks and the space available total was only 30 inches, so... I built it half as wide, using just one of the long sheds of the original.
The hardest part was deciding how to "compress" the original building. The length was determined by the length of the sheetwood I had, in this case, 24 inches, which was pretty close to the prototype's actual length. The width would have been about 20 inches wide, and if I had been in the planning stage of the layout, I would have built it "full size", but I had already put down tracks and the space available total was only 30 inches, so... I built it half as wide, using just one of the long sheds of the original.
Attachments
Building Del Monte 3
As you can see in this and the previous photo, I have no life, and decided to put in all the nail holes in as possible... it took about ten hours and some very sore fingers! I used a push pin and worked while watching Saturday morning cartoons, and a couple of college football games...
As you can see in this and the previous photo, I have no life, and decided to put in all the nail holes in as possible... it took about ten hours and some very sore fingers! I used a push pin and worked while watching Saturday morning cartoons, and a couple of college football games...
Attachments
Building Del Monte cont.
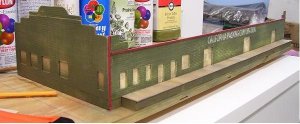
You will notice in the previous photo that I used a good amount of plywood bracing to make sure that the modules would not warp. Since this model was finished, I have switched to heavy particle board which is much, much denser than plywood, and have saved the plywood for the layout base.
Here are the two sides joined together.
Attachments
Del Monte cont.
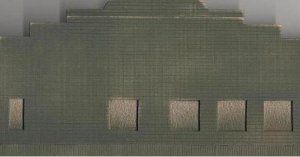
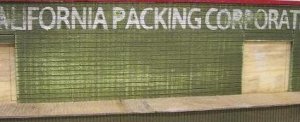
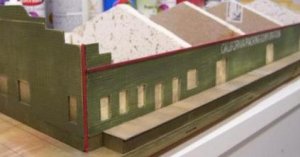
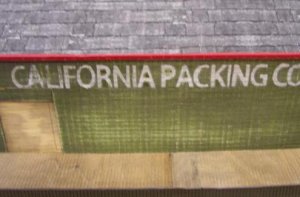
Here is a close up of the painted name on the trackside of the building. I used the computer to match as closely as possible the typeface of the original in the photo. I then printed out two copies, and carefully cut out each one, each having about one inch worth of letters cut out, alternating, so that I could tape it down securely. After the paint dried from the first stencil, I replaced it with the second one and repainted.
Here is a close up of the painted name on the trackside of the building. I used the computer to match as closely as possible the typeface of the original in the photo. I then printed out two copies, and carefully cut out each one, each having about one inch worth of letters cut out, alternating, so that I could tape it down securely. After the paint dried from the first stencil, I replaced it with the second one and repainted.
Attachments
Del Monte cont.
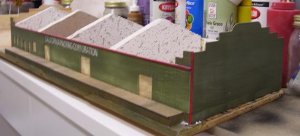
In the previous photo, the retouching had not taken place yet. Using a small brush and acrylic paint, I cleaned up the lettering. I wanted a used, but maintained building.
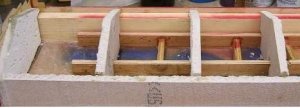
This photo shows the interior bracing. I used ceiling panels which are rather dense. I figure if they don't warp while they're hanging from the ceiling, they won't warp in the building. Since the building is two feet long and almost one foot wide, bracing was demanded.
In the previous photo, the retouching had not taken place yet. Using a small brush and acrylic paint, I cleaned up the lettering. I wanted a used, but maintained building.
This photo shows the interior bracing. I used ceiling panels which are rather dense. I figure if they don't warp while they're hanging from the ceiling, they won't warp in the building. Since the building is two feet long and almost one foot wide, bracing was demanded.
Attachments
Del Monte cont.
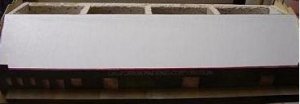
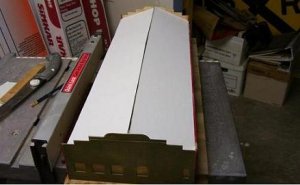
The loading dock was built on a single piece of plywood cut on a table saw and laminated with scribed sheet. I figure that it would help stop any warping and served as a solid base for the front of the building. The trackside wall is laminated also with a solid piece of wood. I used C clamps to hold it all together while the wood glue dried overnight.
The next day, I put on the roof panels. They are a heavy pressed board about 3/16th of an inch thick.
Attachments
Del Monte cont.
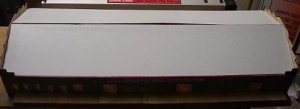
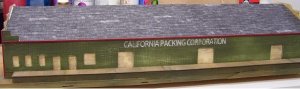
Using a laser printer I printed out enough 'tar paper' to cover the roof. I had spent about a week tweeking the images until I was happy with the way it look after being printed out. What is on the computer screen doesn't always translate out on the paper.
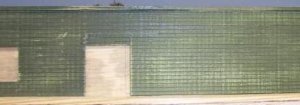
Here are some close ups showing the paint and the roof.
I used a red El Marko marker to color the wooden trim. It matched the Krylon red spray paint I used on the windows and doors.
Using a laser printer I printed out enough 'tar paper' to cover the roof. I had spent about a week tweeking the images until I was happy with the way it look after being printed out. What is on the computer screen doesn't always translate out on the paper.
Here are some close ups showing the paint and the roof.
I used a red El Marko marker to color the wooden trim. It matched the Krylon red spray paint I used on the windows and doors.
Attachments

Del Monte cont.
Here are the last two photos.
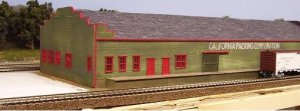
The first one shows the windows and doors painted and glued in. The windows and doors are from one of those San Francisco houses. I used Krystal Klear to glaze the windows.
WARNING: DO NOT USE super glue with Krystal Klear!!! DO NOT USE liquids around Krystal Klear!!!
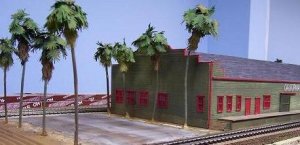
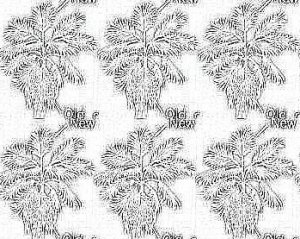
The palm trees are hand made using the front template I have put here... size to your own scale. I have experimented coloring them using colored pencils, spray paint, acrylics with a brush, colored markers... it just depends on what makes you happy. I used hemp twine for the dried fronds, and the branch structure is 14 guage stranded wire glued on top of a natural twig, in this case, 'carrotwood', which was growing in front of my home in Hawthorne, CA. It has the right curve and color, I think.
Here are the last two photos.
The first one shows the windows and doors painted and glued in. The windows and doors are from one of those San Francisco houses. I used Krystal Klear to glaze the windows.
WARNING: DO NOT USE super glue with Krystal Klear!!! DO NOT USE liquids around Krystal Klear!!!
The palm trees are hand made using the front template I have put here... size to your own scale. I have experimented coloring them using colored pencils, spray paint, acrylics with a brush, colored markers... it just depends on what makes you happy. I used hemp twine for the dried fronds, and the branch structure is 14 guage stranded wire glued on top of a natural twig, in this case, 'carrotwood', which was growing in front of my home in Hawthorne, CA. It has the right curve and color, I think.
Attachments
Del Monte finished
The building still needs ventilators and general business clutter and such... something to save up for.
Thanks for reading.
Jim
The building still needs ventilators and general business clutter and such... something to save up for.
Thanks for reading.
Jim
I have to say, that's professional work there! I must respect you for your 10 hrs spent with that push pin!  wow!
wow!
Could you PLEASE do a tutorial on palm trees as well, I really need alot of them for my layout!
Thanks again, this is great!
Also because of your suggestion, I joined the citrus modeling group on yahoo, great stuff! :thumb:
wow! Could you PLEASE do a tutorial on palm trees as well, I really need alot of them for my layout!
Thanks again, this is great!
Also because of your suggestion, I joined the citrus modeling group on yahoo, great stuff! :thumb:
First off welcome.
Second, congrats on finding a layout room with a house on it LOL
Third, looking good there. Look forward to seeing more
Second, congrats on finding a layout room with a house on it
LOLThird, looking good there. Look forward to seeing more
Jim,
Do you recall where the Del Monte building was located in Corona?
What year was the b/w photo taken?
John Quinn
Do you recall where the Del Monte building was located in Corona?
What year was the b/w photo taken?
John Quinn
Chessie6459
Gauge Oldtimer
Corona packing house Del Monte
Do you recall where the Del Monte building was located in Corona?
What year was the b/w photo taken?
John Quinn
All information about these, and other fine California packing houses, can be found on the website by Jim Lancaster: http://ljames1.home.netcom.com/scph.html
The website is divided up into different towns, including a site on packing house models (with a couple by yours' truly!)
Jim
Making Trees the cheap and easy way
You can imagine the total cost of many, many trees on even a small model layout if you have to buy them. One of the latest model railroad magazines tell of a rather well off fellow who bought 20,000 finished trees, but I believe that the rest of mankind is in somewhat a different financial situation. :cry:
Over the years, there have been many different approaches to making trees for the layout. Those of us old enough to be around during the 60s and 70s remember using lichen. I am a biologist, and the idea today of using lichen just strikes me as wrong in so many ways.
The first thing I did was drive around Indianapolis rural areas and phtograph some real trees to get a feel for what real trees look like. I admit growing up in Southern California tended to limit my interaction with trees, usually only eucalyptus and palms. Not counting, of course, the oranges I had growing in the backyard.
One of the "modern" methods is the stretching of a fine mesh, I guess you would call it, over the tree armature. To be completely honest, I don't like the look all that well. It just doesn't give that "real" look of the leaf structures and branches.
Since moving to Indiana from Southern California, I have been overwhelmed by the trees here, although now, winter seems to have arrived early and the trees are either changing color or have dropped their leaves entirely.
The method I am describing can be done in the relative safety and comfort of the den, while watching TV. The best portable "workbench" is the cardboard box that a case of soda comes in, and a bunch of clothes pins "borrowed" from the wife.
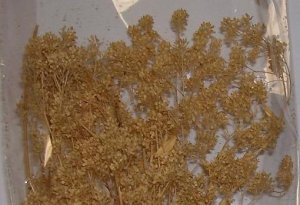
I obtain "Candy Tuft" dried flowers from the local craft supply store. This can be Michael’s, JoAnn’s, etc. If you check your Sunday paper ads, there is usually a coupon for 40% to 50% off the "regular" price, so the "bunch" costs about $2.50 each. If you visit your neighbors and get their coupons, you can buy quite a few on one trip. You have to purchase them one at a time, though. I am able to make about three trees from each bunch in HO scale.
The "trees" themselves come from:
http://www.upickers.com/knarly/knarly.asp
They are sagebrush branches and carefully selected to make trees for model use.
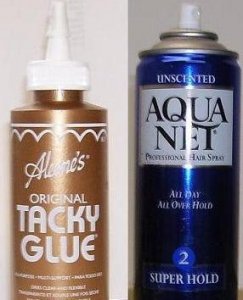
Using clothes pins to hold the "tree" upright, I begin placing small "branches" of the candy tuft, starting at the top of the "tree branch", using Aleene’s Tacky Glue. This glue is thicker than the usual Elmer’s and will hold the "branch" after about ten seconds or so, provided you take into consideration the effects of gravity when you place the first ones.
I find that time wise, it is best to have about two to three trees working at one time. While one tree is setting up, you can work on the others. Do this while watching television, using one of those folding tables so that you don’t loose your wits waiting for the glue to dry.
Since trees in real life are random, there is no "wrong" look, although an "up-front" tree should be one that really looks nice.
Let the glue dry overnight. The next day, you will probably wish to add some more "branches". Later that same day, use light coats of the Krylon paint to color the candy tufts that you have glued to the armatures. This ensures that the colors are consistent throughout.
Now comes the problem. I have shown two types of "finished" trees: some that have just been painted green, some that have had scenic foam added… I know that the ones just painted make the leaves look a bit too large for HO scale, but would be fine for S or O scale.
The foam ones depend on the eye of the beholder… It depends on the foam being used, both for texture and color. It also depends on how close the tree is to the viewer. A foreground tree will require much more effort than one that gets lost in the forest.
I figure the cost per tree is about $1.50 pro-rated across the total cost of supplies.
I hope that this is of some help to you.
You can imagine the total cost of many, many trees on even a small model layout if you have to buy them. One of the latest model railroad magazines tell of a rather well off fellow who bought 20,000 finished trees, but I believe that the rest of mankind is in somewhat a different financial situation. :cry:
Over the years, there have been many different approaches to making trees for the layout. Those of us old enough to be around during the 60s and 70s remember using lichen. I am a biologist, and the idea today of using lichen just strikes me as wrong in so many ways.
The first thing I did was drive around Indianapolis rural areas and phtograph some real trees to get a feel for what real trees look like. I admit growing up in Southern California tended to limit my interaction with trees, usually only eucalyptus and palms. Not counting, of course, the oranges I had growing in the backyard.
One of the "modern" methods is the stretching of a fine mesh, I guess you would call it, over the tree armature. To be completely honest, I don't like the look all that well. It just doesn't give that "real" look of the leaf structures and branches.
Since moving to Indiana from Southern California, I have been overwhelmed by the trees here, although now, winter seems to have arrived early and the trees are either changing color or have dropped their leaves entirely.
The method I am describing can be done in the relative safety and comfort of the den, while watching TV. The best portable "workbench" is the cardboard box that a case of soda comes in, and a bunch of clothes pins "borrowed" from the wife.
I obtain "Candy Tuft" dried flowers from the local craft supply store. This can be Michael’s, JoAnn’s, etc. If you check your Sunday paper ads, there is usually a coupon for 40% to 50% off the "regular" price, so the "bunch" costs about $2.50 each. If you visit your neighbors and get their coupons, you can buy quite a few on one trip. You have to purchase them one at a time, though. I am able to make about three trees from each bunch in HO scale.
The "trees" themselves come from:
http://www.upickers.com/knarly/knarly.asp
They are sagebrush branches and carefully selected to make trees for model use.
Using clothes pins to hold the "tree" upright, I begin placing small "branches" of the candy tuft, starting at the top of the "tree branch", using Aleene’s Tacky Glue. This glue is thicker than the usual Elmer’s and will hold the "branch" after about ten seconds or so, provided you take into consideration the effects of gravity when you place the first ones.
I find that time wise, it is best to have about two to three trees working at one time. While one tree is setting up, you can work on the others. Do this while watching television, using one of those folding tables so that you don’t loose your wits waiting for the glue to dry.
Since trees in real life are random, there is no "wrong" look, although an "up-front" tree should be one that really looks nice.
Let the glue dry overnight. The next day, you will probably wish to add some more "branches". Later that same day, use light coats of the Krylon paint to color the candy tufts that you have glued to the armatures. This ensures that the colors are consistent throughout.
Now comes the problem. I have shown two types of "finished" trees: some that have just been painted green, some that have had scenic foam added… I know that the ones just painted make the leaves look a bit too large for HO scale, but would be fine for S or O scale.
The foam ones depend on the eye of the beholder… It depends on the foam being used, both for texture and color. It also depends on how close the tree is to the viewer. A foreground tree will require much more effort than one that gets lost in the forest.
I figure the cost per tree is about $1.50 pro-rated across the total cost of supplies.
I hope that this is of some help to you.