My Latest Creation - Laser cut kit

Arlaghan

Member
Sep 9, 2003
658
0
16
50
S. FL
There have been some questions raised recently about where our model builders have gone... And it's true, I am guilty of not having shown anything I've done for quite some time! Well, between that, and seeing the handiwork of Dick (absnut), I decided it was high time to get my rear in gear and output something!

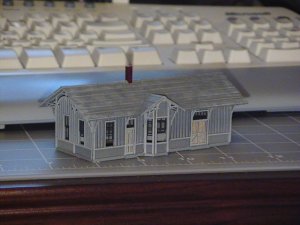
The following is a kit I built in N scale. It is a depot from Blair Lines and I took some liberties (not many) in the coloration. I wanted to time myself accurately to determine how long I spend doing what, but alas, all I got is the following:

It took me roughly 10 hours to complete this kit.
1 hour was spent cutting the pieces from the wood and cleaning up the edges
4 hours was spend organizing the pieces into paint colors, actually painting them, and gluing 2 parts together (I went to bed after this) :)
5 hours was spent putting the rest of the parts together, to yield what you see below:
 

Attachments

  • depot.jpg
    depot.jpg
    62 KB · Views: 226

Arlaghan

Member
Sep 9, 2003
658
0
16
50
S. FL
Single overlay - that stuff is peel-n-stick, actually.

I was a little disappointed in how much actual "construction work" there was to do. But I do think it came out rather nice. Plus I guess having a structure built in 2 days is not bad for making progress. :)
 

RailRon

Active Member
Nov 23, 2002
1,602
0
36
80
Trimbach, Switzerland
Laser cutting makes really fine details possible. This is a very neat little station. Looks like a bleached and paint-peeled building, but still in good shape.

Do you leave the color as it is now, or do you add some 'corporate identity colors' of your RR line?

Ron
 

Drew1125

Active Member
Jan 28, 2001
2,975
0
36
Looks like a station with a lot of good years behind it, & a lot more in front of it!
Nice job!
:cool: :cool: :cool:
 

kettlestack

Member
Jan 18, 2002
859
0
16
84
Scotland UK
Visit site
Arlaghan, one would be very hard-pressed indeed to match let alone better those laser-cut models.
That one you chose is a gem among gems and in N scale too!
It's truly exquisite with such fine details and you've put it together beautifully. It deserves a very prominent position.

Maybe if I missed two payments on the pool table and send the washing machine back I'll be able to get a few laser-cut models .. :) :D :D .

Errol
 

spitfire

Active Member
Jul 28, 2002
3,448
0
36
75
Toronto, Canada
www.parkdaleyard.com
Awesome!

Wow Arl - what a beautiful piece of workmanship! Shooting it in front of the keyboard really shows just how tiny and precice the structure is. Which layout is that going on?

cheers
Val


edit: hmmm - i'm up to 1002 posts! Wonder which one was my 1000th?
 

Arlaghan

Member
Sep 9, 2003
658
0
16
50
S. FL
Thanks Everyone!

It does feel good to finally finish something, even if the layout is not yet ready for it. :D :D :D (Gosh I hate making plaster shells :mad: )

Ralph, that cutting mat you see under my keyboard came in handy too for size comparison. I have that there because my desk has a groove there and I use it to write on.

Ron, I would say I went with about 90% of the C&O color scheme that came with the kit. I only changed a couple of things: The doors, I left the natural color of the wood, and the upper part of the wall was supposed to be light gray (as the trim) but I felt it drew away from the intricacy of the woodwork, so I painted the wall all medium gray instead. However, my train is C&NW... so I wasn't overly concerned with following prototype.

Charlie, I took a gamble with the weathering on the roof... I've not got much experience in the weathering department! I think it did add some "age" to it... I'm pleased this time. ;)

Errol! Don't fret, buddy! This kit only cost me $27! (From an MSRP of $40, I would call that a bargain!) :D If you stop to think about how much you spend on rolling stock (between changing the trucks, wheelsets, detail parts, etc) this really isn't so bad!

Val, this depot goes on my 2' x 4' mini layout. I haven't decided which spur to put it on, but I'll probably put it on the upper level, as that would put it in main view. :) Oh, I happened to catch your 1000th post: It was "Cool, Robin!" on the Gauge Sign-Up thread. :D :D :D Congrats on the big 1000! :)

Thanks again everyone. Encouraging words to keep me motivated!
 

Tileguy

Member
Apr 28, 2003
766
0
16
64
Northern Mn
Visit site
Great looking station Arl.I considered that particular station for my layout.then i found myself a wonderful older craftsman kit by Quality Craft.itsThe Haydenton Covered Depot that was originally scratchbuilt by Dave Frary way back in the 70's.In fact if you have an MRC from feb 75 theres an article on it.ive got 7 hours in it so far and i am not even close to gluing up walls yet.Very labor intensive piece(at least for me)this is my first attempt at an N scale craftsman kit so we shall se what we shall see:D
I just love to see a great picture on the cover and open it up to see a box of stripwood(all color coded of course) and an instruction sheet with absolutly no measurements and not to scale.Well,if i get through this one without botching it too bad,a DPM kits going to look like a childs toy!!;)