My first catalog house

cnw1961

Member
Jan 7, 2006
846
0
16
65
Germany
The Finley was a catalog house sold by the Aladdin Company in 1916/1917 ( Central Michigan University Clarke Historical Library Aladdin Sales Catalog 1917 ). Branchline Trains offers a kit of this house, but it does not really convince me and at $ 39,98 it is a bit pricey. I can scratch build at least 5 of them for $ 40 and it will take ten times longer – who could ask for more? :mrgreen:

To find the right dimensions for my model, I had a close look at the floor plans and worked in Photoshop on the old picture from the Aladdin catalog until I could use it as a template to do a HO scale drawing in CorelDraw. If anyone is interested in my drawings, I’ll post links to PDF-files to download. All drawings are HO scale and can be used as templates to build the structure. Just make sure that the settings of Adobe Acrobat or your printer do not scale the drawings when printing them out.
finley1.jpg


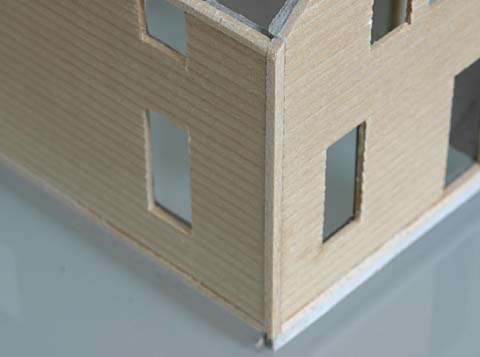
I printed my drawing out and glued it to a piece of cardboard to build a mock-up. My construction and building inspector checked it and only demanded some minor changes. There he is right after the inspection, standing in front of his brand new Chevy (guess who paid for it ?? :mrgreen::mrgreen:)

finley2.jpg


Here is the PDF-file of the mock-up (without the changes the inspector demanded): http://www.cnw.mattheydesign.de/Finley_mock-up.pdf .
 

cnw1961

Member
Jan 7, 2006
846
0
16
65
Germany
The walls

Using the drawing of my mock-up, I could easily do drawings to act as cutting templates. I want to use 1/8" basswood scale clapboards for the walls. The clapboard sidings are only 1/16" thick and the smooth basswood can easily be cut with a sharp knife. To reinforce the thin basswood walls I’ll glue them to .080" cardboard. The first drawing is the template for the clapboard, the second for the cardboard.

finley3.jpg
finley3a.jpg

http://www.cnw.mattheydesign.de/finley_walls_clapboard.pdf , http://www.cnw.mattheydesign.de/finley_walls_cardboard.pdf

I printed the drawings out and glued them to the backside of the clapboard and the cardboard using repositional adhesive spray. Next I cut the walls with a straight edge and a knife. You have to be careful when cutting the basswood, especially the openings for doors and windows.

finley4.jpg
 

cnw1961

Member
Jan 7, 2006
846
0
16
65
Germany
Wall assembly

Now I glued the cardboard to the backsides of the clapboard wall sections. At the top of the sidewalls I let the cardboard protrude for .080" to give space for the house trim.

finley5.jpg


Before I assembled the walls, I added the trim (.080" x .080") to the bottom of the front and rear wall and to the bottom and the top of the side walls.

finley6.jpg


Then I glued the walls together.

finley7.jpg


The last step of the wall assembly was to add trim to the corners of the house.

finley8.jpg


That’s it for today, my crew needs a break :wave:.

finley9.jpg
 

cnw1961

Member
Jan 7, 2006
846
0
16
65
Germany
Art Decko, thank you :wave:
Jac’s Lines, thank you very much for that great link. WOW, they have all the catalogs from 1908 to 1954 online. I had online found websites with some catalog pages so far.
Galen, the foundation will be brick (styrene). I did not get much done today, but I hope to go on tomorrow.
 

UP SD40-2

Senior Member
Apr 29, 2006
2,709
0
36
58
WOW!!!:eeki: SLAP STUPENDOUS JOB KURT!!!:thumb::thumb::thumb: i cant wait to see it finished:winki::mrgreen: . i really liked the pic with the LPP taking a break too, nice touch:thumb: , where would we be without the help of our LPP:winki::119: .
:deano: -Deano
 

jesso

Member
Jul 21, 2006
702
0
16
53
Washington, Utah
www.thetechfamily.com
Wow! As always your work is incredible! I love your posed pictures! It looks like the house is really being built out of lumber.

Did anyone else have a tear come to their eye when reading those catalogs and seeing the price of those houses?
 

cnw1961

Member
Jan 7, 2006
846
0
16
65
Germany
Deano, we’d be totally lost without the help of the little folks. Can you enter the cab of one of your engines?:mrgreen::mrgreen: Thank you for your nice words, my friend. :wave:

It looks like the house is really being built out of lumber.
Jesso, thank you, but what do you mean by "looks like" ??? :confused::confused::confused::confused: :mrgreen:

The carpenters have been working hard since I posted the last photo of the building site.

finley10.jpg
 

cnw1961

Member
Jan 7, 2006
846
0
16
65
Germany
Front porch

Before I built the front porch, I glued strips of styrene brick to the foundation.

To make it easier to cut and glue the pillars of the front porch, I fixed my drawing of the porch ( http://www.cnw.mattheydesign.de/Finley_front_porch.pdf ) to the non-adhesive side of a clear adhesive film and placed the .080 x .080 stripwood on the adhesive side to prevent the pillars from slipping away. Then I glued them together using .040 x .080 stripwood.

finley11.jpg


finley12.jpg


The next pics show the assembly of the front porch.

finley13.jpg


finley14.jpg


finley15.jpg


I did’t glue the roof of the porch in place, I’ll have to paint the house and assemble the windows and the front door first.
 

jesso

Member
Jul 21, 2006
702
0
16
53
Washington, Utah
www.thetechfamily.com
Looks great, I misunderstood what and how you were making the walls, looking back at it again and seeing how the porch is made makes it even more impressive! Your attention to detail is incredible. I can't believe you can get everything cut so straight and well. You and your "carpenters" are doing an incredible job.:thumb:
 

cnw1961

Member
Jan 7, 2006
846
0
16
65
Germany
Jesso, I cut all parts with a knife with snap-off blades or a scalpel and a striaght edge. It is fairly easy to do but takes some practice.

Bernhard, danke (thank you) for your kind comment. You are right, it is fun to build this wooden structure. I hope not to disappoint you if I use styrene for some of the parts I still have to do.

The first part I made of styrene was the roof. I cut two pieces (4 1/4" x 2") of .060 styrene, filed off the edges where the two parts meet and glued them together. I placed them on the house while the glue dried to get the right angle. Then I braced them on the inside and added the roof trim (styrene strips .013" x .120") I won’t fix the roof to the house in case I want to work on the interior of the house in the future.

finley16.jpg


Painting and adding shingles to the roof will be done in the end. Before I can add windows and doors I needed to paint the walls. I "test fitted" a window and a door to see if my design works.

finley18.jpg
 

cnw1961

Member
Jan 7, 2006
846
0
16
65
Germany
The Linnards and Fluffy visited the building site of their new home today. They were quite impressed by the progress my crew made. When they left Mr Linnard stepped into something soft :mrgreen:.

finley17.jpg
 

cnw1961

Member
Jan 7, 2006
846
0
16
65
Germany
Galen, I took the picture with artificial ligthing and it shows a wrong color. It is not black but a mixture of dark brown and grey.
 

cnw1961

Member
Jan 7, 2006
846
0
16
65
Germany
Gary, thank you.

Oh well, today I put the walls in according to the floor plans :rolleyes:. Please don’t tell me that I am overdoing it, I know already :mrgreen:.

finley19.jpg


I am cutting the tiny parts for the windows and doors now. That really slows me down. :-|