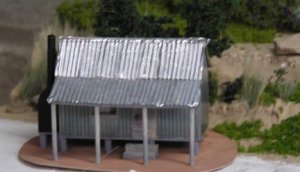
How I made the tin roof
Necessity is the mother of invention. I tried to get corregated tin at the one and only hobby shop here in Regina, and what they had was just C**P! So I decided to make my own, and here is how I did it.
I made a jig out of a scrap of wood and some 18 gauge floral wire. I cut the wire into 2" bits (about 12 of them) then I cut a spacer wire 4" long. My scrap of wood is 3" x 5" x 1/2".Draw a line on the wood block square with the long edge of the block about 1" from one end. Use white glue to glue a 2" bit of wire along the square pencil line, even with the edge of the wood. Don't use to much glue. I used a small paint brush and painted a strip of glue and then pressed the wire bit into the glue. Don't let the glue puddle up next to the wire, use the brush to sweep away any excess glue. Let it dry, five minutes or so should do with such a small amount of glue.
Place the spacer wire right next to the first bit you have glued down, and paint a strip of glue next to it, and place the next 2" bit beside the spacer wire and hold it firm while the glue sets up a bit. The spacer wire should be hanging over the edge of the wood so it is easy to remove it without disturbing the wire bit. Only use a small amount of glue at this time, it makes the construction of the jig go faster and you have less to clean up. Continue this process untill you have all 12 bits of wire stuck down. Make sure the bits are parallel to each other. Once you have all 12 bits stuck down, paint on an even coat of glue. This should cling in the gaps down each side of the wires and firmly secure the wire bits down. befor this coat of glue is dry, take a damp cloth and wipe the tops of the wires to remove most of the glue from the tops of the wire bits (wipe along the wires , not accross them) be very careful you do not press to hard or you will dislodge the wire bits. Let dry, and make the next parts, the forming wires.
If you have 12 wire bits stuck down, then you will need 11 wire forming bits. Cut the wire into 3" bits so the wire will overhang the wood when you are forming and then lift off easy.
Cut the tin foil. I cut my tin foil into 3' x 8' scale pieces. You could cut a long strip 8' wide and make your tin sheets as long as you like. This would be handy for a fence or the side of a building.
Now that you went through all that preparation, the forming goes much faster than you might think.
Start by placing a piece of tin foil along the first wire bit on the jig, keeping the bottom edge square along the edge of the wood, and press it over the first wire with your fingers. Place a forming piece of wire in the first slot between the first and second bits of wire on the jig, and press it down with your fingers to form the first flute. Keep adding forming bits of wire and pressing them down into the tin foil untill you get to the end of the tin foil. Pop the forming bits out with an upward flick of your finger, and remove the finnished corregated tin sheet.
You will find that they over lap just like the real thing and are strong enough to be handled easily. They also take dents and marks to make them look old aswell too. I tryed gluing two pieces of tin foil together with white glue and then forming them and this made a firmer sheet, but it was not necessary, I thought, as a single sheet came out almost as strong and was less trouble to make.
The finnished sheets are glued to the model with white glue.
It may seem like alot of work to make the jig, but once it is made, you can make as much corregated tin as you like for next to nothing.
")