Mounting Soudtraxx DSX in Athearn Dummy

jflessne

Member
May 10, 2006
165
0
16
52
Hot Arizona
www.azlivewire.com
I have a IC SD40 with a matching dummy engine. The engine already has a working NCE decoder.

I read some place you can mount a Soundtraxx DSX decoder in the dummy????


Anyone do this before? Any pictures of the process? I'm a visual leaner. :)

Thanks.
 

MasonJar

It's not rocket surgery
Oct 31, 2002
5,362
0
36
Ottawa, Canada
Visit site
I don't see why you can't do this, but if the sound-only decoder (DSX?) needs a connection with the "controlling" decoder, you may need to either find a way to put a plug in so the units can be separated, or connect them with a drawbar so they cannot accidentally be separated and yank out the wires.

Andrew
 

MasonJar

It's not rocket surgery
Oct 31, 2002
5,362
0
36
Ottawa, Canada
Visit site
Does the manufacturer (Soundtraxx) have any info? How about a local club near you? Or hobby shop?

I had some great help from one of the DCC gurus at our local modular club when I installed my sound decoder in a P2K 0-6-0 switcher...

Andrew
 

caellis

New Member
Jul 28, 2005
72
0
6
89
Mesa, AZ
I don't see why this is any different than installing a decoder/sound in a steam tender.

I installed the decoders in the tender of all my steam loco's. I had to run track pickup, motor and front light wires to the engine. I used #30 wire for all of this and have not experienced any problems in over a year of running.

Where the decoder goes depends on space and if you are using a 'dummy' it is a no-brainer as to what I would do.
 

caellis

New Member
Jul 28, 2005
72
0
6
89
Mesa, AZ
caliban said:
Hi jflessne,

It should be possible to put sound in the dummy, but you will need the trucks or minimum the wheelsets from a powered unit. Athearn dummy's have plastic wheels and you need to pic up the power fromthe tracks somehow. I've found something that might be helpfull, follow the link:

You would not need powered trucks in the dummy if you bring the power from the powered unit.
 

Freelancer

Member
Oct 24, 2002
309
0
16
Utah
www.yardlimit.com
I am not sure of what help I will be, as I am currently in the middle of installating my first sound decoder as well. I am putting in a Soundtraxx DSD-100LC into an Athearn dummy. I will post what I have done and maybe someone that really knows what they are doing can expound a little, and help fix any errors that I have made.

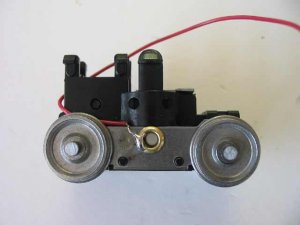
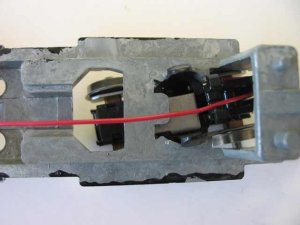
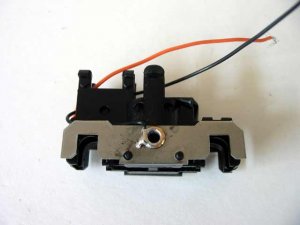
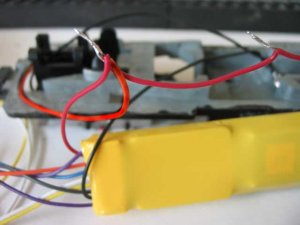
I wanted to run the least amount of wires between the two units so I decided that I would just pull power from the dummy. Besides the fact that I needed to replace the plastic wheels with metal ones, I also found that the dummy has two left hand trucks. (at least mine did) With the plastic wheels it was not a problem, but as soon as I replaced them with metal wheels the chassis would short out. I found that I needed to hard wire the pickups, and try to insulate one of the trucks from the frame.

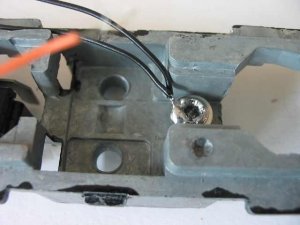
The first truck I just hard wired the right hand side pickup (Red) and just left the left hand side the way it would normally transfer power through the chassis. The second truck however, I had to hard wire both connections and insulate the left hand side pickup by placing electrical tape over the plate that connects to the chassis.
 

Attachments

  • Truck.jpg
    Truck.jpg
    15.8 KB · Views: 59
  • Truck-mounted.jpg
    Truck-mounted.jpg
    19 KB · Views: 57
  • Truck-2.jpg
    Truck-2.jpg
    14.5 KB · Views: 63

Freelancer

Member
Oct 24, 2002
309
0
16
Utah
www.yardlimit.com
I then put the chassis on the track to make sure that there were no more shorts. After I was pleased to find that there were no more shorts I drilled a 3/36" hole, and placed an appropriately sized screw in the hole. I then soldered the left hand connection (Black wire) to that screw, and then another black wire back to the decoder. (The only reason I put the screw in was because for some reason the solder would not stick to the chassis.)

I then soldered the right hand pickups (Red) together, and then to the decoder.
 

Attachments

  • Left-pickup.jpg
    Left-pickup.jpg
    20.4 KB · Views: 58
  • Right-pickup.jpg
    Right-pickup.jpg
    18.6 KB · Views: 59

Freelancer

Member
Oct 24, 2002
309
0
16
Utah
www.yardlimit.com
Next I soldered the resistor (that was included with the decoder) into one of the purple wires. The purple wires then went through two #36 holes that I drilled into the speaker enclosure, and were soldered to the speaker. I then snapped the speaker into the enclosure and glued the speaker/enclosure to the frame with a few dabs of hot glue.
 

Attachments

  • Speaker.jpg
    Speaker.jpg
    16.4 KB · Views: 59
  • Speaker-Mntd.jpg
    Speaker-Mntd.jpg
    17.6 KB · Views: 57

Freelancer

Member
Oct 24, 2002
309
0
16
Utah
www.yardlimit.com
After the hot glue cooled, I placed the decoder on top of the speaker enclosure and strapped it down with some electrical tape and a bit more hot glue. I also wrapped the exposed wires with some electrical tape and tacked them with some more hot glue.
 

Attachments

  • Decoder.jpg
    Decoder.jpg
    14.7 KB · Views: 58
  • Overview.jpg
    Overview.jpg
    22.9 KB · Views: 58

Freelancer

Member
Oct 24, 2002
309
0
16
Utah
www.yardlimit.com
I hope I got everything, if not hopefully someone will fill us in. I am not sure what the differences are on the DSX but I hope that this helps give you an idea of where to start. If you can, I would suggest pulling the power from the dummy so that you could lash up the dummy with any of your motive power to have sound whenever you wanted with whatever consist you wanted.

Good luck!

Freelancer
 

Freelancer

Member
Oct 24, 2002
309
0
16
Utah
www.yardlimit.com
Lets see.....

Parts-
Decoder (obviously)
Speaker
Speaker enclosure- not necissary, but highly recommended
Resistor - hopefully it came with the decoder
Solder
Flux
Electrical tape or heat shrink tubing
Set of powered trucks, or at least some metal loco wheels
Hot glue
Wire- or you could use the excess from the decoder

Tools-
Decoder instructions!
Soldering iron
Brush- to apply flux
Scissors
Wire cutters
Screwdriver
Hot glue gun
Drill with your choice of bit size with appropriately fitting screw
Camera- so you can post pictures of your progress
PATIENCE! (something I didn't have enough of before starting the installation)

I think that is about it.

Freelancer