Modern Chevron Gas Station

Status
Not open for further replies.

Arlaghan

Member
Sep 9, 2003
658
0
16
50
S. FL
To keep my sanity, I tend to work on several projects at once. Helps alleviate the monotony that could be encountered along the way, but causes the problem of having many unfinished structures!

Well, I've always wanted to make a modern day gas station, and surfing the net, I found the coolest picture of one - enough to inspire me to build one for my NTRAK module city.

Since I want the focus of my module to be lighting, I felt this would be a prime candidate for a structure:
 

Attachments

  • chevron.jpg
    chevron.jpg
    56.9 KB · Views: 1,206

Arlaghan

Member
Sep 9, 2003
658
0
16
50
S. FL
Progress so far...

Here's what I've got so far:

I've made the Food Mart structure - as of yet, undetailed. It still needs windows and doors, plus a detailed interior, and maybe stacks of plastic crates full of 2-liter sodas outside. :)
 

Attachments

  • chevron-01.jpg
    chevron-01.jpg
    55.4 KB · Views: 1,080

Arlaghan

Member
Sep 9, 2003
658
0
16
50
S. FL
And how it comes apart...

I've made the structure in pieces (This is typical of my modeling style - lack of commitment? Foresight? Who knows? :D )

Since I want to have lots of lighting, I've made a faux roof that will house the 1.2mm diam. light bulbs. The bulb wiring comes up through the square hole (over the restroom, which is completely boxed in) and through the roof space, and wedged into the supports over the openings in the ceiling.

The tar-paper roof is simply a painted piece of 150 grit sand paper glued to card stock. The parts you see in the photo will remain separate. The building will lift off the foundation, and the roof will lift off the structure - all for maintenance purposes - in case bulbs burn out. Not to mention, I need to detail the interior.

The sidewalk around the building is complete with "watch your step" yellow painted sides. :D
 

Attachments

  • chevron-02.jpg
    chevron-02.jpg
    65.2 KB · Views: 1,066

Arlaghan

Member
Sep 9, 2003
658
0
16
50
S. FL
To answer some common questions.

That's all the progress I've made so far, I'll keep posting pictures to this thread as I make more additions.

I usually get asked about materials so here goes:

Materials are Illustration board for the structure walls, base and roofing - with the exception of the ceiling... that's made from posterboard. I put the "shiny" side down, to help improve the ambient lighting of the interior.

The floor is made from pre-etched styrene. The only glue I've used throughout is white Elmer's glue. Paints are: Primed with cheap flat white spray paint, and painted (so far just the sidewalk and the roof) with Testor's acrylic's.
 

Arlaghan

Member
Sep 9, 2003
658
0
16
50
S. FL
More...

Made a little more progress.

Here, I've added a base of blue where the "Food Mart" lettering will go - I didn't worry too much about the edges, as I plan to put some molding where the white meets the blue.

Also, I added window trim. I used 1/32" basswood striped painted "Gun Metal" (my favorite paint color!) and "mitered" the corners at 45 degrees. No glass yet, that's coming soon. Need to put a restroom door and glass entry doors.
 

Attachments

  • chevron-03.jpg
    chevron-03.jpg
    59.9 KB · Views: 1,022

Arlaghan

Member
Sep 9, 2003
658
0
16
50
S. FL
Thanks for the kind words everyone! Right now this project has 100% of my (hobby) attention... I really ought to get around to ordering the NTRAK manual so I can finish the core of my module...

Here I got a tiny bit more progress: I made the "ceiling" of the canopy and the 8 columns that will hold it up. I made the columns as an "L" of illus. board and the other half of posterboard. I did this for (1) strength, but (2) I needed them to be hollow. I will run the bulb wiring through these columns. The little holes you see will be light bulbs. I didn't put as many as in the photo, because they are 70 cents a piece! I will need lots of bulbs when all is said and done. :p

The blue "pentagons" are the sidings of the canopy. These will be glued over the supports there now. Then, I will have the roof be removable, as well as having the entire canopy able to be lifted off, so I can get to the food mart below it.
 

Attachments

  • chevron-05.jpg
    chevron-05.jpg
    57.3 KB · Views: 960

Arlaghan

Member
Sep 9, 2003
658
0
16
50
S. FL
Originally posted by RailRon
Now I'm wondering how you'll going to wire up the canopy bulbs and still leave the canopy removable...

Very simple: I am not going to glue the columns to the canopy - only to the base. The roof on the canopy will come off to service any bulbs on the canopy, but if I need to get to the food mart, then the canopy itself will lift off of the columns and then the building is exposed. (It will require me detaching all the bulbs from the canopy, but hopefully the food mart bulbs last a long time!)

Originally posted by RailRon
PS: I love that little cutting mat - never seen such a small one before. How practical for smaller projects! [/B]

When I saw it at the store, I just HAD to have one! My regular cutting mat is 11" x 17" and is COMPLETELY covered with stuff. It's much easier to clear this little mat than the big one. :D
 

Arlaghan

Member
Sep 9, 2003
658
0
16
50
S. FL
Originally posted by shaygetz
How about LEDs for lighting? They're almost burnout proof and generate litte heat.

Yep, I've thought of those, too. But the white ones are so expensive!!! :cry: :cry:

I love these new smileys! :D
 

Arlaghan

Member
Sep 9, 2003
658
0
16
50
S. FL
Thanks for the info on the LEDs, Pete... will look into using some for future projects, but an already set up with the incandescent bulbs here. (Where were you 2 weeks ago?? :D )

OK, a little bit more progress:
(A view from the back - restroom side - of the gas station)

The columns are finished - two sides are thick illus. board while the other two sides are thin posterboard. This leaves a hole large enough in the column to allow at least three bulb leads to be passed up through them. I've also finished the pump foundations... pretty much same construction as the food mart foundation.
 

Attachments

  • chevron-06.jpg
    chevron-06.jpg
    46.4 KB · Views: 766

Arlaghan

Member
Sep 9, 2003
658
0
16
50
S. FL
Here's a slightly different angle showing the openings of the columns through the canopy. That strip serves two purposes: "slots" for the bulbs and as supports for the columns (to keep them from poking all the way through and making sure the canopy is level). Still need to make a removable roof for it all.

Nothing here is glued down yet... foundations are loose, even the columns are just "fitted" together. There was some slight warping of the base when I glued sandpaper to it and painted it, so I need to put a little bit of bracing on it before I glue the other stuff down.
 

Attachments

  • chevron-07.jpg
    chevron-07.jpg
    46.9 KB · Views: 679

Arlaghan

Member
Sep 9, 2003
658
0
16
50
S. FL
Thanks Nelson! I was planning to leave the Night Photo for the very end. :D

ezdays, That's why I haven't started on the pumps until just now - the permits finally came in. I don't want to tell you how many palms the owner had to grease to get them this fast!

For some reason, no matter how many hours I spend working on a project, it only seems like I get about 10 minutes worth of work done. Well, after another night of working on it, here's what I've got to date:

The canopy is now 100% complete. I decided for (bird-crud covered) aluminum panel roofing. :D I've started construction on the pumps structure. The illus. board "backbone" will be covered with posterboard, which in turn will be covered with the details.
 

Attachments

  • chevron-08.jpg
    chevron-08.jpg
    54 KB · Views: 674

Arlaghan

Member
Sep 9, 2003
658
0
16
50
S. FL
Here's another shot of the canopy with one of the roof panels removed for demonstration. Each piece has a "flap" that tucks under the roof peak (non-removable) and when fit snugly, is almost seamless. Accessing these light bulbs will be easy... removing the roof (and consequently having to put it back on 8 columns) is not so easy. :p
 

Attachments

  • chevron-09.jpg
    chevron-09.jpg
    53.4 KB · Views: 737

Arlaghan

Member
Sep 9, 2003
658
0
16
50
S. FL
A Short HOW-TO...

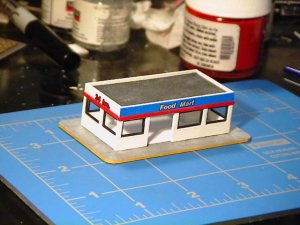
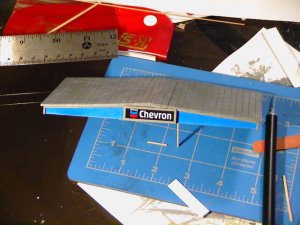
Originally I was just going to do the same type of lettering that I did for the FOOD MART to the side of the canopy - plain ole "Chevron" along the side. However, looking closely at the logo, the letters are a bit more spaced apart, which means I would have to cut out each letter individually - not gonna happen.

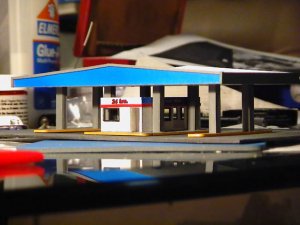
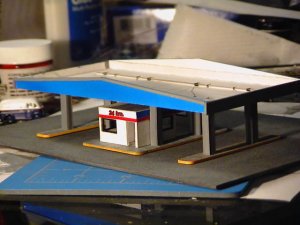
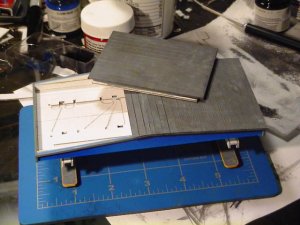
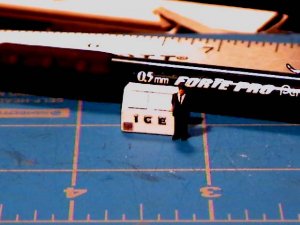
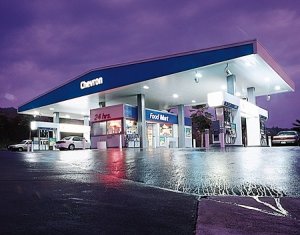
So, instead, I decided to go a little more extravagent... the photo shows it lit up, so I will make a variation of the logo (the chevron bars with "Chevron" on top of it, and larger to the right) in a sort of "box" that will be lit up from within. I'll be using a hybrid of dash10's back-lit sign technique, with some ideas of my own. Here's what I've got so far:

1. First I scoured the internet for a suitably sized image that I could "Photo-CHOP". (Image shown has been scaled down considerably.) I then cleaned up the lettering and put everything as a "negative". Since my laser printer does not print in color, I made a black background with the stuff I want to color white (or clear when it prints out on acetate.) Then, flipping horizontally, I reversed the image. (I do this so that it prints on the "BACK-SIDE" of the transparency. This is the side we will work with, so the "FRONT-SIDE" is clean and protects the whole thing.)

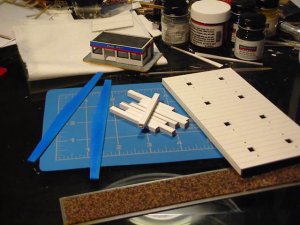
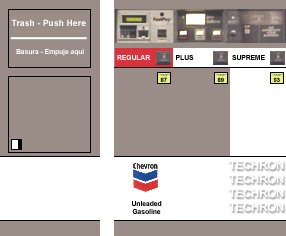
2. When you print it out, this is what it should look like. I only need 2 of these patterns, but I always make extra as I'm bound to screw up at least one of them.

3. The next step is to carefully mask the areas you do not want to paint. Since I am starting with the red chevron bar, I masked everything else. Tamiya paints smell really awful, but I have to admit they are pretty good in an airbrush right out of the bottle.

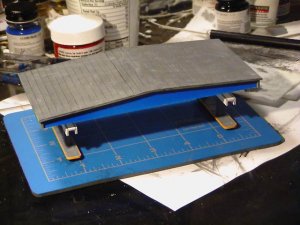
4. This is what the "FRONT-SIDE" looks like. When this dries, I will carefully peel up the tape, and then repeat the process for the blue chevron bar. I DO NOT plan to paint the letters white, as I will put a piece of posterboard or paper to act as the white and make the black appear more "solid". (Don't know why this is, but exposed, the black looks splotchy - when put on a white background, it looks great. Weird.)
 

Attachments

  • chevron-10.jpg
    chevron-10.jpg
    52.8 KB · Views: 845

Arlaghan

Member
Sep 9, 2003
658
0
16
50
S. FL
Experiment? Success!

Well, the little HOW-TO above turned out to be a success. Below is a picture of the result. I had mistakenly printed out a set of signs the "RIGHT" way - meaning, I forgot to reverse it for the painting procedure - which turned out to be useful.

What I did was cut out the reversed one, after painting, and also cut out a matching non-reversed one... then sandwiched a piece of regular paper in between. I encased this in a little wood frame that I painted and temporarily placed it in it's location. I don't want to give away the glorious lit ending to this thread, but let me just say it looks pretty good lit from behind! :D
 

Attachments

  • chevron-11.jpg
    chevron-11.jpg
    57.3 KB · Views: 835

Arlaghan

Member
Sep 9, 2003
658
0
16
50
S. FL
I wasn't really planning to post this until I actually had more progress to show - working on the smaller stuff is in baby steps and it doesn't look like I've done much at all. At any rate, I've been waiting for a printer I ordered (just arrived as I was typing this!) to print out some of the details to continue, but I will post these pics in the meantime as they relate to the pump structure.

Here is a fold-up pattern I made to make the long part over the pumps. The end is shaped like the bottom half of a stop-sign. I left openings for the canopy columns to go through.
 

Attachments

  • chevron-12.jpg
    chevron-12.jpg
    34.4 KB · Views: 475

Arlaghan

Member
Sep 9, 2003
658
0
16
50
S. FL
Another Baby Step...

Thanks guys!

The key to good pictures is to have good lighting. I have a halogen lamp that I use when I work on my models, I just position it over the subject when I take a photo. It's a bright white light that makes the pictures come out rather bright. In fact, I had to reduce the brightness on this one! :D

Here's the stereotypical "ICE" box you see in just about every gas station. For something so small, it was surprisingly easy to make. And it's the closest to prototype - I should know, I went to a Chevron today and took some more research photos. :)
 

Attachments

  • chevron-14.jpg
    chevron-14.jpg
    41.6 KB · Views: 488

Arlaghan

Member
Sep 9, 2003
658
0
16
50
S. FL
Ummm I think there's some confusion about lighting? :eek:ops: I meant that I use the desk lamp in place of flash. My digicam is a camcorder, and while it does have a built in lamp, it comes out somewhat yellow and isn't as good as the desk lamp.

As for the icebox, it was so quick in the making that I didn't stop to take pictures along the way. :( But it uses the same construction method as the long structure over the pumps. It's basically a small (5mm x 11mm) card stock base, with a posterboard "box" around it. The icebox doors are simply small pieces of posterboard and the "ICE" lettering is done with me new printer, as is the grime covered air vent (hard to tell) on the lower left. It's so tiny! I am really pleased with how it came out. :) I'm contemplating putting in something to represent hinges and doorlocks on it, but I need to finish the other details before I go crazy on one small item such as this. :)

Val, thanks for the link on the lamps! Really cool... but you're right, it's too late. I don't think I could fit one of those inside the food mart... it's too small!

Pete sells white LEDs at a reasonable price on eBay, and I might take him up on that offer. The bulbs I am using now are tiny 3V bulbs and while they don't get hot at all, they aren't very bright. I think using LEDs is the way to go. (At least for lighting up the CHEVRON signs on the canopy. The little bulbs just don't cut it.)
 

Arlaghan

Member
Sep 9, 2003
658
0
16
50
S. FL
Originally posted by dash10
Radio Trash

ROFL!!! I've always called it Radio Shaft - as in you are bound to get shafted if you buy from them - LOL!

Moving right along...

I've spent the last hour or so in Photo-CHOP and this is what I came up with. I set the document to 600 dpi (what my new printer resolution is set at for regular non-photo printing) and worked in actual dimensions. The pump housing is 1 cm in height. Taking measurements from an actual photo, the width is proportional to the actual prototype. (I had to guess the height, but one of my photos had a guy getting gas on the other side, so I was able to approximate.)

At anyrate, here is the graphic, in case any of you want to print some out and save yourself some graphical work:
 

Attachments

  • chevron-15.jpg
    chevron-15.jpg
    39 KB · Views: 536
Status
Not open for further replies.