Model Of The Week: Kit Build Goodyear F2G-1 Super Corsair

mldixon

Member
May 30, 2006
66
0
16
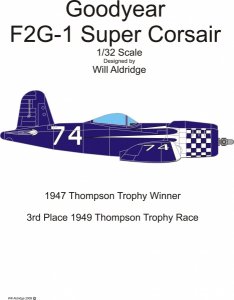
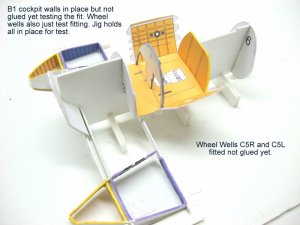
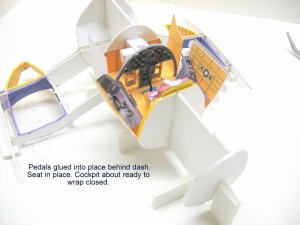
This is going to be a blow by blow kit build of Will Aldridge's 1:32 scale Goodyear F2G-1 Super Corsair. I am going to add enhancement details and will detail that when it takes place. If you have questions or want more detail in any area just post and I will try to accomadate. This kit came from Ecardmodels.com and is 12 pages total.
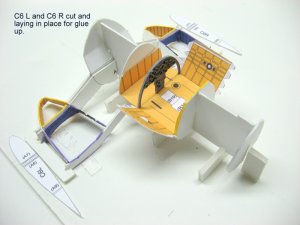
The engine is detailed and I intend to build it with full details. Details make these models great. The designer has instruction sheets and an excel spread sheet of the parts on the pages. I find that very useful. I will provide an attachment some where near the end of this thread that will list the parts as I cut them out and attached them into the model.
 

Attachments

  • Cover Sheet.jpg
    Cover Sheet.jpg
    65 KB · Views: 51

mldixon

Member
May 30, 2006
66
0
16
Getting Started

Here is the first sequence of parts that I cut out and assembled.
 

Attachments

  • IMG_0003.jpg
    IMG_0003.jpg
    115 KB · Views: 36
  • IMG_0005.jpg
    IMG_0005.jpg
    122.3 KB · Views: 32
  • IMG_0007.jpg
    IMG_0007.jpg
    95.7 KB · Views: 26
  • IMG_0009.jpg
    IMG_0009.jpg
    119.2 KB · Views: 19
  • IMG_0011.jpg
    IMG_0011.jpg
    104.6 KB · Views: 27

mldixon

Member
May 30, 2006
66
0
16
Next stage Jigs

I used a jig for alignment of parts and to add a little order to this.
 

Attachments

  • IMG_0012.jpg
    IMG_0012.jpg
    115.6 KB · Views: 24
  • IMG_0013.jpg
    IMG_0013.jpg
    105.4 KB · Views: 19
  • IMG_0015.jpg
    IMG_0015.jpg
    121.2 KB · Views: 20
  • IMG_0016.jpg
    IMG_0016.jpg
    117 KB · Views: 19
  • IMG_0017.jpg
    IMG_0017.jpg
    97.9 KB · Views: 20
  • IMG_0020.jpg
    IMG_0020.jpg
    123.2 KB · Views: 19

mldixon

Member
May 30, 2006
66
0
16
Next step interior of cockpit

This is interior details getting ready for assembly
 

Attachments

  • IMG_0024.jpg
    IMG_0024.jpg
    105.5 KB · Views: 23
  • IMG_0026.jpg
    IMG_0026.jpg
    131.9 KB · Views: 18
  • IMG_0027.jpg
    IMG_0027.jpg
    105.2 KB · Views: 17
  • IMG_0028.jpg
    IMG_0028.jpg
    96.4 KB · Views: 19
  • IMG_0030.jpg
    IMG_0030.jpg
    160.7 KB · Views: 22
  • IMG_0035.jpg
    IMG_0035.jpg
    115.6 KB · Views: 31

bulldogowner

Destroyer of Spam
Moderator
Oct 12, 2006
520
0
16
58
West Michigan
Excellent build and fantastic detail!! Keep the pics coming!! I like the use of your jigs to keep thinks in place for you...very smart.
 

mldixon

Member
May 30, 2006
66
0
16
Watercolor Penils

Thanks Bulldog Jigs are essential to this build, there is a lot of flex when you are gluing up. The superglues get hard fast and hold the position.

Chris
I use Stabilo Aquatico 48 pencil set, costs a little bit of money but last forever. Sharpen points and dip in water. No need to worry about if the mixture is right every time you use them. Quick , easy, no mess. You can get these online from fine art sites. No sure you'll find them at craft type sites.
 

Attachments

  • IMG_0039.jpg
    IMG_0039.jpg
    140.5 KB · Views: 28
  • IMG_0040.jpg
    IMG_0040.jpg
    197.6 KB · Views: 31

cgutzmer

Well-Known Member
May 30, 2006
5,242
1
76
55
Sun Prairie WI
www.ecardmodels.com
I have a set very similar to that but I was not happy with the result. maybe I wasnt soaking the tip enough? I couldnt get the color to come off on the edge very well without pressing hard enough to damage the edge.
Chris
 

mldixon

Member
May 30, 2006
66
0
16
Watercolor Penils

Chris
Make sure you have watercolor pencils and not just colored pencils. These are true watercolor mediums in the pencils. I dip the end in water and they paint just like a brush. In fact the color just flows onto the edges of the paper. Brand does make a difference.
 

mldixon

Member
May 30, 2006
66
0
16
Paper Pilots

Well here is a short sidetrack, will start another thread on this when done with model
 

Attachments

  • IMG_0049.jpg
    IMG_0049.jpg
    133.2 KB · Views: 27
  • IMG_0050.jpg
    IMG_0050.jpg
    132.8 KB · Views: 26
  • IMG_0051.jpg
    IMG_0051.jpg
    124.9 KB · Views: 29

cgutzmer

Well-Known Member
May 30, 2006
5,242
1
76
55
Sun Prairie WI
www.ecardmodels.com
I will see what I got but they are labeled as water color pencils.

Pilot looks good! Can you put another flat section cutting through that would show the front and back which might impart a 3d effect - or it may look worse, I dunno!
Chris
 

mldixon

Member
May 30, 2006
66
0
16
Fuselage buildup

I am going to assume that the last post above this one must be the designer. I don't know that for sure. But it sounded like it. I am amazed that I will be the first to finish this. It looks like a great model, and so far not too many problems. I usally build in 1:16 scale but stuck with your published size out of respect for the kit build. I am glad your happy with the build so far. When I am done will scale it up and build again. So please hang around. Now on with the build.
 

Attachments

  • IMG_0055.jpg
    IMG_0055.jpg
    146.6 KB · Views: 22
  • IMG_0056.jpg
    IMG_0056.jpg
    148.1 KB · Views: 22
  • IMG_0057.jpg
    IMG_0057.jpg
    149.2 KB · Views: 23
  • IMG_0058.jpg
    IMG_0058.jpg
    74 KB · Views: 24
  • IMG_0059.jpg
    IMG_0059.jpg
    136.4 KB · Views: 21
  • IMG_0060.jpg
    IMG_0060.jpg
    147.9 KB · Views: 26

Willja67

Member
Feb 12, 2005
154
6
16
44
Grantsville,Utah
Yeah I'm the designer. I look forward to the 1/16 scale build. If there are any parts you want reference on I have about 1.7 gig worth on the Super Corsair on my hard drive. Includes the maintenance manuals and a whole ton of pictures.

Since you are going whole hog on this thing let me do you a favor. I am working on a military version of the Super and I upgraded a lot of stuff including the wings. The main spars stayed pretty much the same though so if you are interested I can send you the new design ( a little work to paint it for #74 first). In particular the landing gear doors are much more detailed. The only downside of it is that I haven't created diagrams or instructions for it yet so you will have to figure some stuff out on your own. I will of course answer all questions you have.
 

mldixon

Member
May 30, 2006
66
0
16
Send it on

Willja
First let me thank you for the design. I know that a lot of work goes into getting one of these things to buildable point. With that said.

Send the military version on . I am sure I can figure it out. Repaint not a problem,

You ok if I want to fold up the wing on one side for a more interesting look.
 

peter taft

Senior Member
Jan 15, 2010
878
1
16
Superb workmanship

Although i'm not a great fan of this aircraft, i think your work and build procedures are excellent... very clean and precise. Love the text overlays {i do this sometimes} and find them very helpful and informative. My late father liked this plane and built her 1:32 scale {plastic model - can't remember kit manu} and the wings could be in folded or normal position although the hinge mechanism was a tad sloppy which was the norm for that particular kit. I will be following this fascinating build {great design by the way :thumb: } :wave:
 

mldixon

Member
May 30, 2006
66
0
16
On with the glue up

Peter thanks for commets. I love this plane. I think the wing roots are good looking as heck no Sexy is a better word.. I am inclined to build a stand for this to show it off as it should be, I will include that at the end of this build.
 

Attachments

  • IMG_0061.jpg
    IMG_0061.jpg
    116.1 KB · Views: 18
  • IMG_0062.jpg
    IMG_0062.jpg
    118.5 KB · Views: 14
  • IMG_0063.jpg
    IMG_0063.jpg
    135.9 KB · Views: 19
  • IMG_0064.jpg
    IMG_0064.jpg
    162.3 KB · Views: 14
  • IMG_0065.jpg
    IMG_0065.jpg
    196.3 KB · Views: 11
  • IMG_0066.jpg
    IMG_0066.jpg
    117.6 KB · Views: 19

Willja67

Member
Feb 12, 2005
154
6
16
44
Grantsville,Utah
Well I spent a couple hours last night getting the wing skins reworked for you. I still need to do a little work but I'm 95% there. In all the pictures I have ever seen of #74 I have never seen the wings folded. If you really want to you can do it. I have personally been to Bob Odegaards shop while he was restoring #74 and I know that it has all the hinges to have the wings folded but it's not really something this plane was ever shown with. However I have been working on a folding wing military version. You might want to do the military version in 1/16 as it has more detail. Here is a link to a thread over at papermodelers.com that you might find interesting.

Please pm me your email and i will send the new wings when they are ready.

ps you are going to have to remove the gear bays and use the new ones that I'll be sending
 

mldixon

Member
May 30, 2006
66
0
16
Front of Fuselage

These are parts from page 6-47 , f1-f7 ,
 

Attachments

  • IMG_0071.jpg
    IMG_0071.jpg
    132.1 KB · Views: 11
  • IMG_0074.jpg
    IMG_0074.jpg
    117.1 KB · Views: 9
  • IMG_0079.jpg
    IMG_0079.jpg
    146.6 KB · Views: 10
  • IMG_0080.jpg
    IMG_0080.jpg
    112.6 KB · Views: 9
  • IMG_0083.jpg
    IMG_0083.jpg
    120.8 KB · Views: 9
  • IMG_0085.jpg
    IMG_0085.jpg
    134.2 KB · Views: 12

mldixon

Member
May 30, 2006
66
0
16
Firewall and Exhaust Pipes

Well I glued the forward part of the fuselage in the previous post and added the firewall and exhaust pipes. Closing in on that engine. Can't wait...
 

Attachments

  • IMG_0087.jpg
    IMG_0087.jpg
    114.9 KB · Views: 18
  • IMG_0088.jpg
    IMG_0088.jpg
    110.1 KB · Views: 12
  • IMG_0089.jpg
    IMG_0089.jpg
    115.4 KB · Views: 14
  • IMG_0090.jpg
    IMG_0090.jpg
    99.6 KB · Views: 12
  • IMG_0092.jpg
    IMG_0092.jpg
    129.3 KB · Views: 16