

McCabe Planing Mill
- Thread starter belg
- Start date
You are using an out of date browser. It may not display this or other websites correctly.
You should upgrade or use an alternative browser.
You should upgrade or use an alternative browser.
The progress is slow but I have pretty much finished the transfer storage building except for the rails. Let me know what you think and let me know what else could done to make i better. Detailing with junk and so forth will happen when the scene gets put together. Pat
Attachments
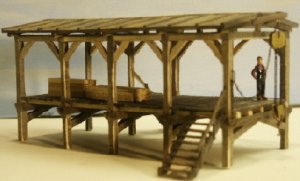
Well, Pat, that's coming along beautifully. I suppose the main details would be stacks and stacks of lumber and something to move the lumber with. I plan on using a couple of these to move lumber: http://www.walthers.com/exec/productinfo/786-5109 in addition to a tram system.
Then there's the matter of a kiln; every planing mill had a drying kiln. They produced kiln-dried as well as air-dried lumber. The lumber was generally rolled into the kiln on some sort of metal carts and remained on the cart during the drying process as I understand it. The work are was kept generally clear of junk to prevent accidents, but I'm sure there would be a pile of banged-ip boards around, maybe with some wire banding in it too. I'd put one near the kiln and another near wherever I load the lumber onto the railroad cars. And, I'd work dirt and ground cover right into the pile, as if the pile had been growing over time.
But, what you've got there so far is terrific!
--Stu--
Guys I appreciate the encouragement and hope that your being honest in your praise for I would rather be told it looks like it needs something if that's what you truly feel, I don't have thin skin when it comes to that.
Thanks for the link on that loader Stu, I'll definately look into getting at least one of those. As for the cost of the project so far I think I have spent about $20. So I'm well under the cost of the kit.
Might actually get a little more time to work on it tonite. Pat
Thanks for the link on that loader Stu, I'll definately look into getting at least one of those. As for the cost of the project so far I think I have spent about $20. So I'm well under the cost of the kit.
Might actually get a little more time to work on it tonite. Pat
It's looking good belg. Are you going to build a sawmill too?
I also like the lumber carrier Stu
neil
I also like the lumber carrier Stu
neil
Yes Neil, I plan on building the whole sawmill complex. I have not started that yet but after some rearranging in the work shop, it will be getting underway. Pat
WOW Belg, how on earth do you manage to get all those angled pieces (roof supports) to sit properly. A cut just a fraction too short or too long and they just will not look right.
Those steps are out of this world too, I need fifteen pairs of hands to do steps that good! (Which is why I've never managed to make decent looking steps).
The skill and effort you've put into those structures is really great.
Errol
Those steps are out of this world too, I need fifteen pairs of hands to do steps that good! (Which is why I've never managed to make decent looking steps).
The skill and effort you've put into those structures is really great.
Errol
update
Good morning ,guys here is a long overdue update on my sawmill.
Errol, I first built all the rafter bents and the attach them to the frame by spanning the main beam on either side, I used about twenty little alligator clips with the ends bent out.


Good morning ,guys here is a long overdue update on my sawmill.
Errol, I first built all the rafter bents and the attach them to the frame by spanning the main beam on either side, I used about twenty little alligator clips with the ends bent out.
Belg- On your pics just posted which is yours?
They both look down-right awesome!
The top pictures coloring looks like they might be burning off the waste.
Gives that burnt, smoky sunlight look.
Being where I'm from in Florida, trust me I know what sunlight looks like thru smoke.
They both look down-right awesome!
The top pictures coloring looks like they might be burning off the waste.
Gives that burnt, smoky sunlight look.
Being where I'm from in Florida, trust me I know what sunlight looks like thru smoke.
Hi Belg,
Thats one beautiful project you put together. I love the detail. With those skills you don't need a lot of bucks for structures.
Ron :thumb: :thumb: :thumb:
Thats one beautiful project you put together. I love the detail. With those skills you don't need a lot of bucks for structures.
Ron :thumb: :thumb: :thumb:
Thanks for the positive feed back men and I'll make sure to post more as it progresses.
Ken both pictures are mine just took the second one with a borrowed camera to see if I liked it enough to buy one. Pat
Ken both pictures are mine just took the second one with a borrowed camera to see if I liked it enough to buy one. Pat
ahhhh, I see.
Well, I guess my compliment was in the question.
Looks kit bought... pro/pre-built.
P.S.-The second picture camera does very well at that distance.
Well, I guess my compliment was in the question.
Looks kit bought... pro/pre-built.
P.S.-The second picture camera does very well at that distance.
Pat, hows the mill coming along??
I really enjoyed your pictures.Youve put alot of work into this and it looks great.
I'd love to see more
I really enjoyed your pictures.Youve put alot of work into this and it looks great.
I'd love to see more