

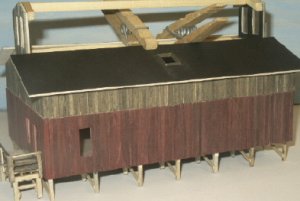
McCabe Planing Mill
- Thread starter belg
- Start date
You are using an out of date browser. It may not display this or other websites correctly.
You should upgrade or use an alternative browser.
You should upgrade or use an alternative browser.
Hi Belg
do not worry about your budget, your work is better than what could get for money. Congratulation.
do not worry about your budget, your work is better than what could get for money. Congratulation.
Looking great Pat!
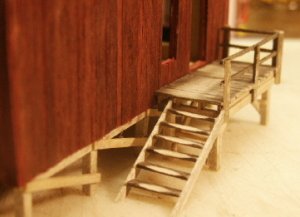
Did you scratch-build those steps to the loading dock or are they pre-fab? If scratch-build I'd love to know your technique, mine always seem to come out looking like something on a haunted house.
Did you scratch-build those steps to the loading dock or are they pre-fab? If scratch-build I'd love to know your technique, mine always seem to come out looking like something on a haunted house.
Pretty kewl, Belg. I tried steps like that, but gave up. :cry:  Maybe another time for me.
Looks good though.
Maybe another time for me. Looks good though.
Now that's looking real good, Belg. I also love those steps and their worn-out look.
I think your scratchbuilt structure looks every bit as good as any expensive kit. There's no need for an excuse because you're scratchbuilding that structure - on the contrary: Be proud of it! :thumb: :thumb: :thumb:
Ron
I think your scratchbuilt structure looks every bit as good as any expensive kit. There's no need for an excuse because you're scratchbuilding that structure - on the contrary: Be proud of it! :thumb: :thumb: :thumb:
Ron
I agree with what others have said that scratchbuilding is equal to the expensive kits. In my books scratchbuilding provides a unique look to the structure that kits can't come close to. The best part of sratchbuilding is the cost. Foe example, my current is a copy of a kit that sold for $250. My cost so far is around $1. I doubt I will ever by a kit again even if I could afford it.
The stairs were built using very simple method,
(1) cut all steps to size on a tool with a stop
(2) take a file and sand the depression in the middle
(3) take your stringers (the side pieces) and take a piece of strip wood the size that you want in between the steps and mark one side
(4) lay it flat and glue one side of the steps on your layout lines
(5) adjust steps for spacing while the glue is still wet
(6) apply glue to tops of steps AFTER the one side has dried lay down and attach the second side I used two heavy pieces of metal on either side to keep them clamped.
I hope thats as clear as mud for everyone if not feel free to ask more questions I'll try to answer to the best of my ability. Thanks Pat
(1) cut all steps to size on a tool with a stop
(2) take a file and sand the depression in the middle
(3) take your stringers (the side pieces) and take a piece of strip wood the size that you want in between the steps and mark one side
(4) lay it flat and glue one side of the steps on your layout lines
(5) adjust steps for spacing while the glue is still wet
(6) apply glue to tops of steps AFTER the one side has dried lay down and attach the second side I used two heavy pieces of metal on either side to keep them clamped.
I hope thats as clear as mud for everyone
if not feel free to ask more questions I'll try to answer to the best of my ability. Thanks Pat
P
philip
ole mill
That a nice one Pat. Nice stringer also! Is this one of the structures you need windows for?:thumb:
keep posting your progress
philip
That a nice one Pat. Nice stringer also! Is this one of the structures you need windows for?:thumb:
keep posting your progress
philip
Yes Philip this is indeed one of the structures I need the windows for. The other will be the second addition to this series. Pat
Ron I'm extremely proud of what I've accomplished so far and don't want to make an exact copy of the original but merely use it as my template. The only things I will have to spend some real money on is the castings so I'll still be well ahead of what the kit would have cost.
Robin,I have in fact spent only about $2 on supplies so far. Coffee stirrers, matte board scraps from framing store both free. I have ordered my windows/doors for the first floor and that should be a $12.
Thanks Pat
Robin,I have in fact spent only about $2 on supplies so far. Coffee stirrers, matte board scraps from framing store both free. I have ordered my windows/doors for the first floor and that should be a $12.
Thanks Pat
Well guys here's an update on my project it is a link to railimages where I also posted my new Rivarossi loco from trainworld at a good price.
http://www.railimages.com/gallery/patmeeuwissen/aar
http://www.railimages.com/gallery/patmeeuwissen/aar
Your scratchbuilt rendition looks absolutely great, Belg.
This is one HO kit I did spring for after seeing B.T.S.'s diorama at a show in November. The mfgr. does include a good amount of detail parts in the kit, including brass figures. Either approach works; it's the fun along the way and the satisfaction you get from building that matter. I will note that there have been a couple of my scratch projects that got a bit out of hand--I spent more on doors, windows, and details than the kit would have cost in the first place!
Please keep posting those photos Belg! Happy Easter.
--Stu--