Matthysen Junction's coal dumper...

shaygetz

Active Member
May 2, 2003
3,612
0
36
64
www.freewebs.com
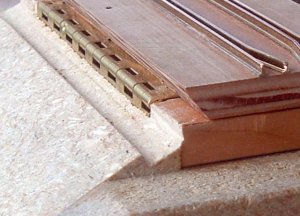
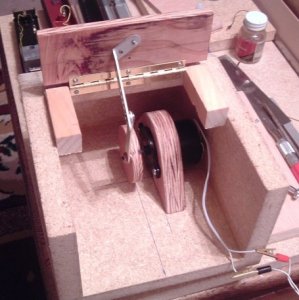
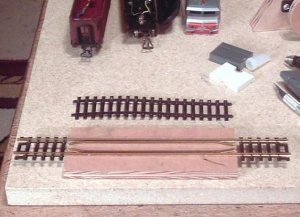
Years before the B&MC became a podunk tourist/branchline, the town of Matthysen Junction had a small tilt dumper to send coal down the bay to local coal suppliers when coal was still used for heating a good percentage of Eastern Shore homes. Ten cars a week came to this noisy, dusty beast and few tears were shed when it tossed its last load in the spring of '63.

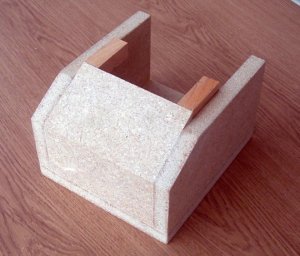
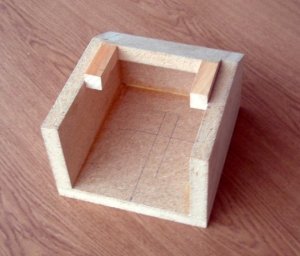
Based on plans on page 79 of the long out of print "Bridges and Buildings for Model Railroads" and remeniscent of a time when there were far fewer kits available, I've wanted to build this thing since I first read the article over thirty years ago. Robin's work took me back to my own beginnings, when I made my models with the same materials and nothing but a straight edge razor, a scale ruler cut from a magazine and paper matches for paint brushes.

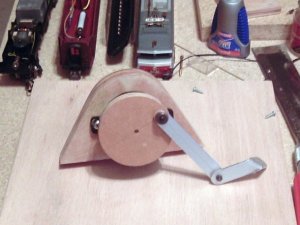
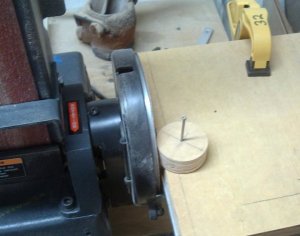
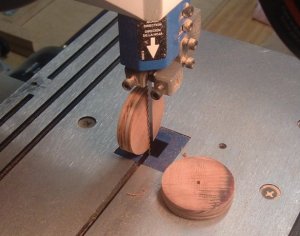
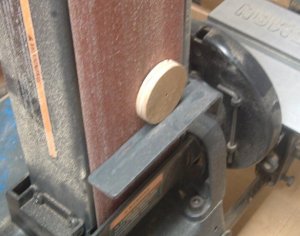
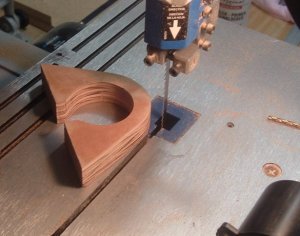
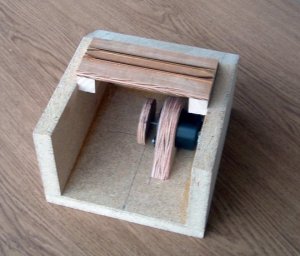
I started by turning the bull wheel by first rough cutting it on a band saw. Then I placed a finishing nail thru the center and then nailed it to a scrap piece of wood. By applying even pressure as I turned it against my sander, I was able to produce the proper sized disc and make it perfectly round. Because the plywood used was much too thick, I simply split the disc on my bandsaw, then sanded it flat.
 

Attachments

  • robin1.jpg
    robin1.jpg
    47.7 KB · Views: 248
  • robin2.jpg
    robin2.jpg
    59.6 KB · Views: 246
  • robin3.jpg
    robin3.jpg
    58.2 KB · Views: 245

shaygetz

Active Member
May 2, 2003
3,612
0
36
64
www.freewebs.com
The slo-mo motor came from an old store display and turns at about 1 1/2 RPMs @ 2 volts, perfect for this project...and...free for the asking. I fashioned a mount for the motor then mounted it and the bull wheel to it for a test fit.
 

Attachments

  • robin4.jpg
    robin4.jpg
    60.2 KB · Views: 247
  • robin5.jpg
    robin5.jpg
    65.4 KB · Views: 248

shaygetz

Active Member
May 2, 2003
3,612
0
36
64
www.freewebs.com
Then I turned my attention to the tilt table. Using the same plywood, I cut it to a scale 16x40 feet, then split it as I had the bull wheel. The wood is scrap pieces of a high quality MDO used for highway signage. It is infused with an epoxy and makes for a very stable base.

I gauge the track by removing a portion of Atlas Snap Track tie strip, then gluing it to the base, using a track gauge in the center to insure a uniform gauge the whole length. I then made a set of guard rails and glued them in place with a gap filling ACC glue. Then I clipped the rails and squared the ends on my sander.
 

Attachments

  • robin6.jpg
    robin6.jpg
    49.9 KB · Views: 241
  • robin7.jpg
    robin7.jpg
    43.7 KB · Views: 245

shaygetz

Active Member
May 2, 2003
3,612
0
36
64
www.freewebs.com
Part model, part functional base, the drive box came next, built from scrap MDF particle board, solid, stable but a bit unforgiving of water soluble scenery material so be careful where you use it. I made it fairly solid as it will be part of a 6' traveling module.
 

Attachments

  • robin8.jpg
    robin8.jpg
    61.1 KB · Views: 239
  • robin9.jpg
    robin9.jpg
    48.3 KB · Views: 245

shaygetz

Active Member
May 2, 2003
3,612
0
36
64
www.freewebs.com
Thanks, guys, it do feel good to do some bottom line scratch building again.

Today found me toiling on the tilt hinge, finally settling on a 4" piano model in brass. Thru much trail and error, it tilts smoothly and sets flat. Patience is a virtue here.
 

Attachments

  • robin11a.jpg
    robin11a.jpg
    49.8 KB · Views: 204
  • robin12.jpg
    robin12.jpg
    56.2 KB · Views: 197
  • robin11.jpg
    robin11.jpg
    60.2 KB · Views: 199

shaygetz

Active Member
May 2, 2003
3,612
0
36
64
www.freewebs.com
jim currie said:
great work just love to see the chains of ready to run discarded:)

:thumb: :thumb: :thumb:

One of the pitfalls of turning to old MRs for projects is that the articles are generally written on the assumption that you're mechanically inclined. "Fashion part A and then attach it to part B" Fair enough---if you have a mechanical engineering degree from MIT and a workshop that would have Norm Abrams sobbing like a little girl.:rolleyes:

Here are some closeups of how I got the tilt table to tilt past 90 degrees and return to flat. About an hour of non-stop adventure, flyin' sawdust and tongue bitin'...:thumb: :thumb:
 

Attachments

  • robin13.jpg
    robin13.jpg
    63.6 KB · Views: 194
  • robin14.jpg
    robin14.jpg
    63.7 KB · Views: 192

shaygetz

Active Member
May 2, 2003
3,612
0
36
64
www.freewebs.com
Glen Haasdyk said:
You never cease to amaze me. you wouldn't happen to be related to Macgyver would you?

Thanks, Glen. I can't take all the credit when my friends names are Dewalt, Bosch, Porter Cable and Craftsman....:thumb:
 

shaygetz

Active Member
May 2, 2003
3,612
0
36
64
www.freewebs.com
Papa Bear said:
Sounds like you're in good company, Bob.:D

Kinda nice when the job gives me a reason (excuse:rolleyes: ) to buy cool power tools.:thumb: Didja ever get that Docksider running you picked up at the swap meet?

Hey, G4JC:wave:
 

shaygetz

Active Member
May 2, 2003
3,612
0
36
64
www.freewebs.com
Today was spent running from the shop to the apartment in the rain fabricating the lift linkages. Found my hardware store didn't carry small enough bar stock so I resorted to my inner McGyver and made my own from scrap door sill material. I drilled, bent and shaped the connecting rod and lift arm according to the instructions and now am ready for final fitting and assembly.
 

Attachments

  • robin16.jpg
    robin16.jpg
    25.4 KB · Views: 140
  • robin17.jpg
    robin17.jpg
    58.9 KB · Views: 137

shaygetz

Active Member
May 2, 2003
3,612
0
36
64
www.freewebs.com
The rest of the weekend will find me no doubt wishing I had taken up stamp collecting or something as I fiddle and adjust the tilt mechanism for optimal performance. Already I've deviated from the plans by reforming a lift arm with multiple adjustment holes to help in the final tweeking. Once finished I will fasten the whole smack down and then repeatedly slam my head in a door while muttering, "Model railroading is fun..."wall1
 

Attachments

  • robin18.jpg
    robin18.jpg
    43 KB · Views: 142
  • robin19.jpg
    robin19.jpg
    56.2 KB · Views: 140

webmaster

Member
Feb 17, 2006
155
0
16
54
Surrey, UK
www.budgetwebsiteservices.co.uk
I take it you will use power one way to lift & then reverse the power to lower??

When I first saw the disk, I would have thought you would have made it similar to a loco wheel with just one rod. Using a micro switch to cut the power when the bed returns. That means that you would only need to power in one direction with a momentary switch to over ride the micro switch to start the proccess.?
 

shaygetz

Active Member
May 2, 2003
3,612
0
36
64
www.freewebs.com
webmaster said:
I take it you will use power one way to lift & then reverse the power to lower??

When I first saw the disk, I would have thought you would have made it similar to a loco wheel with just one rod. Using a micro switch to cut the power when the bed returns. That means that you would only need to power in one direction with a momentary switch to over ride the micro switch to start the proccess.?

The motor travels in one direction. The bend in the lift arm offsets the top dead center so that, once the wheel passes a certain point, the connecting rod pulls down rather than pushes up. I will add a micro roller switch to the circuitry so that, when it hits bottom dead center, it will stop the motor, thus making it semi-automatic. Then, like you said, I'll have a momentary on switch to bypass the micro switch and start the whole process again.

The adjustments are proving interesting to say the least and not risk suffering potty mouth and will probably take a bit longer then I had hoped. Again, it goes back to those early articles that assumed skills that may or may not be there. Help to adjust the mechanism just is nowhere to be found in the article I got this from.