Marvin Beta Build

BazookaJo

Member
Apr 2, 2006
317
24
16
UK
www.bazookajo.me.uk
Bowdenja said:
Ya know what............. I've gotta make me one of those helmets for Halloween next year!
john

I've been thinking the same thing ;) Blow it up to A1 and you're probably in business (not sure what the equivalent would be in US sizes).

Paul.
 

sneaker

Member
Sep 23, 2006
50
0
16
Chandler, Arizona
BazookaJo said:
I've been thinking the same thing ;) Blow it up to A1 and you're probably in business (not sure what the equivalent would be in US sizes).

Paul.


That would be D paper in the US. They are the almost same size, I believe D to be 22X34

But I have been wrong before:eek:ops:
 

stagecoach

Member
Aug 24, 2006
110
0
16
80
New Hampshire
johns-shipyard.tripod.com
paper sizes

American standard sizes in inches.
in the drafting sizes:
A = 8-1/2 X 11 --- that's 1 X letter size paper

when you fold these papers onto each other
they come out to a single letter size except
for E size it's usually too big to fold.
B = 11 X 17 --- that's 2 X letter size paper
C = 17 X 22 --- that's 4 X letter size paper
D = 22 X 34 --- that's 8 X letter size paper

E = 34 X extra long usually on a roll

another size is called Legal thats 8-1/2 X 14 paper
this paper would be closer to a A4 foreign size
 

B-Manic

Peripheral Visionary
Nov 27, 2006
218
0
16
Beautiful British Columbia
"Back to the thread, this is it." :)
Just kidding - the info about paper sizes is great.

metric and Japan standards http://home.inter.net/eds/paper/papersize.html#isojis
Metricated - used in the UK/EU and Japan http://home.inter.net/eds/paper/papersize.html#trad
Commonly Used Paper Sizes Listed by Country http://home.inter.net/eds/paper/papersize.html#countrylist

I just finished the hands. I think I need another hand myself, possibly a tentacle. They were quite the challenge for me. I am seriously considering redoing one of them.

Will post pix when I make-up my mind.
 

sneaker

Member
Sep 23, 2006
50
0
16
Chandler, Arizona
AAAAARRRGGGG!!! There I feel better :razz: Made some pretty decent progress this evening, er uh morning. Does anyone else lose track of time when working on Marvin...Sheesh! lol :)

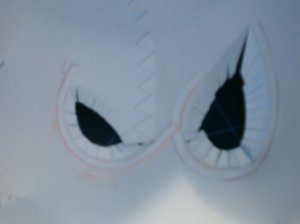
Any way Bazookajo! How the hell are ya? The first pic is of the back of the eye sockets with the reinforcers. Sorry about the fuzzy pic, guess I need a cam with a macro lens. Is this what you meant about the placement of the reinforcers?

I completed the face/head mostly. I decided to let the glue dry a good time arpound the neck support doomahicky, before messing with head to neck attachments.


The second pic needs a little explaining. First of all it is to show my progress thus far, but on an interesting note, nothing is glued together except the major sub-assemblies. The shoes are not glued to the legs/skirt, the gloves are not glued to arms. the arms are not glued to the torso. The torso is not glued to the skirt. The helmet is not glued to the face you get the idea, I am pointing this out to show how well engineered a model this is, even with a noob like me building it. I am getting near the end of this build, and I think I can safely say, if I am able to do it, it will be no problem for anyone else. Especially the seasoned builders. Anyone who is not an experienced builder, my only suggestion at this point is to take your time and read the instructions carefully. More build pics tomorrow


That being said goodnight and happy building


David (Sneaker)

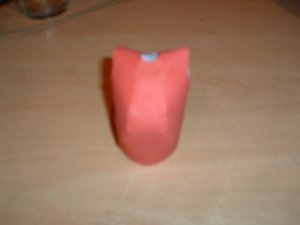
p.s. sorry about pic 2 it is kinda fat, I wanted to make sure I had a clear/crisp pic :cry:
 

Attachments

  • pic1.JPG
    pic1.JPG
    103.6 KB · Views: 195
  • pic2.JPG
    pic2.JPG
    831.7 KB · Views: 192

BazookaJo

Member
Apr 2, 2006
317
24
16
UK
www.bazookajo.me.uk
sneaker said:
Is this what you meant about the placement of the reinforcers?
Exactly:grin:

sneaker said:
The shoes are not glued to the legs/skirt, the gloves are not glued to arms. the arms are not glued to the torso. The torso is not glued to the skirt. The helmet is not glued to the face you get the idea...

How have you got the skirt to stick to the legs and torso without glue - Does the angle of the skirt/torso match the profile photo I posted some posts back?

sneaker said:
I am getting near the end of this build, and I think I can safely say, if I am able to do it, it will be no problem for anyone else. Especially the seasoned builders.

Yeah but I reckon you must be a natural Sneaker:)
 
P

paulhbell

torso/body

Finished the torso/body and tried a dry fit to see what i looks like. I used a bit off sticky tape to keep the legs, skirt and torso together. Looks good. But i have looked back at the photos i have posted during the build, I am sorry the photos are out of focus, even the full ones that i have just posted. I will try and sort the camera by the next post tonignt.
 

Attachments

  • DSCF0085.JPG
    DSCF0085.JPG
    120.1 KB · Views: 157
  • DSCF0086.JPG
    DSCF0086.JPG
    121.1 KB · Views: 127
  • DSCF0087.JPG
    DSCF0087.JPG
    117 KB · Views: 160

sneaker

Member
Sep 23, 2006
50
0
16
Chandler, Arizona
BazookaJo said:
How have you got the skirt to stick to the legs and torso without glue - Does the angle of the skirt/torso match the profile photo I posted some posts back?

Ok! I understand why you ask that. The angle is there, but since the legs are not glued into place The skirt legs tended to be set back a little. I did not think about that at the time of my post (was real Late at night/early in the morning for me) I can set the legs proper, and it will still sit. It sits a lot better with the head/helmet in place, (as opposed to just the torso) as it acts as a counter balance. During the course of the building process I would dry fit the parts to see how they worked together. A normal part of the process when building anything. But i started to notice how well it balanced without the help of glue. the only time it did not sit steady, is when I was test fitting the neck, and I positioned the torso/neck/head assembly upon the skirt without the helmet, as you guessed..it fell forward. My point was this. I had botched some cuts, and some scores...quite a few actually. And still Marvin stands. So one of two things is happening. Either I got extremlely lucky with this build thus far, or you designed a cardmodel that is well balanced in all aspects. I believe it to be the latter........:)
 

BazookaJo

Member
Apr 2, 2006
317
24
16
UK
www.bazookajo.me.uk
:)
sneaker said:
Ok! I understand why you ask that. The angle is there, but since the legs are not glued into place The skirt legs tended to be set back a little. I did not think about that at the time of my post (was real Late at night/early in the morning for me) I can set the legs proper, and it will still sit. It sits a lot better with the head/helmet in place, (as opposed to just the torso) as it acts as a counter balance. During the course of the building process I would dry fit the parts to see how they worked together. A normal part of the process when building anything. But i started to notice how well it balanced without the help of glue. the only time it did not sit steady, is when I was test fitting the neck, and I positioned the torso/neck/head assembly upon the skirt without the helmet, as you guessed..it fell forward. My point was this. I had botched some cuts, and some scores...quite a few actually. And still Marvin stands. So one of two things is happening. Either I got extremlely lucky with this build thus far, or you designed a cardmodel that is well balanced in all aspects. I believe it to be the latter........:)

Finding it a little hard to grasp exactly what's going on, but if your happy it's matching the pics I won't worry about it:)

I would mention one thing though, from your pic you have the hand almost grasping the chin, whereas it was desgned so that the thumb was touching the chin, and the finger was stuck to the front of the left cheek plate (I think there is a front shot further back in this thread).

But hey, if you like it better the other way, that's cool too:grin:

Regards

Paul.
 

sneaker

Member
Sep 23, 2006
50
0
16
Chandler, Arizona
BazookaJo said:
:)

Finding it a little hard to grasp exactly what's going on, but if your happy it's matching the pics I won't worry about it:)

I would mention one thing though, from your pic you have the hand almost grasping the chin, whereas it was desgned so that the thumb was touching the chin, and the finger was stuck to the front of the left cheek plate (I think there is a front shot further back in this thread).

LOL :)

Ok simply put since, he is not glued in, he is tilted a little back, so it looks as if his skirt :)oops: ) is tilted up. Same with the hand, not glued, just a quick pose for a quick pic. I intend to pose him as designed. As far as anything else I said I was trying to make a point in regards to the design, and how well it fits together. That is all. I do tend to babble, so I apologize for the confusion..............:eek:ops:


David
 

BazookaJo

Member
Apr 2, 2006
317
24
16
UK
www.bazookajo.me.uk
sneaker said:
LOL :)
Ok simply put since, he is not glued in, he is tilted a little back, so it looks as if his skirt :)oops: ) is tilted up.
David

:grin: I think someone on this thread referred to it as a kilt - I may change my instructions to refer to it as such...
 
P

paulhbell

hands and helmet

Ok. the hands are finished and I have started on the helmet. I may rebuild the left cheek plate as i am not happy with it. This is my fault as I wanted to finish the helmet tonight and I was rushing the build. I would recommend not rushing this build. I am not building anymore tonight as it is nearly 11pm and I am letting my brains have a rest.
 

Attachments

  • DSCF0088.JPG
    DSCF0088.JPG
    111 KB · Views: 162
  • DSCF0089.JPG
    DSCF0089.JPG
    113.9 KB · Views: 174

sneaker

Member
Sep 23, 2006
50
0
16
Chandler, Arizona
uh oh!


I might have a problem!

I was about to finish Marvin with the brush, when I noticed a potential problem, BazookaJo Do the holes on the brush and brush base line up? Or are they intended to be off center to achieve part of the pose. The hole on the brush is center, how I expected to be after looking at the pic in the instruction, the holes on the base however seem to be misaligned. Did I miss something? The support rod should pass through straight should'nt it? I do not have my cam to take pics with, but if you look at the pdf file you might be able to tell what I am talking about, unless like I said I am missing something. Should the brush be centered on the base?

Sneaker
 

BazookaJo

Member
Apr 2, 2006
317
24
16
UK
www.bazookajo.me.uk
B-Manic said:
I think Marvin would prefer that to calling it a Tutu:grin:

That's what it is!!!!:grin:

B-Manic said:
Duck Dodgers in the 24½th Century

The complete original cartoon

http://video.yahoo.com/video/play?p=...y&ei=UTF-8

Nice link by the way - if anyone hasn't seen it I highly recommend it...


Sneaker said:
The hole on the brush is center, how I expected to be after looking at the pic in the instruction, the holes on the base however seem to be misaligned. Did I miss something? The support rod should pass through straight should'nt it? I do not have my cam to take pics with, but if you look at the pdf file you might be able to tell what I am talking about, unless like I said I am missing something. Should the brush be centered on the base?

Nice one Sneaker - Guess I must have done some last minute shuffling of the parts and not had those bits grouped.

Revised page attached:) :
 

Attachments

  • MarvFix1.pdf
    108.1 KB · Views: 130