

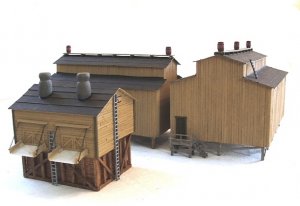
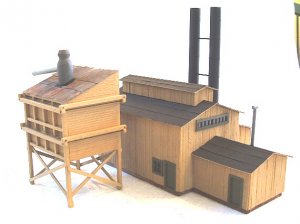
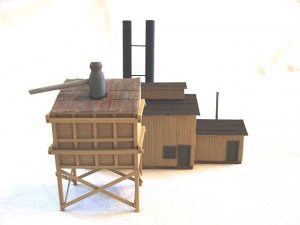
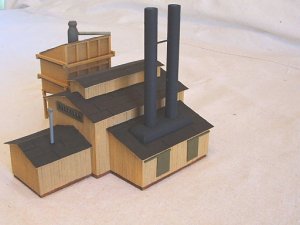
Welcome to one of my most recent endeavors.I am new to this forum & have been enjoying it. I'm sorry for not having any raw pics. I started this project back in the summer & have been really busy this winter working on it because of business being slow.Recently having 10" of snow outside, don't have to work, bills paid, plenty of coffee, & trains now how much better can it get! Most buildings are started from poster board & are entirely scratch built from poplar & cedar. I still have a lot of work to do. My next step is to assemble these buildings & get an idea of the ground levels so I can start on the pond area.I basically took some ideas of several Mills I liked & here it is. Hope you enjoy!
Maple Valley Logging & Millwork
- Thread starter Sawdust
- Start date
You are using an out of date browser. It may not display this or other websites correctly.
You should upgrade or use an alternative browser.
You should upgrade or use an alternative browser.
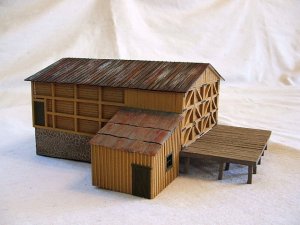

Does that mean cardboard structures covered in wood siding?Most buildings are started from poster board & are entirely scratch built from poplar & cedar.
I find my eye drawn to the doors with heavy diagonal bracing, and the... uh... drawbridges on the... uh...
I can tell it's good, but I'm not familiar with what a real industrial structure of this era looked like.
Hey Triplex thanks for responding. The main structure of most buildings are the foam board that you can get from most craft stores. I cut the sides of the buildings out of this & cover the walls with individual scaled boards with Titebond II wood glue. I then cut my windows & door openings out cutting through the entire wall. Most of my doors & windows are scratch built as well. I aquired a lot of windows very cheap from a local swap meet in my home town. Most of these windows are commercial but I cut the panes out & scratch build the frames & trim according to my needs. The open structure is part of a tram that will have a track with wagons to move rough sawn lumber to the Planing Sheds & Drying Kiln. There will also be other tram areas that will connect to all this. Any other ? feel free to contact. Thanks
Those are truly beautiful. You are very talented. Just be careful round here ... someone will tell you that you have to grow your own timber to call it 100% scratchbuilt. Not Me - No Way Ho'se.
1000 Kudos from me. Keep up the good work.:thumb:
What's the "tin roofing" from????
1000 Kudos from me. Keep up the good work.:thumb:
What's the "tin roofing" from????
Thanks Silfoldalot for the comments. The tin roof material is heavey duty aluminum foil cut into scaled strips & pulled between two 5/16" fine threaded bolts. The trick to this for me is actually cutting the foil without tearing or peeling the edges. I believe a paper cutter would be good for a short while until the blades got dull. I do get some scrap but I get enough to do small roofs. I do have a jig in the making using two knurled wheels but haven't been able to get a machinist to turn the wheels for me because it would be such a small job for them versus setup time. I weather the metal roof tops with water based acrylics that you can get at craft stores. The colors I use for the first coat is Apple Barrel brand Pewter Grey. I then dry brush the roof with Americana brand Burnt Sienna for the rust effect. Thanks again !
Excelent work!
Excellent work on them buildings, hope to see pictures of them in place.
I love working with foam core, You can draw and cut it in no time, and have the shape of the building to put it in place on the layout, and see how it fits. If it's not just right, you can cut it down some, ore start over easily. when it is just right, I paint it flat black (so if any peeks through, it looks a shadow, and then I slap boards on them. I have even used balsa! the big sawmill in Crooked Creek on my DG, CC, & W RR is built this way. Has the look of a board by board masterpiece, and was thrown together in a couple weekends!
You use cedar and poplar, those woods are a joy to work with, fine even grain. what size tablesaws to you use. I have a 10 inch, and an ancient, and heavily modified dremil 4 inch tablesaw. I'd love to get a better small saw, but they are mighty pricey. Being able to cut your own scale lumber really speeds up the process of building with wood.
I love your buildings, can't wait to see them on a RR.
Bill Nelson
I too love the buildings!!! Like Bill I am a big user of foam core for modeling buildings. It is an excellent medium to work with. I really like your models, particularly what looks like to me to be a drying kiln.
Keep up the good work!!!!!
Doc Tom:thumb:
Keep up the good work!!!!!
Doc Tom:thumb:
Sawdust...Check this thread out....Post #25....
http://www.zealot.com/forum/showthread.php?t=164109&page=2
http://www.zealot.com/forum/showthread.php?t=164109&page=2
Thanks Bill & Tom for the reply.I will be setting all this project up as a completed section on 2" blue insulation foam board. I don't have my layout set up anymore due to planning on a larger one. I have an antique 10" Rockwell cast iron table saw I converted to a 5 1/2" using a thin kerf blade for a cordless saw. I fabricated a filler plate around the blade to keep the small pieces from falling thru. Along with some jigs to keep my fingers attached I have been able to do pretty good with this setup. Most of my modeling is rustic & weathered so that helps. I too would love to have the Micro Mark type saw but don't won't to pay more for a 4" saw than I did for the one I use everyday on my jobs.They are the best way to go though. I built a Master Bath for a guy a few years ago & he wanted all the scraps. He showed me his shop in the basement & I was shocked at what I saw. He cuts scaled lumber for ship builders all over the country. He uses the jewlers type tools but pays a fortune for them. I have enjoyed the work both of you guys are doing especially in the brass detailing. I have done a lot of soldering with copper, brass & galvanized metals related to my work but for some reason have never used it in my modeling. When I find a need for metal I use a lot of thin paper or styrene but will try some metal for sure.
Thanks Gus. I did check that jig out for making foil roofing. He is doing the same thing that I am but probably is getting more good pieces from his jig. I really want to get my roller type jig done because I really hate having more scrap than usable pieces. I am thinking about tapping sections of a whole roll of foil to keep it wound tight & cutting sections on a miter saw with a fine blade. I will let everyone know how that works. Thanks again.
something missing.
Jim,
There was something that bugged me about your main sawmill building, but I couldn't put my finger on it.
I rerurned to it several times, without figuring it out. and I finally figured out, there isn't a hole A the top of the Jackslip for the log to go into the building.
did you plan it that way? that is a problematic spot for all saw mills that don't have interior detailing, and an especial problem for ones like ours which have foamcore walls. I framed the hole on mine with lumber, before I planked the outside, so the foam doesn't show, but the wall is thicker than it should be. I have a set of Keystone locomotive works sawmill machinery for mine, but that opens up a whole nother can of worms.
Your sawmill looks to my eye like one that was based on an actual prototype. Mine is a hodgepodge, I drew sketches of photos of mills I thought were interesting, and tried to encorporate elements of several into something that fit my space, which wasn't quite as wide as I needed. Much later as I was trying to plan fit of the bandsaw I realized I had incorporated features of single band saw mills, and double band saw mills, so my mill has a split personality. That , and the fact that I didn't design in a saw filer's loft drive me crazy.
I think I'm going to set mine up as a single band saw mill, and once I know where the bandsaw is going, I might study my roof, and see if I could git a loft up there. the loft would be a cool feature, as the roof would be mostly skylights, so interior detailing would show well. fortunately my sawmill is removeable, so it can make the trip to the workbench with only a half hour needed to remove or reinstall it.
Glad to hear you are getting ready to plant the buildings, they look good, and ought to make an awsome scene.
Bill Nelson
Thanks Bill.
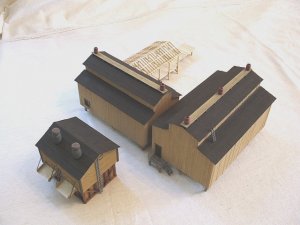
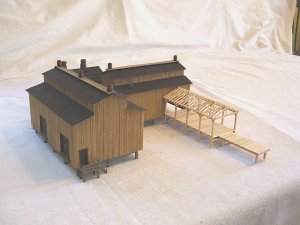
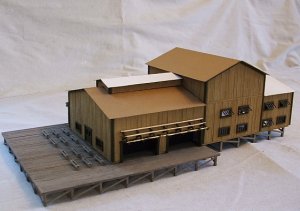
Yes there will be an opening. I find it easier to plank over the whole wall then make cutouts through the planks & foam core wall material at the same time with a dremel. I will then frame & trim this opening. It also has a small entry with a roof as the logs go into the opening. I will build a blacked out back drop with some details as for some other openings as well. My whole design is from several different mills. Some were expanded & some had been reconstructed due to fires. The framed roof over the tram that enters into the small planning mill was part of a reconstructed fire area. I thought about leaving this exposed with some new roof panels applied by a construction crew, old truck with materials, fat boss man sitting on the dock etc. to give the effect this was being newly rebuilt.I am also trying to decide to have camp cars built on rail cars or skidders. I am leaning more on the skidder type placed behind the back, kind of nestled at the edge of some woods.Thanks a lot to you & others for their comments. I am having a lot of fun on this forum.
Yes there will be an opening. I find it easier to plank over the whole wall then make cutouts through the planks & foam core wall material at the same time with a dremel. I will then frame & trim this opening. It also has a small entry with a roof as the logs go into the opening. I will build a blacked out back drop with some details as for some other openings as well. My whole design is from several different mills. Some were expanded & some had been reconstructed due to fires. The framed roof over the tram that enters into the small planning mill was part of a reconstructed fire area. I thought about leaving this exposed with some new roof panels applied by a construction crew, old truck with materials, fat boss man sitting on the dock etc. to give the effect this was being newly rebuilt.I am also trying to decide to have camp cars built on rail cars or skidders. I am leaning more on the skidder type placed behind the back, kind of nestled at the edge of some woods.Thanks a lot to you & others for their comments. I am having a lot of fun on this forum.
Interesting!
That's interesting! I do it exactly the opposite way. I make the openings first, and frame them, and then I add the exterior planks across the whole wall, and then open the holes.
Of course you use real wood, I use balsa wood as often as not, and then spray paint it tan. then grey, and then whatever color I'm trying to simulate paint ( white on my sawmill). I take an emory board, and trim it so it;s the same size as the boards. I sand each board seprately using varying pressure, so that more or less white is removed exposing varying amounts of grey and tan. giving the impression of individually done boards, in a quick and dirty process.
Bill Nelson
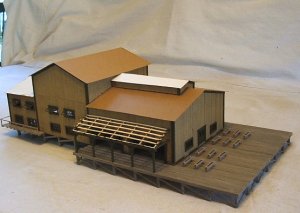
close up of B.S. Mill planking
Since we had been discussing varying techniques I am posting a close up of the Big mill over on my thread
Eastern Tn logging on the DG CC & W RR 1928
Note the mills foundation, which was built with the mill, but as a separate piece , and is fastened to the ground permanently, helping the mill to look solidly attached to the ground. the loading dock and the Jack slip, are also permanantly fastened to the ground, and between them firmly locate the nill building, which has to go straight rearward to be removed. the planing mill and the elevated walkway have to be removed first, ot there is no room to move the mill back far enough to get the mill off the jack slip.
Can't wait to see your fine buildings in place.
Bill Nelson
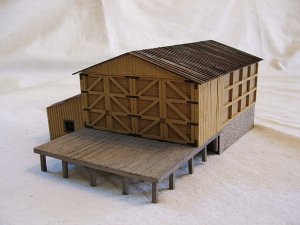
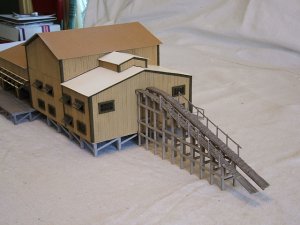
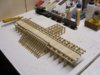
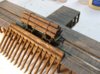
Log Dump Platform for MVL&M
Thanks everybody for the replies. I have posted some pics of my Log Dump platform. I built this with scaled cut lumber from Poplar. I had somewhat of a plan but altered as I went. I hand cut 561 pieces that went into this little project. This will sit next to the pond area near the main Mill building. I welcome any comments or suggestions. Thanks once again for viewing.
Thanks everybody for the replies. I have posted some pics of my Log Dump platform. I built this with scaled cut lumber from Poplar. I had somewhat of a plan but altered as I went. I hand cut 561 pieces that went into this little project. This will sit next to the pond area near the main Mill building. I welcome any comments or suggestions. Thanks once again for viewing.
Attachments
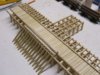

Very nice looking dump platform and rollaway. I love poplar, it's hard enough to keep it's shape well, while still being easy to work with, has nice grain, not too pronouced for HO, and it stains up so well. Looks rally good. You must be very neat with the glue to work with the unstained stock, and then finnish the whole thing. I usually stain or paint all my boards before assembly. assemble them, and then touch up the un painted or stained ends where the wood was cut. I do that to avoid having a spot of unstained woos where the glue ooze won't let the wood obsorb the stain.
I don't see any evedence of that, so you must work very neatly with the glue.
once again excellent work, I can't wait to see this stuff get planted, How much room do you have for the saw mill complex.
Bill Nelson- getting ready to sprout a logg camp @ Ridgemont Tn
I don't see any evedence of that, so you must work very neatly with the glue.
once again excellent work, I can't wait to see this stuff get planted, How much room do you have for the saw mill complex.
Bill Nelson- getting ready to sprout a logg camp @ Ridgemont Tn
Thanks Bill for the comments.I found from experience not to wipe the glue when wet. I wait till the oozzies get rubbery or semi hard then cut them out as a piece of glue rather than spread it around when wet. No matter how much I wipe glue some will still manage to get into the grain & show up when stained. Can't wait to see your next project. My next encounter for my Mill is camp cars. I'm leaning more on the type that are built on skidders rather than the ones built on rail cars. I have about a 5' x 12' area I want to keep as a mill area. I would like to border the mill at the back with these camp cars next to woods & hills. I also have to build at least three water towers. I have built a few in the past from scribed balsa wood wrapped around a piece of plastic tube. Keep us posted Bill. Again I welcome any comments. Hey tell your friend Doc G we miss him over here.
561 pieces...???!!! I'd loose my hold on reality if I were to do that....
I love the different shades of staining on that planking...and the whole structure is just AWESOME....
A #1....:thumb:
I love the different shades of staining on that planking...and the whole structure is just AWESOME....
A #1....:thumb: