Latest Weathering Attempt for Critique Please
- Thread starter Herc Driver
- Start date
You are using an out of date browser. It may not display this or other websites correctly.
You should upgrade or use an alternative browser.
You should upgrade or use an alternative browser.
Herc...
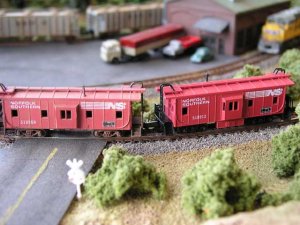
Good stuff... That first caboose looks perfect - like it has been out working, but is well cared for. The trucks are great! I like having the second "new" one for comparison too.
Andrew
Good stuff... That first caboose looks perfect - like it has been out working, but is well cared for. The trucks are great! I like having the second "new" one for comparison too.
Andrew
Herc Driver said:Now, after they're done...do they get dull coat sprayed on to "lock" in the chalks?
In the DVD i got on weathering techniques, it did say to spray dull coat over the entire car to seal the chalks, but only if you are completly satisfyed with the results which in my opinion look GREAT:thumb: :thumb:
They look great Herc!!:thumb: :thumb:
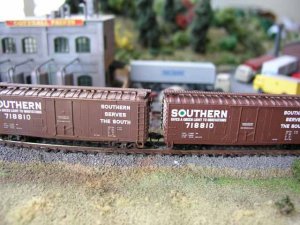
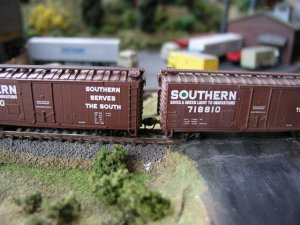
You can really see the diff. between those 2 boxcars now!! Great Job.
You can really see the diff. between those 2 boxcars now!! Great Job.
May I suggest that your work is a good start?
As Dr Wayne says thinning the paint more will give a thinner wash.
Someone else has suggested rust. There are loads of ways of doing rust and every degree of it from the delicate wash out of iron oxide from behind bubbled paint to wondering how much real metal is left and "aeration".
Okay; the things that Ii would like to suggest are highlighting specific features and "scuff" areas.
I tend to give my (H0) cars a highlight of a grey on things like the working sides of door tracks (underside for top track, top for bottom track with grease spill on the face). Door fittings get messy too... all those projecting bits get dust mixed in with any lubricant from the lock(s) and rod guides. Part of the trick is to only highlight with a very little and very faint colour. You want to highlight the feature not put it centre stage (if that makes sense).
Okay... then there's scuff areas... Anywhere people grab on or tread regularly is either going to get worn or dirtied. this applies particularly to door handles and locks, all ladders and stirrups and the brake gear. if you are lucky enough to have stock with cut levers these will also get messed up.
I always try to put whatever weathering there is on the main body equally in back of the ladders and steps. This can be really difficult; especially with solid cast steps rather than clear bar steps. I've settled for the idea that so long as I don't get a huge dollop of weathering on the solid step a dusting is okay... because if one could look through the real open step one would see the spattering on the car side behind and below it. I often tend to use a darker grey where the bar step would be right at the front of the moulded step. This makes the "bar" more pronounced and helps suggest that anything else is "behind/below" it.
Anything to do with the draw gear I always reckon should be messy... there's grease and dust down there... except on a car fresh out of the shops... when the grease is black (if it's the old disgusting graffite grease)... or whatever shade from yellow to dark brown they happen to be using now.
I would also reckon that the grab bars at the head of ladders/beginning of roofwalks should be fairly well used/worn but I haven't made my mind up on whether to do anything to colour the roofwalks... for me (modeeling the 80s) this usually means the grid walks on covered hoppers. One thing I've tried is using an absolute minimum of paint to just cacth the very tops of the grid while getting nothing into the "holes". It's my own work and I haven't got to run it so much in trains so i'm not sure how good this looks.
Hope that this helps.
 ops: Hey Dr Wayne... remember I'm English. We embarrass easily!
 Don't yet know if I can edit a post here...
As soon as I finished the last one I remembered two things...
1. When weathering hoppers and covered hoppers I take the weathering around and inside the ends and double it up... because no one except brake fitters ever goes in there. It gets real messy. The brake cylinder, air reservoir and so on can be pretty yeuked up... especially on the harder to reach sides. then again... an occasional bright shiny new one indicates maintenance has been done.
Which leads to...
2. All weathering shows the history of the car. So I try to work out something of what it has been used for and where. the only really non-obvious things I can say about this is that some cars that will have run together for some time I will try to weather together... the simplest idea is a fine coat of "dust" for a grain train that's just made a long haul... I have a string of the Accurail 3 bays in ATSF that have to have this treatment.
trouble is that I can never recall exactly what I did to get an effect so any "train" weathering I do i have to do at one hit.
Thanks for the welcome. (I've got jammed out of the MRR forum yet again :curse: will try this one for a bit).
Found the "edit" key! :thumb:
Dave-the-Train said:Don't yet know if I can edit a post here...
 Hi Dave and welcome to the Gauge, I think that you will enjoy it here. Now to answer your question, Yes you can edit your post, simply click the edit button at the bottom of your post. If you want to add smilies or pictures, click the "go advanced" button after you have clicked the edit button. I hope that helps.:thumb:
Dave, I think you'll enjoy this site, especially once you know your way around. With the Forums separated by category, it's much easier to find topics in which you're interested, and the little preview that you get when the cursor is placed on the thread title further helps to let you know if the topic is of interest. It's also much easier to post and view photographs here. The best part, however, is the people: our range of skills is wide, and the friendly attitude is widespread. And we try to ensure that model railroading remains fun, so you'll not often see those confrontational exchanges that can occur elsewhere.
Wayne
Wayne
Actually Dave...yes we will!!! I very much appreciate the informationa and will incorporate the ideas into the weathering.
It's tougher to get good weathering ideas when you (1) don't really live anywhere close to a rail yard or mainline where cars transit and (2) the photographic searches sometimes yield completely different weathering versions of the same car. So I pretty much make up my mind what I'd like to see on the car and try it out. Mostly, what weathering has taught me is more attention to detail on the engines and rolling stock. Getting it to look right on Nscale is the challange. :thumb:
It's tougher to get good weathering ideas when you (1) don't really live anywhere close to a rail yard or mainline where cars transit and (2) the photographic searches sometimes yield completely different weathering versions of the same car. So I pretty much make up my mind what I'd like to see on the car and try it out. Mostly, what weathering has taught me is more attention to detail on the engines and rolling stock. Getting it to look right on Nscale is the challange. :thumb:
Okay...here's a starter that I just had put concisely by the military modellers.
When painting figures do not paint any face details... just use a dark wash and wipe most of it off leaving tiny amounts in the "crevices". When dry and seen at normal distance this will leave enough impression to suggest the details of a face.
The big thing (in my opinion) is to teach one's self to notice the everyday things that we "don't see".
When we look at a freight car we may see the graffitti or the big blobs of rust but what we need to pay attention to is the overall very faint coating of dust that breaks up the clean new paint. From there we need to look at where the dust gets washed off and/or gets to remain in corners.
When we look at most photos we are looking at colours that the processing sytem averages out to give a generally good image. This does not show the subtle variations that are created on a painted surface by the build up, wash off, build up etc of dust.
Try this... What colour did you paint your house? Okay, go outside and check what colour it is at 50 yards, then 10 feet, then close up... then wipe a vertical and a flat surface. Unless you live way out in the mountains you will almost certainly remove at least a fine smear of atmospheric pollution... which is at least partly just normal wind blown dust.
Again... you don't actually model/paint this... it's just an effect that we try to create in any scale.
Paint and colour are not scale specific. Similarly the refraction and reflection of light are not scale specific.
Hope that this helps
Good points...Thank you!
I've found that I'm still learning the techniques with paints, and for now, have better success with chalks.
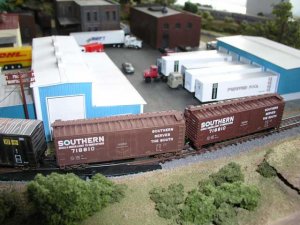
I've found my best colors to weather rolling stock are yellow and white. I know that might sound crazy, but it seems like each color looks quite a bit different than what you'd expect depending on the base color of the car you're weathering. Yellow and white seem to look great on just about everything. They dull down boxcar roofs, make rust on black things look well rusty'r, highlights things well, brushed on the tops of trees it lightens the green and adds some variation to the foilage. I like a rust color for the couplers and wheel trucks, browns on anywhere someone's hand or foot would traverse, and every rooftop get some white/yellow to sunbleach. Also, the white makes any boxcar's white lettering look older and weathered. I am still very much learning the art of weathering as well as the science behind it. Here's some of the pics of three identical cars, one weathered - one with no weathering - one lightly weathered. White, yellow, rust, brown, black were the only colors used and blended together.
(Two of them will get renumbered soon.)
I've found that I'm still learning the techniques with paints, and for now, have better success with chalks.
I've found my best colors to weather rolling stock are yellow and white. I know that might sound crazy, but it seems like each color looks quite a bit different than what you'd expect depending on the base color of the car you're weathering. Yellow and white seem to look great on just about everything. They dull down boxcar roofs, make rust on black things look well rusty'r, highlights things well, brushed on the tops of trees it lightens the green and adds some variation to the foilage. I like a rust color for the couplers and wheel trucks, browns on anywhere someone's hand or foot would traverse, and every rooftop get some white/yellow to sunbleach. Also, the white makes any boxcar's white lettering look older and weathered. I am still very much learning the art of weathering as well as the science behind it. Here's some of the pics of three identical cars, one weathered - one with no weathering - one lightly weathered. White, yellow, rust, brown, black were the only colors used and blended together.
(Two of them will get renumbered soon.)