Latest Projects: A Boxcar & Two Gondolas

doctorwayne

Active Member
Sep 6, 2005
3,516
0
36
Canada, eh?
Thanks for the compliment, farnham. I don't think that railroads did specific cleaning of freight car exteriors, partly because of the cost involved, and partly because many freight cars spend a lot of time off-line: that is, in service on another railroad. Even a car damage in service on a line other than the owner's is repaired by the road on whose line the damage occurred, with an appropriate bill sent to the owning road. Paint would be touched-up as required, usually with paint that is close in colour to the original, unless, of course, the car is not a common colour. That's one reason why we used to see a lot of black or boxcar red patch areas on those jade green cars of the Penn Central. In any case, the owning road, or at least the people on that road who would be responsible for doing cleaning or repainting, probably wouldn't see these cars unless they were brought in to have some specific work done on them, and even then, the work to be done would more likely to be of a mechanical nature, intended to keep the car in service.
Another good way to show age and use on a freight car is to add either reweigh or repack data, even on cars that you've had in service on your layout for years. Champ makes sets to do cars from all over North America. Simply select the data that you wish to use, paint a suitably-sized patch of paint in an appropriate spot on the car side, and apply the lettering. You can use a colour similar to the colour of the car, but cleaner of course, or a contrasting colour, as I did on this gondola, for repack data.

100_5412.jpg


You can also get this effect on a new car by masking off a suitable area before weathering, then removing the masking and applying the data on the "clean" patch.
And finally: the Niagara Peninsula is the area of southern Ontario across from what Americans call the Niagara Frontier. It's the area of Ontario that lies between Lake Erie and Lake Ontario.

Wayne
 

farnham

New Member
Mar 4, 2006
18
0
1
84
BROOKLYN NY
Ties and gravel.

Doctor Wayne could you tell me what kinds of ties/ gravel/ grass were used in that inspiring scene or anything else you would care to say about it? That is the scene with the gondola where you are explaining repack and reweigh data. Ties 8' or 8'6"? 4" or 7" thick? Individual ties or flex track or what? Also, how did you achieve the low but still raised effect of the ballast?

BTW, you gave me a fair idea of what reweigh data are, but how is that different from repack data? .....
wave.gif


aged but mystical farnham
 

doctorwayne

Active Member
Sep 6, 2005
3,516
0
36
Canada, eh?
Farnham, the track in the scene with the gondola is Atlas Code 83 flextrack, laid directly on plywood. The ballast/ground cover is all by Woodland Scenics. The near track is a siding, and is ballasted with a mixture of fine cinders, earth, and foliage, along with some coarser foliage. The next two tracks are meant to represent mainline tracks running through a yard area: the track itself is ballasted with fine ballast, with fine cinders along the outer edges representing underfill. I added some foliage along the edges of the cinders with varying amounts "creeping" into the edges. The two farthest tracks are industrial sidings, again code 83 flex directly on the plywood. Ballast is a mixture of earth and cinders, with quite a fair amount of foliage included. All of the rail has been painted with Polly Scale paints, usually some kind of brown, applied with a brush. If you want to see how I treat track that is actually raised from the surrounding scenery, you can check out my entry in the March Photo Contest, or go back through some of my threads in the Photography Forum: There are quite a few, with the most distant being on Page 10. You'll also see a lot of nice work by other members of the Gauge.
Repack data is again to denote work done to a car, in this case, repacking of the axle bearings. I believe that this was a scheduled maintenance task that was required at predetermined times: perhaps another Member can elaborate on this. The journal boxes on cars with solid (brass) bearings were packed with oil-soaked cotton waste, which periodically required either fresh oil or waste material. When this occurred, the car would be stencilled with a station symbol (a combination of letters denoting a specific railroad's shop where the work was done), along with the date that the work was done. If this occurred while the car was off-line (not on its home road), the line performing the work would send a bill to the line owning the car. Cars equipped with roller bearings (they first appeared in the '20s I believe, although they weren't common until well into the '60s) do not require this kind of service. On newer cars, reweigh and maintenance information is contained on the "COTS" label (I can't remember what that stands for, although they were generally known as consolidated stencils). That's the black box with the white lettering and outline, usually seen on the car side, towards the right end of the car.
I hope this information is of some assistance.

Wayne
 

farnham

New Member
Mar 4, 2006
18
0
1
84
BROOKLYN NY
Again, very very encouraging Dr. Wayne! Just a few follow-ups if I may:

I assume after the rails and ties are painted the paint has to be removed from the tops-- and sides?-- of the rails?

Is the reweigh/ repack data on one side of the car or both sides?

Getting back to yr painting, how would a black car be weathered? Would the wash still be the same? Is the blue radiator fluid essential? I almost got some at an auto parts store today. There is a Life-Like Erie RR black gondola kit in front of me. Would the handgrabs, brake gear, etc. be weathered/ painted before assembly? --oops, this question should be for Tom! Best wishes,

still farnham . . . :thumb:
 

TomPM

Another Fried Egg Fan
Oct 15, 2002
3,335
0
36
61
Drexel Hill, PA
www.trainweb.org
If Wayne feels like answering your question farnham then by all means he should. My weathering technique is not an exclusive property. It has come about by looking at many other people’s weathering styles and methods. I have borrowed many methods and use them as I need to in different situations. That is the great thing about having a forum like this where we can exchange these ideas and methods.

Now back to your Erie gondola are you talking about something like this?
aak.jpg


All weathering was done after I applied (and broke a few) details. The heavier weathering is designed to hide the broken items.

BTW
Does your handle have anything to do with Farnhamville?
abq.jpg
 

doctorwayne

Active Member
Sep 6, 2005
3,516
0
36
Canada, eh?
The repack/reweigh info goes on both sides of the car.
The rail is all that I usually paint; both sides of both rails, and I try to keep it off the rail top and off the ties. By the time you work the paint around the moulded spike heads though, you're bound to get some paint on the ties. It's not really noticeable after the track is ballasted, although if you use track with black ties, the brown might show up more. I have some track where I went back after painting the sides of the rail brown, and painted the spike heads and tie plates with a rust colour. I think that it looks good, but it's not really noticeable when this step is absent. As I said, I use Polly Scale water-based paints for this job, applied with a brush. I usually paint about 10' or 12' of track, then wipe the top of the rail with a rag stretched over my finger. While the paint by this time is dry to the touch, it's not hardened, so it comes off easily. I try to maintain pressure on the finger so that excess rag (and finger) rolls to the centre of the track, thereby wiping some of the paint from the part of the rail normally contacted by the wheel flanges. Any that you miss will be worn away by passing trains. Switches (turnouts) take a little longer to paint, but the procedure is the same, making sure that you don't lock the points in place with too much paint. Some modellers like to paint the rail using an airbrush, but I don't like using this kind of paint for airbrushing when I want some control over the spray. That may be because I learned my airbrushing techniques using lacquer-based paints, which are not really a good choice if you're working in a room with little or no external ventilation. My other reason for brush painting is to avoid creating excess dust in the layout room, as it's pretty tough to avoid some overspray. I try to leave the painted rails for a couple of days, so that the paint can harden, before running trains.
For weathering a black car, the best place to start is by not painting the car black in the first place. Add some white or light grey paint to the black: this will make the paint look faded, so vary the mix depending on how old you want the car to look. If you're weathering a pre-painted and lettered car, the procedure is the same no matter what colour the car is, with some exceptions. Most prototype cars are subject to the same dirty environment, so a lightened black or dark grey wash is a good starting point. If you use water-based paints, thin with alcohol (washer fluid I would guess falls in this category) or use water with a couple drops of liquid dish detergent added. The most important thing to remember with washes, or any weathering, for that matter, is to apply light coats. If you want heavier weathering, apply more light coats. It's usually wisest to stop before you think you've got enough weathering. It's easy to add more, but very difficult to undo without making a real mess. You can use other colours for washes, depending on the usual area where a car would operate or on the commodity carried. Prototype photos are the best source of ideas and examples. I often combine washes with airbrushed weathering, usually applying the washes first, then using the airbrush to soften the effect. If you use an airbrush for weathering, simple masking devices can allow you to achieve lots of realistic results. As with water-based paints, lacquer-based paints used for weathering should be mostly thinner (90% thinner is a good starting point) but this type of paint is very tricky to use as a wash, as it will attack most model paints. A very simple way to "tone down" a new car's paint job is to give the car a very light spray with a very thinned-down version of the car's body colour. This cuts down the contrast between the lettering and the background colour.
As for weathering before or after assembly, either way has its benefits and drawbacks. I prefer to build first, keeping in mind that details like grabirons can prevent sprayed weathering from reaching some areas around them when sprayed from only one direction. The same grabirons can cause washes to "pool" around them, causing unrealistic blotches if not caught in time. Each weathering technique has its own strengths: the more that you can master, the more able you'll be able to choose the best for each particular situation.
This Athearn car was done with washes of Polly S (no longer made) water-based paint, about 30 years ago. A couple of years ago, I updated the car (actually about 20 of them) with metal steps and grabirons, thinned roofwalks and new doors. I tried to paint the new parts of the car the same colour as the weathered older parts, then blended the results with a very light overspray of the same colour.

100_5404.jpg


This yellow Accurail boxcar, meant to represent a fairly recent paint job, was done entirely with an airbrush. The covered hopper behind it, a Sylvan kit, was painted with Floquil lacquer-based paints, then weathered with heavy washes of Polly Scale water-based paint, and then over sprayed with heavily thinned Floquil. And it's not my example of weathering run amok: the car was weathered using a photo as a reference, and is very true to the prototype, which was used in phosphate service.

100_5476.jpg


After you've read all of the advice, from all of the "experts", the best way to learn this is by doing. Start with a couple of cheap cars, used stuff is good, and try the techniques, not only to test the results, but also to develop your own way of using the resources.

Wayne
 

farnham

New Member
Mar 4, 2006
18
0
1
84
BROOKLYN NY
"After you've read all of the advice, from all of the "experts", the best way to learn this is by doing. Start with a couple of cheap cars, used stuff is good, and try the techniques, not only to test the results, but also to develop your own way of using the resources.

"Wayne"

Thanks again and sorry I had, and still have, too much personal business to be on until now.

I'm more interested in following one thread than reading "all the advice." So I'd like to ask whether you can suggest a brand or brands of acrylic paint to use, since Polly Scale or Polly-S is no longer made? Also, I was interested to hear that water-based paints can be thinned with alcohol-- but after all why not? Also, if I use antifreeze fluid, does it have toxic substances that, say, rubbing alcohol wouldn't have?

BTW-- I love your photos and the others that have been posted. Started an exact 3/8 inch scale drawing of my hallway but didn't finish it yet, it is only about 40' 1" and not the 50' I first thought. I did notice that the bathroom (south) door opens out while the bedroom (north) door opens in, so that won't matter too much.

BTW-- Do you know off-hand the minimum distance between tracks both horizontal and vertical for HO? Also, when laying tracks do the gauges work on curves or does some adjustment have to be made?

As always, . . . :wave:

farnham
 

doctorwayne

Active Member
Sep 6, 2005
3,516
0
36
Canada, eh?
Polly S paint is no longer made: it was replaced by Polly Scale paint, which is still readily available. As for the washer fluid, there must be something else in it besides alcohol: perhaps some kind of detergent, some colouring and, in some, fragrance. For making washes, two or three drops of liquid dish detergent is probably the cheapest way to go, and works just as well.
There are published standards for distances between tracks, although I don't have them at hand. In my staging yard, where I use an 0-5-0 switcher to remove or replace cars, the tracks are about 3" o.c., whereas on my mainline, passing sidings are placed 2 1/2" o.c. from the main. If you're running long cars, it's a good idea to increase the spacing on curves: the tighter the radius, the more space required between tracks. My passing tracks mentioned above are about 2 7/8" o.c. on curves of about 34" radius. This allows plenty of room to have 80' passenger cars pass on both tracks. In the photo below, the two mainlines in the centre of the picture are only 1 3/4" o.c., due to lack of space. (There's a turntable just out of view to the right, along with some loco service tracks, then the edge of the layout.)

100_5739.jpg


This puts passing trains very close together and makes manual rerailing difficult, although, luckily, I never have derailments.
icon12.gif
icon12.gif

I don't think that I used a predetermined standard to lay out the tracks, though: I simply put some trains in place and if it looked okay, that was it. I used passenger cars to determine the spacing on the curves. Most pre-fab track is a bit wide in gauge, so there's no need to compensate for curves, although you may need to if you're handlaying your track.
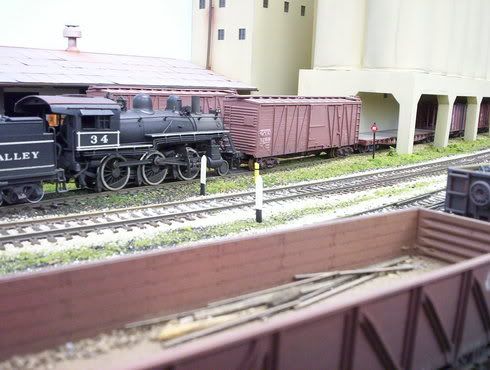
As for vertical separation, I started with my tallest piece of equipment as my standard: I believe that it was a wreck crane. All bridges, tunnels or overhead benchwork on the main line has to allow passage of that crane. In some places, the overhead clearance may be greater in order to comply with the track plan. Overhead, or sometimes side, clearance, or rather lack of such, can also add some operating possibilities. This loading area, intended for covered hoppers, is so low that many cars are too tall to enter, so flatcars or gondolas are used as idlers to reach in for cars spotted at the far end. That little sign with the "R" denotes a restriction listed in the rulebook, preventing many cars and all locomotives from passing this point.

100_5849.jpg


Similarily, I use these restriction signs to prevent the use of some equipment, mostly plows, spreaders, and weed sprayers, on certain tracks where obstacles, such as station platforms, present a side clearance problem.

Wayne