Landmaster; Damnation Alley

Status
Not open for further replies.

trt

Member
Jul 23, 2011
116
10
18
Durham, England
Happy new year to everyone balloon6(always wanted to use that one)

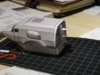
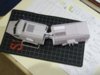
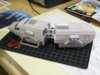
Sobered up enough to do some more building.
Hi Zathros all this will be covered up, so doesn't matter what it looks like, I just got a bit carried away.

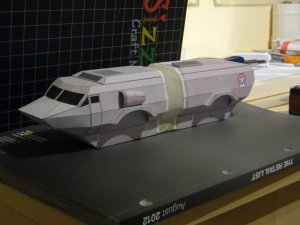
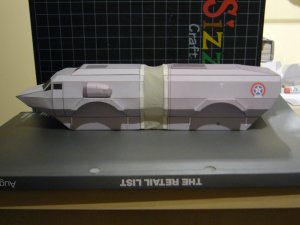
One thing's for sure, this will have a terrible turning circle.
 

Attachments

  • P1020241.jpg
    P1020241.jpg
    170 KB · Views: 46
  • P1020242.jpg
    P1020242.jpg
    181.2 KB · Views: 68
Z

Zathros

Wheels! This is looking so awesome, I can't wait to see the wheels. The hinge framing looks so good, you could get away with leaving it uncovered. This is really excellent!! :)
 

Rhaven Blaack

!!!THE MAN BEHIND THE CURTAIN!!!
Staff member
Administrator
Moderator
Jun 12, 2009
12,516
9,892
228
Oregon
www.deviantart.com
The progress that you are making in this project is FANTASTIC!!! It is coming together nicely.
I like your solution for the hinge.
I am really looking forward to seeing how this turns out.
 

trt

Member
Jul 23, 2011
116
10
18
Durham, England
Been thinking about this bit for a while and decided the best way is to create a flange to attach whatever the joining material will be (more fiddley bits, sorry folks :p) It is set one paper width in, the plan is then to wrap a 4mm strip to sandwich it (and cover any bad joins)

Material wise, latex doesn't seem to have enough give, so thinking about hosiery as a solution (I'm avoiding any jokes here :twisted:) It seems to have the right give and apparently there are different grades called denier. May be sending the wife shopping. Coming home with latex gloves and some tights may have taken some explaining.

Anyway a picture
 

Attachments

  • P1020250.jpg
    P1020250.jpg
    146.1 KB · Views: 25

trt

Member
Jul 23, 2011
116
10
18
Durham, England
Evening all. Taken a while to get further with the project. Had to rework all the parts of the hinge mechanism as all slightly out. Also joined the 2 parts together (this is still work in progress but it appears to be a sound theory) Gone back to the latex glove idea (or latex free glove. is everyone allergic to latex :confused:) Need to stretch it tighter and didn't realise how see through it was. I might try to mask the area off and flash a bit of silver paint over it. The good news is the engineering worked. Used CA super glue with 45 sec curing time. Give the ability to position correctly, but 45 seconds seems like ages. Do each piece and let fully cure before moving onto the next one. Inevitably stuck Landmaster to fingers a few times :mrgreen:

Another thought also occurs. It is definitely worth doing this before adding any external pieces as you have to man handle it a fair amount. Also if you make a complete pigs ear of it, you haven't wasted all those fiddley bits.
 

Attachments

  • P1020261.jpg
    P1020261.jpg
    132.7 KB · Views: 33
  • P1020259.jpg
    P1020259.jpg
    128.5 KB · Views: 36

micahrogers

Moderator "Where am I, and how did I get here?"
Staff member
Moderator
Jul 12, 2012
3,772
4,639
113
Shannon GA
Looks good as always. I would have gone with an accordion bellows approach. but is still looking good.
 

lemonade

New Member
Jul 19, 2008
10
0
1
Very nice model. One that is in my wish list. Do you intend to publish the plans for this Landmaster beauty ?

Thanks.
 

trt

Member
Jul 23, 2011
116
10
18
Durham, England
Thanks for kind comments. Yes it will be going in the download section when I get it finished (sometime towards the end of the year at this rate)

I was thinking about various ways to joint the 2 section and accordion was one of them, but in truth and despite all the other fiddley bits I reckon might be too difficult (we'll for me anyway). Also while trying to keep as much paper as possible in the model (please forgive me) latex seemed more accurate. My feable excuse and I'm sticking to it.

Back to modelling, going to try to overlay the latex section with a more stretched piece (too remove a bit of the sagging), pre sprayed silver and see how that looks.
 

Patron_zero

Member
May 5, 2008
102
4
18
Again, Wow ! That glove treatment looks great and really enhances the 'authenticity' of the model as viewed against it's full-sized counterpart.
 

lemonade

New Member
Jul 19, 2008
10
0
1
6 days of no work and this is the first time I get to post. good to see everyone else has been busy.

On with the show, got after a few attempts a definitive version 1 hinge system. (well half off it) Slight cheat again as using a steel pin :eek:

This joint you made was very ingenious. I can't stop admiring the details of it. I wanted to ask your opinion in regards to a crazy idea that I thought I could implement when I eventually build such wonderful model.

I thought I could use a ping-pong ball to make up a kind of spheric coupling between the front and back sections so that the rear body could have 3-axis of free movement. I'd have it encased in some paper cage structure to hold it and also to limit the range of movement.

Do you believe this could work in my case or do you have some other suggestion that I should try ?

Appreciate any feedback :)
 

trt

Member
Jul 23, 2011
116
10
18
Durham, England
In theory should work.

Ball attached to a tube on one side, The a ring on the tube side joined to a ring on the other with at least 3 arms joining them together would work. Then join the ring to the other cab. I would get a prototype done first :thumb:

as below
 

Attachments

  • all way.jpg
    all way.jpg
    10.9 KB · Views: 23

lemonade

New Member
Jul 19, 2008
10
0
1
In theory should work.

Ball attached to a tube on one side, The a ring on the tube side joined to a ring on the other with at least 3 arms joining them together would work. Then join the ring to the other cab. I would get a prototype done first :thumb:

as below


Wow. You've got it exactly the way I thought. The only other thing I would add are some "arms" attached at the same side of the ball tube sctructure so as to act like bumpers and limit the movement of the cubic cage to just a few degrees of motion.

Edit: Only now I've figured out what you're meaning by an "A" ring. It should work even better that what I planned as a Cube (square) ring cage. Errrr... sorry for the mis-used words (cube, square, rings LOL), I know that an image speaks better than words.

Thanks for the drawing. Much appreciated ! :thumb:
 
Status
Not open for further replies.