Kitbasher's Diary - Model Power Freight Gepot (N Scale)

Drew1125

Active Member
Jan 28, 2001
2,975
0
36
Thanks Arl! :)
Well, I finally got around to doing some roofing...

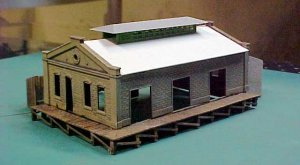
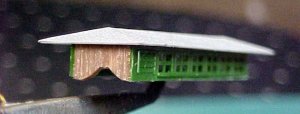
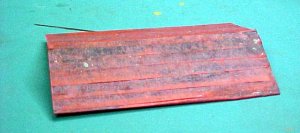
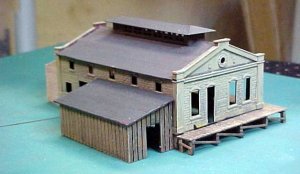
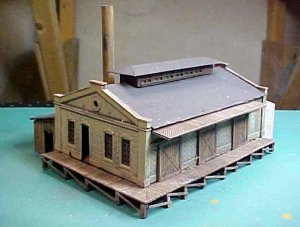
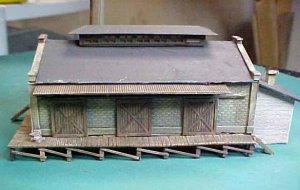
I really likred the way the kit roof, with the little clerestory structure on top looked, but try as I might, I could not get that %$#@ed main roof to fit...so I made another one from 0.30" styrene...
 

Attachments

  • kb10.jpg
    kb10.jpg
    29.1 KB · Views: 126

Drew1125

Active Member
Jan 28, 2001
2,975
0
36
Another problem I encountered was that the kit was missing the end pieces for the clerestory, but I solved this problem (I hope) by cutting some pieces from the "wooden" portion of the kit's original loading dock...
 

Attachments

  • kb13.jpg
    kb13.jpg
    20.5 KB · Views: 122

Drew1125

Active Member
Jan 28, 2001
2,975
0
36
I decided to give the new main roof the look of rolled roofing, or tarpaper...I did this by painting the styrene flat black, then brushing on white glue, & attaching strips of tissue paper cut in strips 4 scale ft in width...
(the only tissue paper I could find was this Christmasy red stuff!)
 

Attachments

  • kb14.jpg
    kb14.jpg
    25.4 KB · Views: 122

Drew1125

Active Member
Jan 28, 2001
2,975
0
36
I made the same type of roof for the side shed, & painted them, along with the clerestory roof, Polly Scale Grimy Black...
 

Attachments

  • kb15.jpg
    kb15.jpg
    28.9 KB · Views: 122

Drew1125

Active Member
Jan 28, 2001
2,975
0
36
Well, I've made a little bit more progress...

On the tracside loading dock, I added the doors from the kit (I roughed them up a little & painted them to give them a more "wooden" look) I also added a a piece of styrene strip along the top of the doors to look like a rail they might slide on...
 

Attachments

  • kb16.jpg
    kb16.jpg
    38.4 KB · Views: 100

Drew1125

Active Member
Jan 28, 2001
2,975
0
36
I made a smokestack from an old inkpen, & added the smaller of the 2 corrugated roofs from the kit over the loading dock...
 

Attachments

  • kb17.jpg
    kb17.jpg
    24.9 KB · Views: 114

Drew1125

Active Member
Jan 28, 2001
2,975
0
36
For the rear addition, I cut a piece from the kit's original roof, & added the chimney that came with the kit...
 

Attachments

  • kb19.jpg
    kb19.jpg
    31.1 KB · Views: 89

Drew1125

Active Member
Jan 28, 2001
2,975
0
36
I added the doors & windows, leaving the front door slightly ajar, & glueing a piece of styrene to the bottom of it to look like a "floor"
Note the paint & glue I managed to slop all over the walls!:rolleyes: :eek:ops:
 

Attachments

  • kb18.jpg
    kb18.jpg
    30.2 KB · Views: 91

Drew1125

Active Member
Jan 28, 2001
2,975
0
36
To fix this, I add little bits of styrene "freight" to hide my mistakes!
I also found some stairs in the scrap box...
 

Attachments

  • kb21.jpg
    kb21.jpg
    47.2 KB · Views: 129

Drew1125

Active Member
Jan 28, 2001
2,975
0
36
At the rear corner, the only section of foundation that is left visible, I cut some pieces from the kit's original "stone" loading platform, painted them black & glued them on...
 

Attachments

  • kb20.jpg
    kb20.jpg
    32.2 KB · Views: 148

Drew1125

Active Member
Jan 28, 2001
2,975
0
36
I painted the foundation, & cut some more pieces from the kit's original "wooden" dock to make some big opened doors for the ground level loading door...I sti;ll need to work on that botched corner joimt...
 

Attachments

  • kb22.jpg
    kb22.jpg
    42.7 KB · Views: 145

Drew1125

Active Member
Jan 28, 2001
2,975
0
36
Here's a tracside view, showing more steps that I added to the rear of the loading dock...
 

Attachments

  • kb23.jpg
    kb23.jpg
    28.5 KB · Views: 142

Arlaghan

Member
Sep 9, 2003
658
0
16
50
S. FL
Oops looked like I jumped the gun!

Really nice work, Charlie. I like how you "hide" things with details rather than go back and repair... you end up with a nicer model with less the effort! :D
 

Drew1125

Active Member
Jan 28, 2001
2,975
0
36
Thanks guys! :)

Originally posted by Arlaghan
... I like how you "hide" things with details rather than go back and repair... you end up with a nicer model with less the effort! :D
Thanks again, Arl!
That's what I call my "Cheap Fast & Easy Method For Detailing(slash)Damage Control"!;) :D
 

shaywen

New Member
Dec 31, 2003
27
0
6
Visit site
As Bob Ross used to say, "There's no such thing as a mistake, just happy accidents." Great work, Charlie! I'm looking forward to seeing pictures of it on your layout.

shaywen
 

Drew1125

Active Member
Jan 28, 2001
2,975
0
36
Thanks Shaywen!
And if I haven't done so already, allow me to welcome you to The Gauge!:) :wave: :wave: :)
 

shaygetz

Active Member
May 2, 2003
3,612
0
36
64
www.freewebs.com
Originally posted by Charlie
That's what I call my "Cheap Fast & Easy Method For Detailing(slash)Damage Control"!;) :D

I was painting a hopper with some Dulcote when it flipped into my hand, leaving a perfect impression of my palm print in the paint. A quick fix with some graffitti decals I had on hand and "Eureka!", another expert detailer was born. Great work:thumb: :thumb: :thumb:
 

Drew1125

Active Member
Jan 28, 2001
2,975
0
36
Thanks Shaygetz! :)

I got a little more done last night, & this morning...I've added some details to the dock area, & I've put a name on the place...
The Marksberry Feed Co. (In honor of my friend, & fellow Gauger, JMarksberry)
This will be one of 3 online rail customers in the town of Glasgow Jct.
 

Attachments

  • kb25.jpg
    kb25.jpg
    27.3 KB · Views: 125