JV models sawmill construction

Glen Haasdyk

Active Member
Feb 2, 2004
1,283
0
36
53
Kelowna, BC
Visit site
I'm not putting your methods down, it's just that I've never tried them. I've always had a "whatever works' additude towards people's modeling methods.
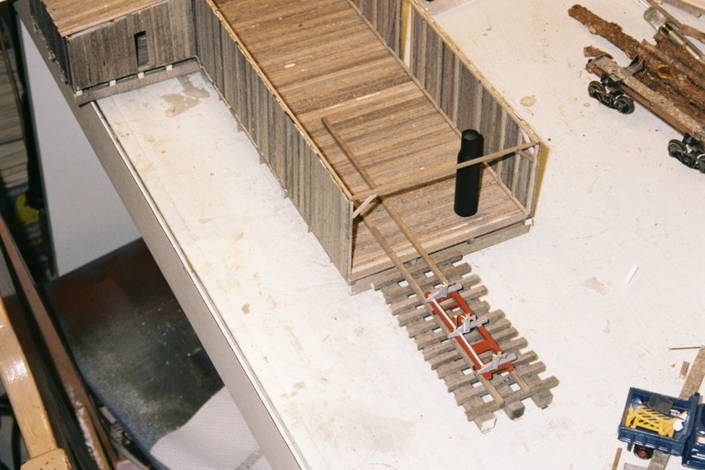
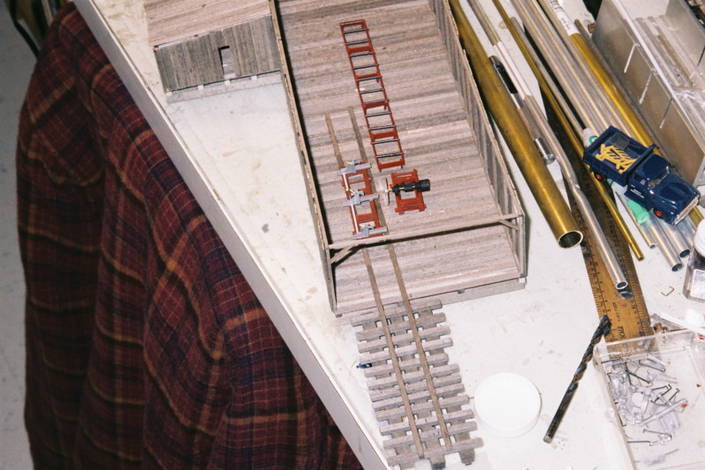
All I have left in the kit now is the wood that is for building the machinery and the water barrel castings so that's why I'm going to have to fabricate the roof using other materials.
Thanks for your help
 

Glen Haasdyk

Active Member
Feb 2, 2004
1,283
0
36
53
Kelowna, BC
Visit site
Just a quick update. I got home today and there was a package in the mail from JV models. Inside was the missing roof pieces. I apologize for the continued complaining seeing as everything turned out okay now.
This weekend I got about halfway through the headsaw fabrication with the frame and most of the machinery components scratchbuilt. Now I have to put it together and start positioning it all in the building itself.
 

Glen Haasdyk

Active Member
Feb 2, 2004
1,283
0
36
53
Kelowna, BC
Visit site
I finished the headsaw, cariage track (it's glued down now) and the rolls. I broke with the habit of using wood and built the rolls out of styrene. Sine all the equipment is painted you can't tell the difference and styrene was easier to work with in this case. The headsaw looks pretty convincing, considering it has a real saw blade. I used a mix of brass and styrene to fabricate the shafts and pulleys.
I started to scratchbuld the steam engine. I'm using a set of old climax drawings to figure the dimensions for the mechanicals. I figure that an operation like this could have salvaged part of a climax to build the power unit for the mill. so far I've built the cylinder and crosshead. After that comes the piston rod , drove wheel, frame, flywheel and drive pulley. the rest should come along shortly.
After that I'm starting the edger. I'm not an expert but from the one picture I'm got the edger looks like a set of live rolls with a set of circular saws across to resize the plank widths. Does anyone have pictures of one so I can get a better idea?
 

sumpter250

multiscale modelbuilder
Jan 19, 2002
3,073
0
36
80
Vernon Hills, Illinois
Visit site
Sine all the equipment is painted you can't tell the difference and styrene was easier to work with in this case.
This was one of the selling points Allen Armitage made, years ago, in his case for modeling in styrene, when it was still,"looked on unfavorably" by the modeling community.
 

sumpter250

multiscale modelbuilder
Jan 19, 2002
3,073
0
36
80
Vernon Hills, Illinois
Visit site
Glen,
The Spring 2007, "the Logging, Mining, & Industrial Annual" from the publishers of Finescale railroader, is out, and has ten pages on a steam powered sawmill model being built. Many clear photos, and lots of detail. Yeah, it's $17.99, but I think you might like all the information there, to help with your mill interior.
Pete
 

Glen Haasdyk

Active Member
Feb 2, 2004
1,283
0
36
53
Kelowna, BC
Visit site
[Glen,
The Spring 2007, "the Logging, Mining, & Industrial Annual" from the publishers of Finescale railroader, is out, and has ten pages on a steam powered sawmill model being built. Many clear photos, and lots of detail. Yeah, it's $17.99, but I think you might like all the information there, to help with your mill interior.
Pete
/QUOTE]

Ouch, as good as that sounds it comes a little late. I've almost finished the steam engine and after that All I have left is the edger. We also don't get finescale railroader around here
 

sumpter250

multiscale modelbuilder
Jan 19, 2002
3,073
0
36
80
Vernon Hills, Illinois
Visit site
Ouch, as good as that sounds it comes a little late. I've almost finished the steam engine and after that All I have left is the edger. We also don't get finescale railroader around here
Actually, Finescale Railroader is no longer published,that was primarily G scale. only the "Annual" is available now.
the "outside the U.S." price is $22.99 Westlake Publishing Company, 1574 Kerryglen Street, Westlake Village Ca. 91361 is the publisher.
The first 47 pages, are photos of Rayonier logging locomotives. This is one of the really good references for logging, and as the name infers, industrial, and mining, prototype, and model information.
 

rfmicro

New Member
Sep 24, 2006
39
0
6
77
Glen, if you search for Keystone Edger you should get some rough pictures of the edger. Having said that, there are some good saw mill sites on the web that will reinforce your layout and should have photos of all the equipment. I would have provided the site in question, but that was on my recently crashed hard disk. I'll give another look-see.

Regards,
Trent Mulkern
Mechanicsville, MD
 

Glen Haasdyk

Active Member
Feb 2, 2004
1,283
0
36
53
Kelowna, BC
Visit site
Thanks Trent. I'm halfway through building the edger now. My Father-in-law is a master carpenter and used to work in a sawmill back in the sixies. I showed him the drwing of the edger that I'm using it build my own and he said it was just like the one they had in his old mill.
Again because it's easier with this particular project the material will be styrene. After it's build I'll be positioning the equipment and trying to figure out the belt system. The Instructions say that the prototype had an under-floor belt system which I've never heard of before. I'm not sure if I should try to build a belt drive in the roof or under the floor.
As a side note I'm almost finished this roll of film in my camera so pictures could be posted soon. We're also going to be looking at a digital camera in the next couple of weeks so I'll be able to post progress pictures as soon as I take them (finally!)
 

Glen Haasdyk

Active Member
Feb 2, 2004
1,283
0
36
53
Kelowna, BC
Visit site
Thanks, I think I will be building an under floor system. At least it will look like an under floor. I figure that I'll just cut the floor where the pulleys are and install the belts going under but not conect them since no one will see the underside anyway.
 

Glen Haasdyk

Active Member
Feb 2, 2004
1,283
0
36
53
Kelowna, BC
Visit site
Good news. I've got Pictures to share. I finally finished the roll of film in my camera and got it developed.

sawmill3.JPG


Here's the floor joists in place on the template They are tacked in place temporairily with pins into a foam block.
 

Glen Haasdyk

Active Member
Feb 2, 2004
1,283
0
36
53
Kelowna, BC
Visit site
sawmill5.JPG


The walls are up and you can see what kind of job the acrylic paint stain does. The indiviual boards stand out nicely. I added the bracing on the ends because I was going to have a removable roof. I changed my plans when I discouvered my roof didn't sit flat on the walls so I'll probably be glueing it on and leaving half of the roof unsheeted so you can see inside.
 

Glen Haasdyk

Active Member
Feb 2, 2004
1,283
0
36
53
Kelowna, BC
Visit site
sawmill6.JPG


The log carriage. As I mentioned before it's about 2 1/2" long and there are thirty-eight parts to it. It took me a week to build

sawmill7.JPG


I built the carriage track acourding to the instructions in the JV models kit, adapting it slightly for the size of the carriage. Beside it the beginings of the steam boiler power plant, made out of an old rifle shell. I'm not sure If I'm going to use it though. I have a half-finished climax that I was scratchbuilding a couple years ago and I might just use that instead.
 

Glen Haasdyk

Active Member
Feb 2, 2004
1,283
0
36
53
Kelowna, BC
Visit site
sawmill8.JPG


The rolls. They are located behind the headsaw so the cut planks fall and are carried away to the men operating the edger.

sawmill9.JPG


This is a quick mock-up of the carriage end on the mill. the carriage, headsaw and rolls are in place but just placed there, not glued down. I'll wait untill I complete the machinery before i do that. since this picture was taken I built the steam engine to power the machinery, and half-built the edger. I didn't realize untill I developed my pictures that I hadn't taken I good picture of the headsaw. I'll take one later.
 

Glen Haasdyk

Active Member
Feb 2, 2004
1,283
0
36
53
Kelowna, BC
Visit site
sawmill10.JPG

The roof trusses. After making the 6 trusses I pinned them into place over a template that I made of the top of the mill. After this pic was taken I added the stringers that tied them all together.
 

sumpter250

multiscale modelbuilder
Jan 19, 2002
3,073
0
36
80
Vernon Hills, Illinois
Visit site
Glen,
Knock your socks off good looking! The log carriage, rollers, and head saw are great! Nice work!

I am, however, not too surprised that your LPB drove his truck into the pile of pipe. :eek:ops: Hope the building crew didn't have to spend too much time getting it out of trouble. :-D
Very nice pictures, thanks!

Edit: LPB, Little Plastic "Boss"
 

Glen Haasdyk

Active Member
Feb 2, 2004
1,283
0
36
53
Kelowna, BC
Visit site
Thanks. I'm going to work on the edger tonight and then the steam boiler.

Oh yeah, the truck in the pipe is just something I have to deal with ever since the beer parlour opened just a block away from the construction site.