

Jewelers's Last and Modeling Tray
- Thread starter TrainClown
- Start date
You are using an out of date browser. It may not display this or other websites correctly.
You should upgrade or use an alternative browser.
You should upgrade or use an alternative browser.
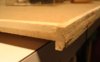
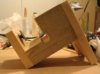
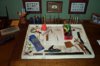
It's kind of hard to saw or file small parts without putting the table at risk, so I made a Jeweler's Last. I saw one of these at my friends place. He makes jewelry, rings and such. I always thought this would be perfect for working on model parts so I made one that would clamp to the edge of my table.
Attachments

F
Fred_M
That's a cool idea TC. One question, in the fourth pix I see both of your hands, so how did you take it? You have 3 arms?  I need 5 of them trays. Fred
I need 5 of them trays. Fred:thumb: yep, I've used a Jewelers last (never knew what it was called) for a long time myself. The perfect mate to it is a Jewelers saw. They are similiar to a coping saw but are designed to use much finer blades than the cope.
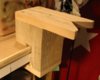
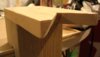
My saw has a 8" frame. Using the V notch in the last lets you easily cut metal, wood, plastic, etc.. with control.
t.
My saw has a 8" frame. Using the V notch in the last lets you easily cut metal, wood, plastic, etc.. with control.
t.
NYC-BKO: Your welcome, but I'm just passing along the idea. Jewelers have used these things for hundreds of years.
Fred: I used a handy little device called a tripod. Then set the camera for a 10 second delay. Hey Mon, make yerself half a dozen of them trays. Mine sits on a high shelf out of my way and safe from blunders. If I had six trays, I would make a frame against a wall someplace with 6 sets of brackets to store the trays on. :thumb:
t: I remember my friends saw, now that you mention it. It is a very fine saw, made out of a piece of strong fine wire covered with diamond dust. Cuts in any direction.
The term "Last" is an old one. It refers to a number of different things, but the thing they have in common is that a craftsman works on it repeatedly. First time I heard it was in the theater where I worked. The stage manager fixed the dancing girls shoes on a Cobbler's Last. That is a funny looking anvil with three flat foot shapes of different sizes that the cobbler would pound on shoes on. I guess these things got the name "Last" because they are meant to last a long time.
TrainClown
Fred: I used a handy little device called a tripod.
Then set the camera for a 10 second delay. Hey Mon, make yerself half a dozen of them trays. Mine sits on a high shelf out of my way and safe from blunders. If I had six trays, I would make a frame against a wall someplace with 6 sets of brackets to store the trays on. :thumb: t: I remember my friends saw, now that you mention it. It is a very fine saw, made out of a piece of strong fine wire covered with diamond dust. Cuts in any direction.
The term "Last" is an old one. It refers to a number of different things, but the thing they have in common is that a craftsman works on it repeatedly. First time I heard it was in the theater where I worked. The stage manager fixed the dancing girls shoes on a Cobbler's Last. That is a funny looking anvil with three flat foot shapes of different sizes that the cobbler would pound on shoes on. I guess these things got the name "Last" because they are meant to last a long time.
TrainClown
TrainClown said:Here is the last from the side. You can see the leveling bolt I used for the clamp. I used one of those nuts that hammer into a hole. I'm not sure what there called, but they work fine for this job.
A Tee nut... As much filing and cutting I do, this is just the thing to keep me from messin' up the dining room table. :thumb: :thumb: :thumb:
F
Fred_M
Dang TC, I was thinking you would say the wife took it. I then would come back with "you let your wife get that close to you" or some such comeback. Fred
FredCool!
Needs a few measurement details and a perminant place in the Academy, or at least Tips &
Tricks.
Needs a few measurement details and a perminant place in the Academy, or at least Tips &
Tricks.
Good thinking TC, we can all use a tray and that last . If it wasn't for your post I wouldn't have known about the last. Thanks
Yer all welly coomb
There's nothing I like better than to share a good idea (even if it's not mine per say).
shaygetz: Thanks for the info. :thumb: A Tee Nut. I never new there name. One more thought. You could put felt on the contacting surfaces of the last, and this would do more to save your table. You could put some felt on the underside of the modeling tray as well.
Sir Prize: The main body of my last is made from a scrap of 4"x4" post I had left over from my fence project. The last could be made from 2"x4" blocks glued together. I got the hardwood for free. I salvaged an old shipping pallet from a paint store. Pallets are usually made from good hardwood timber. I don't pry them apart, as this can be tough to do. Instead I cut out the bits I need with a skill saw. Much faster and easier.
Jon and Robin: Glad to share the spark of an idea. :thumb:
Clark: Sharp! Oh your sharp! Once you use it, it will be your first last and always.
Doc: A while back I had knocked together a tray out of cardboard, but it didn't last long. It had taller sides too, but I found the edges would get in the way of some tasks, and sometimes my arms would get soar leaning on the edge. That is why I put such a small edge on this tray, and really why I got rid of the other. I just want to stop those skittering small parts that are the bain of my existence. I suppose it's a personal choice as to what suits you best. I don't often spill or drop paint, but when I do, no amount of edge will save the environment. It goes flying! I do like the idea of the tool rack in the edge. I think I'll make a block to sit on my tray that dose the same sort of thing. Thanks for the tip. :thumb:
TrainClown
Self Portrait.
There's nothing I like better than to share a good idea (even if it's not mine per say).
shaygetz: Thanks for the info. :thumb: A Tee Nut. I never new there name. One more thought. You could put felt on the contacting surfaces of the last, and this would do more to save your table. You could put some felt on the underside of the modeling tray as well.
Sir Prize: The main body of my last is made from a scrap of 4"x4" post I had left over from my fence project. The last could be made from 2"x4" blocks glued together. I got the hardwood for free. I salvaged an old shipping pallet from a paint store. Pallets are usually made from good hardwood timber. I don't pry them apart, as this can be tough to do. Instead I cut out the bits I need with a skill saw. Much faster and easier.
Jon and Robin: Glad to share the spark of an idea. :thumb:
Clark: Sharp! Oh your sharp! Once you use it, it will be your first last and always.
Doc: A while back I had knocked together a tray out of cardboard, but it didn't last long. It had taller sides too, but I found the edges would get in the way of some tasks, and sometimes my arms would get soar leaning on the edge. That is why I put such a small edge on this tray, and really why I got rid of the other. I just want to stop those skittering small parts that are the bain of my existence. I suppose it's a personal choice as to what suits you best. I don't often spill or drop paint, but when I do, no amount of edge will save the environment.
It goes flying! I do like the idea of the tool rack in the edge. I think I'll make a block to sit on my tray that dose the same sort of thing. Thanks for the tip. :thumb: TrainClown
Self Portrait.
Attachments

Found a cheap paint it urself wooedn tray at Michaels about a month ago for $2.49 that I use. Has nice "rails" around it and also slots cut in the narrow end panels and use that for my things when I am working. Also found a small metal bucket about 3" high that is poerfect for paint brushes, rulers and knives. that was $.98 in the "decorate urself" tinware section.
Michaels and AC Moore arts and craft center along with Pearl Paint are a great source for lots of hobby/art suppleis that translate well into scratchbuilding and general train work and a lot more convenient to me the the LHS or MB Klein's (45m away).
Michaels and AC Moore arts and craft center along with Pearl Paint are a great source for lots of hobby/art suppleis that translate well into scratchbuilding and general train work and a lot more convenient to me the the LHS or MB Klein's (45m away).