I'm ready to give it a try. First layout!

Renovo PPR

Just a Farmer
Dec 23, 2006
544
0
36
55
Somerset County PA
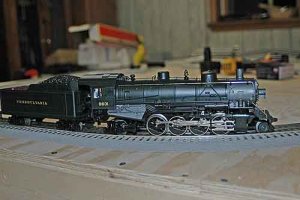
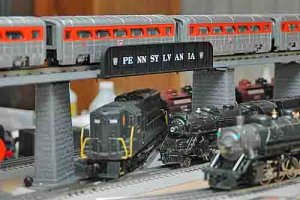
It has only taken about two months of shifting ideas and decisions but the future home railroad will soon start to come to life. The feature player for this new railroad will be the new Lionel Mikado locomotive pulling a string of 12 various PRR's rolling stock. This was not a stock set and I was happy that I was able to put this together over the past two months.

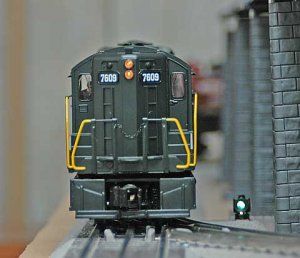
A future Canadian National locomotive will anchor the second main line; I am still looking for a TMCC version However the rolling stock is all in place and if it comes to it I have found a MTH CN diesel.

The third main land will be an elevated passenger service held steady by the MTH Aerotrain. Construction of this line will include a mountain site passenger station and the inclusion of a large MTH black steel arch bridge.

There has been an addition added today as we purchased a new MTH Trolley to complete a short dedicated trolley line.

The first two mainlines will be interconnected with added sidings and passing lanes with the inclusion of isolated sections so that we can run conventional trains.

The power sources will include four separate transformers with the main power for connecting mainlines coming from the Lionel 180 power brick, Lionel Lock on and TMCC control. When not connecting both lines the choice of power for main line number 2 will come from either a Lionel CW-80 or Lionel SW. The elevated line will be powered by the MTH Z- 1000.

With a little creative wiring it all works out even if you have to play around with a few transformers and connections. I figured I would use what I have and adapt later when it makes sense and I have a few more dollars for do it better for the power.

The subject of track was an easy choice, I had Lionel Fastrack and I like it. Unless I run my trains at speeds capable of tossing a train of the tracks I don’t hear that wild noise everyone speaks of. I figure that since this is my first major layout I will change it in the future and fasttrack would provide me the flexibility to get an cool looking layout up faster.

The main base of the layout will be a 9X 5 with two wings added. I have included some trap door access spots that will permit me to work on anything.

The layout will be made out of ¾ plywood supported by a sturdy frame and will included hidden shelves and wiring harness etc. I have not made my final decision on the top cover for the plywood though I am leaning towards some type of a foam board.

Well this is the major plan and I’m sure I will make some changes as we move forward. Our target date to start is this weekend provided nothing important comes up. We don’t have a completion date since I will be making most of the support columns and tunnel entrances.

I really hope to get some photographs of the trains up over the next few days, I will be sure to provide photographs as the layout progresses.

[FONT=&quot]If you have any ideas or suggestions feel free to pass them on[/FONT]
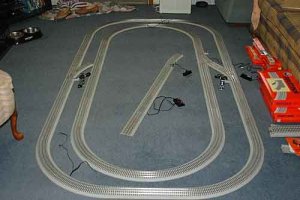
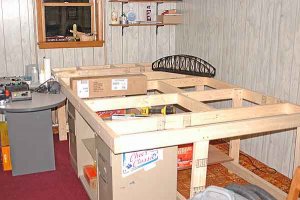
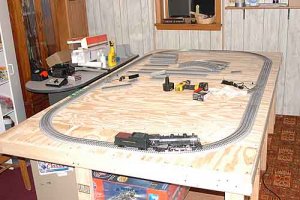
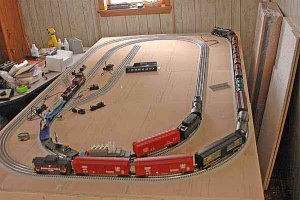
 

Renovo PPR

Just a Farmer
Dec 23, 2006
544
0
36
55
Somerset County PA
Wow I had a chance to build the first level mock up on the floor. The first thing I thought was 9 X 5 doesn’t give you all that much room to play. In any event it all fits on the planned bench work. I could go larger but I wanted access on three sides.


The only draw back is when I had to buy the 5 automatic fastrack switches, which gets a little expensive. This adds to the track construction fast.

The two interconnected ovals will be great for running two mainline operations. In addition I have a large enough isolated track in the oval to park one train and still be able to use a siding for fun thing such as action or just parking some rolling stock.

The added benefit of the isolation section is that I can run Conventional trains with the TMCC trains.

I still hope to get the project off the ground this weekend and hope to even have some trains running by Sunday. I will start the construction of the elevated passenger line and figure out where to put the trolley service in place after getting the main layout down. This part keeps moving around in my head and does not have a set plan yet.


[FONT=&quot]I’m just excited since this will be my first real layout and I will start to place some photographs tonight of just what I did for planning along with sources I used to learn about isolating tracks sections, etc.

I hope i'm not boring you all with my excitement. announce1
[/FONT]
 

Renovo PPR

Just a Farmer
Dec 23, 2006
544
0
36
55
Somerset County PA
I told you I would get around to some photographs. This is a look at the raw layout placed on the floor so that I could get a real life overview. I am still waiting for 2 right hand switches and the track stop for the siding.

This will be the track for the plan for the bottom that will enable me to run two different trains or park one and be able to use part of the inner track and the siding. I have added a decoupler and an activator track in the siding for future use.
 

Attachments

  • gg.jpg
    gg.jpg
    34 KB · Views: 984

Renovo PPR

Just a Farmer
Dec 23, 2006
544
0
36
55
Somerset County PA
Ok I spent the last few days getting the room ready and getting some wood together. I think it is funny that after you get the frame work done for a basic 5x9 table it looks small.

I still have some supports to add but the layout has been started and I incorporated an old metal desk for both support and storage.

This is a flat farm land layout and will have a second mountain level added. I know its not much to look at but it is a start, one step up from a floor layout.
 

Attachments

  • layout.jpg
    layout.jpg
    60.6 KB · Views: 666

TrainNut

Ditat Deus
Sep 15, 2004
1,731
0
36
54
AZ
Every layout has to start somewhere and yours is coming along nicely. It wasn't too long ago that mine was nothing but bare boards as well! Can't wait to see more!
 

Renovo PPR

Just a Farmer
Dec 23, 2006
544
0
36
55
Somerset County PA
I ran trains tonight. :) The first stage of the rough bench work is done. I made some test runs just to see how the fastrack sounded on bare plywood. To be honest I have no clue where all this noise stuff comes from. In fact I would call it pleasantly quiet, I had no problems with it drowning out the railsounds.

In any event I now have to get use to run on the edge with a nice drop to the floor.
 

Attachments

  • DSC_0003.JPG
    DSC_0003.JPG
    61.2 KB · Views: 932
  • DSC_0005.JPG
    DSC_0005.JPG
    50 KB · Views: 938

granpa

New Member
Dec 19, 2006
19
0
6
72
Rio Vista, CA.
Looking good. :thumb: You're getting me fired up to start my layout, soon to be photo'ed. Noise?? All have it,.. I wish I could get my house to rumble. :D
 

granpa

New Member
Dec 19, 2006
19
0
6
72
Rio Vista, CA.
How's your layout coming along? Yes,.. I am a Steeler fan, born in Uniontown. Imagine that!? Haven't seen many coke ovens posted here!! Maybe I should make a few and smoke Grandma out of the house!

Enjoy,
 

Renovo PPR

Just a Farmer
Dec 23, 2006
544
0
36
55
Somerset County PA
Uniontown isn’t so bad; it could be Dunbar or part of West Virginia. I had to make a choice for the top covering and I settled on something a little different.

If you look at the photograph the main track plan is in place with the exception of the two switches need for the right side connection of the loop. The two right hand remotes are on back order from my LHS. I’m happy with the track plan and I have been testing it over the past two days.

The plywood did produce a little bit of a funnel noise so I knew that I needed something more to deaden the sound. My first thought was to use one-inch foam board to make it a fast and easy job. However after reading the fire warnings printed on the pink foam board several times over I decided it was not worth the risk. I just didn’t need to bring that much of a potential fire hazard into the house and run electric all through it. The safety of my children was more important so I dropped the idea of using foam board.

In a different twist I decided to use the hard Armstrong ceiling tiles. They were easy to cut when needed and I was happy with the degree of firmness and their strong ability to dampen the sound. They actually have some weight to them so it helps to put some extra top weight on the bench work.

I have been running two trains on top of this for a few hours and I am very happy with my choice. I plan to test it for a few more days then apply a topcoat of paint to act as an extra sealer.

Since the ceiling tile can support the same weight as the foam board I think the trade off in material favors the ceiling tile due to the safety of them being fire resistant. The thought of 100 square inches of burning foam board with the toxic gas just turned me off.

[FONT=&quot]I am still currently designing the elevated / second tier mainline.


[/FONT]
 

Attachments

  • plan.jpg
    plan.jpg
    64.8 KB · Views: 536

Renovo PPR

Just a Farmer
Dec 23, 2006
544
0
36
55
Somerset County PA
Today was the official start of laying the track. I spent the past few days running the train to make sure the ceiling tile was going to be good for the job. I am happy to report it was and that I gave it two coats of paint to seal it.

The process is going a little slower than I thought but then again I’m running the wire under the table. It is a good idea to label all the wire and to make sure you write down the color order for the switches.

The block wiring is going pretty well but is tedious. However it is worth the trouble and will permit the operation of two trains on the same main line while in conventional mode. In addition I have block wired the only siding that is in the track plan.

I am still waiting for the two right hand turnouts I ordered from my LHS. In fact I’m still waiting for my TMCC set up, bridges and lighted bumpers.

The layout looks pretty neat with all the hidden wiring. I can’t wait to start the second level and I will get some photographs up as soon as I get the first level completed.

[FONT=&quot]Now I am going to have to buy some screws for the track along with a terminal block for some of the wiring. I’m going to try and post of diagram of the wiring for this setup over the weekend.[/FONT]
 

granpa

New Member
Dec 19, 2006
19
0
6
72
Rio Vista, CA.
Looking Good! I think I'll try the ceiling tile method as well. Can't wait to see your photos. i'm currently searching down parts for my 1948 Berkshire. Just picked up Greenburg's repair and operating manual. [great stuff] I'll post a before and after photo of my restoration soon and I'll soon be able to post educated questions!! Talk to you soon neighbor!!
 

Renovo PPR

Just a Farmer
Dec 23, 2006
544
0
36
55
Somerset County PA
[FONT=&quot]I have started the second tier, which is basically a third mainline on piers and a small tunnel. However since I now have a larger diesel I found that my original track plan for this tier would not work.

This was something I did not think about when make the original design. While I accepted the fact that my locomotives would be limited by the size of the track curves I forgot that in addition they would be limited by side clearances such as piers and the like.

In any event I am now re working the track plans and will review other areas so that I have the clearance needed to run the longer trains.

Building this complicated layout has been both fun and a learning experience. When you think you know every thing you find out you don't.[/FONT]
 

Renovo PPR

Just a Farmer
Dec 23, 2006
544
0
36
55
Somerset County PA
Construction has both been slow and over budget. I did start the elevated section of the layout this weekend. The only bad part is that I am still waiting for two right turnouts and two bridge sections. I have made a few changes including adding a TPC 400 and upgrading the wiring to 14 gauge. In addition I am waiting for my 180-watt power brick and TMCC controls. The pleasure of dealing with a smaller LHS.

I did find one thing out Fastrack is far better to work with than the Real Trax. Real Trax is much harder to take apart and at times will damage the lightweight copper connections. To be blunt RT is a pain in the backside compared to FT. If I had it to do over again I would not of used the Real Trax. The Fastract connections are far superior.

[FONT=&quot]Well this is about as far as I can get until the rest of the supplies comes in so I can start making the tunnel and mountain sections. I just hope the Aerotrain doesn’t try to make its daily passenger run on the track to nowhere.

Overbudget items - TPC 400, addition 36 turnout for a second siding.

[/FONT]
 

Attachments

  • train 1.jpg
    train 1.jpg
    53.6 KB · Views: 347
  • train 2.jpg
    train 2.jpg
    52.7 KB · Views: 221

granpa

New Member
Dec 19, 2006
19
0
6
72
Rio Vista, CA.
Hey it's looking really good. I took your idea of ceiling tiles for a base. I looked at a 4x8 sheet of sound board, foam and a fiberous type. Clearly labeled warnings of smoldering and fire hazards. Running post-war loco's, I too wanted something fire retardant. My son is a fireman and proud we are taking these steps. Thanks for posting that. I painted a sealer on this material to elimante the dust factor.

I have a small section of Realtrax and find the same problem you are having. I dread disconecting this track. Fastrack will also be my next purchase. I am still waiting for my 726 parts to arrive and I have nearly 100 track sections of the old Lionel that need cleaned. So it's back to the cleaning table I go....
 

Cannonball

More Trains Than Brains
Dec 4, 2006
1,564
0
36
55
St. Joseph, MO
Wow!
That's looking really good.
It almost amkes me wish I could afford to do my layout in Fastrack.
Regular tube track is expensive enough though.