Ijn yubari 1/200

jkrenzer

Member
Oct 2, 2007
126
0
16
Syracuse, NY
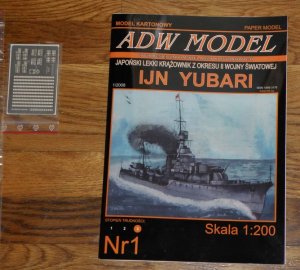
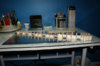
I just got my IJN 1/200 scale Yubari and decided to build her on this thread. I love this ship for 2 reasons, classic Japanese early lines and she was unique. Yubari was built primarily as a test hull for the upcoming gracefully mean CA's. She was meant to prove out the basic hull form that was to be adopted. As such she was a one off ship making her very unique. Surprising she survived till early spring 1944.

I am taking a break from Titanic, the zillion motorized vents are killing my interest. I will build Yubari's hull then go back to Titanic. At that time i will finish Yubari then hope to play a bunch a golf as I am sure spring will be here.

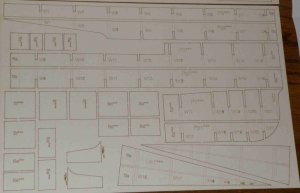
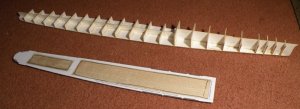
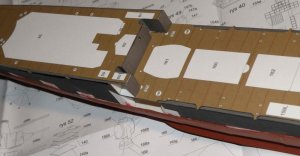
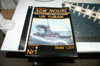
I purchased the laser cut hull frames, 1st time to build with them. I figure why not, I have built plenty of and will continue to build many more hull I have to cut. Probably a wash between the cost of the laser frames and all the number 11 blades i won't need to use up and it will save a tom of times. Plus I think I will get a feel for how good I really do with cutting my own hull formers.

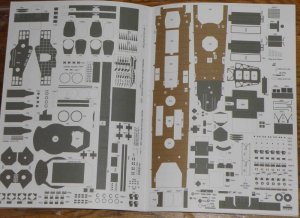
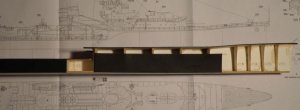
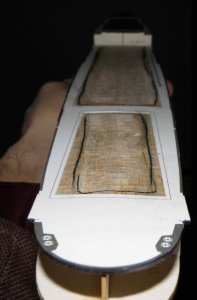
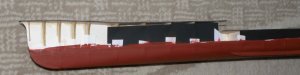
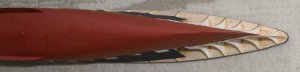
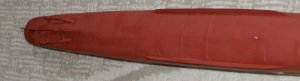
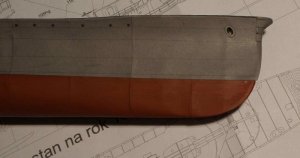
Here are some pics of the parts.

:wave:
 

Attachments

  • P1200001.jpg
    P1200001.jpg
    165.4 KB · Views: 73
  • P1200002.jpg
    P1200002.jpg
    108.7 KB · Views: 49
  • P1200003.jpg
    P1200003.jpg
    108.7 KB · Views: 43
  • P1200004.jpg
    P1200004.jpg
    115 KB · Views: 52
  • P1200005.jpg
    P1200005.jpg
    174.7 KB · Views: 56
M

modelperry

This certainly looks interesting. I will follow your thread closely.

Greg
 

eibwarrior

Member
Dec 17, 2005
568
0
16
54
Knoxville, TN
I've been looking at this model for a while. I've not seen one built, so this should be fun.

The laser cut frames look like money well spent.

Can't wait for some more updates.
 

papastumpy

Member
Dec 20, 2008
140
0
16
Lowell, North Carolina
Got the same kit w/laser cut frames, and w/the laser cut frames you also get some PE as well. All that is missing is a set of barrels. Will watch this build since I too will build at some point. INJ are some of my favorite ships. I thought I would add the following, the PE is laser cut paper/card parts that are amazing.:eek:
 

Teamski

Member
Mar 29, 2007
309
0
16
Delaware
Looks good! Dumb question, I know, but are the frames full thickness? Looking forward to seeing this one in action!

-Ski
 

jkrenzer

Member
Oct 2, 2007
126
0
16
Syracuse, NY
Nothing like these laser frames. they doubled up the supply for the 2mm thickness frames, all the bulkheads and waterline deck. Just laminate and install, I cut notches where the tree was still connected to keep the parts square. 3 hrs work and the waterline up frames are installed. I still laminated the after deck to 1/32 balsa (close to 1mm). The deck is interesting as parts are printed inside the outer area. They have a .5 mm double deck for the Japanese linoleum deck to build up. I will install some spare card so the next level does no sag into the gap. Very fun build for such a short time.

This is the 1st time I ever started a model the day I got it. The guns are 5.7 inch (140 mm) so I will be using the clock pin that I just bought with paper rolled over a portion of the barrel to simulate the telescoping form, I expect it will work fine. I draw the line at 8 inch CA barrels for turned CNC, smaller guns are not noticable from any normal viewing range and not worth the $'s unless they come with the larger mains.

:wave:
 

Attachments

  • P1200001x.jpg
    P1200001x.jpg
    157.5 KB · Views: 55
  • P1200002x.jpg
    P1200002x.jpg
    102.9 KB · Views: 47
  • P1200003x.jpg
    P1200003x.jpg
    159.4 KB · Views: 41

Lex

Dollmaker
Dec 1, 2006
645
1
36
Oxford, UK
I've been looking forward to actually seeing someone building this Yubari. It's a ship I love a lot but the details all look a little forbidding... :D Good luck!
 

jkrenzer

Member
Oct 2, 2007
126
0
16
Syracuse, NY
After placing the upper bulkhead formers I glued the center of the hull with a dab of thich CA in the middle of the hull under former 14 and attached it to a plate of glass. This made the hull very straight. I did this because there was a bow upwards at the hull mid section. I attached the 2 black card stock hull sides, not kit supplied. Once dried I twisted the hull off the glass leaving a small hole under 14 but also a very flat waterline section. If the hull was bowed upward at the ends I would have glued them down at the tips and proceeded accordingly.

I then added the 2 bow false sides making that portion of the bow stiff and square. I did this bacause the bow tip 5 formers were twisted slightly to the starboard. This did not remove the twist until I added the foward main deck. I glued it to the 5 formers with the false sides attached. After that was dried I forced the bow twist out by using the deck and gluing the remaining formers one at a time foward until the tip was attached. The final hull frame became flat as glass.

Last, just attach all the lower bulk heads and keel.

A couple days off now.

:wave:
 

Attachments

  • P1210001.jpg
    P1210001.jpg
    27.3 KB · Views: 49
  • P1210004.jpg
    P1210004.jpg
    34.8 KB · Views: 38
  • P1210006.jpg
    P1210006.jpg
    71.5 KB · Views: 39
  • P1210007.jpg
    P1210007.jpg
    29 KB · Views: 36
  • P1210010.jpg
    P1210010.jpg
    58.2 KB · Views: 45

eibwarrior

Member
Dec 17, 2005
568
0
16
54
Knoxville, TN
Nice start! The laser cut frames probably make a big difference.

Funny on the jar of coins. I look for anything and everything heavy that I can find to put on the deck during mounting. I'm glad to see I'm not the only one with a unique idea of what classifies as mounting ballast...
 

jkrenzer

Member
Oct 2, 2007
126
0
16
Syracuse, NY
I got the lower hull done Saturday. Overall the fit was excellent. I wrapped thin copy paper over each former then added the hull plates. I started at the center and worked both foward and aft. The only poor fit was the usual culprit the stuffing box protrusions. They do not offer a very good angular fit for the shafts. I painted the lower hull with my home mixed IJN red, 1 part each Testers flat red and rust. I laminated the main deck linoleum as specified and will install them next, followed by the main and bow deck supperstructure. After that I will add the upper hull sides.
I will start them tomorrow, shortly my wife and I are heading to the local dive (pup for my European friends) to see the Syracuse vs Louisville NCAA basketball game, so not likely to be in the best model building state afterwards.

:wave:
 

Attachments

  • P1240214.jpg
    P1240214.jpg
    35.4 KB · Views: 39
  • P1240215.jpg
    P1240215.jpg
    51.9 KB · Views: 46
  • P1240216.jpg
    P1240216.jpg
    45.8 KB · Views: 42
  • P1240217.jpg
    P1240217.jpg
    48.7 KB · Views: 59

Teamski

Member
Mar 29, 2007
309
0
16
Delaware
She's looking really good. I'm starting to leave some extra length on the lower hull pieces where they meet the upper hull, a lesson from my HMS Hood build. It seems like you never have enough left at the top ends to cover the seam between the pieces.

-Ski
 

jkrenzer

Member
Oct 2, 2007
126
0
16
Syracuse, NY
I left about 1/8th inch, always have. In this case it did help. The model leaves no added margin. Even the printed parts fit just line to line so I have to color the white edges. I wish printers would not print the glue edge in white but onle use hidden lines to aid in alignment. Also even though the fir was good the decks are about 1/16th inch too long. Since the end of the deck is used for depth charge racks I decided not to shorten it but leave a gap between the hull side and bottom, this will only be visible when viewing the model upside down anyway.
 

jkrenzer

Member
Oct 2, 2007
126
0
16
Syracuse, NY
The decks, hull sides and bow are finished. The biggest problem shown was with the fit of 3 small bow pieces to blend the upper rake of the deck with the sharp cutter bow. The pieces shown attached left a lot to be desired. I improved it bt delaminating some spare card stock and paper machaying it to the bow. I think it improved the look well enough not to be an obvious focal point of the ship. Also shown is the gap at the stern, not visible from the side or above. I could have trimmed the deck to fit bit would have left the upper deck obviously too short. I feel displayed the overhang will not be so noticable. The bow I did trim back about 3/32 inch. Normally I would contribute the miss match to my skills cutting formers but not this time. Overall the decks are to long by almost 1/4 inch and either the laser cut decs are wrong or the kit is and the laser cut parts were modeled from the kit. Overall I like the way she looks so far.
Back onto Titanic, rested enough from those *&%^$ vents, time to make more. Yubari will wait to Titanic is finished now.
 

Attachments

  • P1250002.jpg
    P1250002.jpg
    103.3 KB · Views: 43
  • P1260004.jpg
    P1260004.jpg
    92.1 KB · Views: 40
  • P1260009.jpg
    P1260009.jpg
    94.6 KB · Views: 39
  • P1260011.jpg
    P1260011.jpg
    99.9 KB · Views: 32
  • P1260012.jpg
    P1260012.jpg
    95.9 KB · Views: 36
  • P1260015.jpg
    P1260015.jpg
    124.5 KB · Views: 46

papastumpy

Member
Dec 20, 2008
140
0
16
Lowell, North Carolina
After placing the upper bulkhead formers I glued the center of the hull with a dab of thich CA in the middle of the hull under former 14 and attached it to a plate of glass. This made the hull very straight. I did this because there was a bow upwards at the hull mid section. I attached the 2 black card stock hull sides, not kit supplied. Once dried I twisted the hull off the glass leaving a small hole under 14 but also a very flat waterline section. If the hull was bowed upward at the ends I would have glued them down at the tips and proceeded accordingly.

I then added the 2 bow false sides making that portion of the bow stiff and square. I did this bacause the bow tip 5 formers were twisted slightly to the starboard. This did not remove the twist until I added the foward main deck. I glued it to the 5 formers with the false sides attached. After that was dried I forced the bow twist out by using the deck and gluing the remaining formers one at a time foward until the tip was attached. The final hull frame became flat as glass.

Last, just attach all the lower bulk heads and keel.

A couple days off now.

:wave:
What is the purpose of the black card attached to the sides, is this to stiffen or to black out something behind the hull? I was just curious if the card served another purpose. Thanks.
 

Attachments

  • 001.JPG
    001.JPG
    52.4 KB · Views: 47
  • 004.JPG
    004.JPG
    73.2 KB · Views: 31

jkrenzer

Member
Oct 2, 2007
126
0
16
Syracuse, NY
I usually build the keel full up then add the bulk heads as single pieces. After installing, no glue the bulk heads, I add the two waterline plates. I have found that building the hull in one segment and not restraining it until all the parts are fitted gives the best results. I physically hold the 2 waterline plates, sqeezing them to force the keel to be straight then drip part by part thin CA glue to the bulk heads, aligning them vertically one at a time. Last I glue the horizontal waterline plates.

For this model I purchased the laser cut Yubari frames and was forced to build upper and lower separately. The black paper was added to maintain the upper section straightness while I added the lower frames. I noticed long ago the hulls are not solid (straight) until the paper plating is added, so I cheated. It worked very well. This was the 1st time a used laser cut parts and I guessed or hoped that this method might work. It did.

As it turns out I added the black card stock to the bow even though I already framed and sheethed her lower hull. I got the smoothest raked bow ever, few ripples if any. I think I stumbled on to a nice way to add upper plates without filling and sanding styrofoam as others do. Black works because the seems are dark anyway and white is obviously not.

It helps to look for the easy way out and as an engineer I am always looking for the easier way to do things. That is what makes the world turn after all. Looking for the easy way is the only reason technology exists.

A few more weeks on Titanic and back to Yubari.

Your build will likely preceed mine, it looks good so far. One suggestion, use CA glue to frame her up. No close pins required. CA is a biological cellular glue and works great with wood/paper products.
 

papastumpy

Member
Dec 20, 2008
140
0
16
Lowell, North Carolina
Thanks for the information on your build techniques. I understand now the reason for black card to stiffen the frame work. That was a smart find, kills two birds at the same time. Thanks for the tip on the CA. What type, thin or medium set. Please forgive if I ask too many questions, I followed your Rodney and Titanic build threads and I was impressed with your abilities. This explains the kitchen remodel and ship build at same time, only someone with advance mechanical skills, ie: a engineer could pull that one off. So off to Hobby Lobby for some black card stock. One more question, do you think the laser cut frames vs kit parts and lamination, are a better way to go. It certainly cuts down the spray, stick and cut time, but if the chance is there that the two do not match as you point out (deck/frame), is it worth the price vs saved time. This is my 1st time using laser cut frames as well. If I am keeping you from the Titanic, let me know and I will ask my questions at a later date.:wave: Again, thanks for your help.
 

jkrenzer

Member
Oct 2, 2007
126
0
16
Syracuse, NY
I like the laser cut frames for time savings but have no real preferrance. I use thin CA in framing and medium CA for any styrene and photo etch. White for all else.