Idaho Springs Mine (Campbell craftsman kit)

Nazgul

Active Member
Jan 22, 2006
992
0
36
63
Ohio
I haven't had any time for modeling lately, and with my son's weight equipment occupying the space that was to be devoted to my new layout...I didn't feel like starting the scratch building process for the structures I will be needing for it (yet).

I did feel like doing something however, but what?
Then I remembered the Campbell's kit I purchased (but never built) for my old layout. Seems like a good way to keep a "toe in the water", so to speak.

Here's a link to a pic on Walthers site:

http://www.walthers.com/exec/productinfo/200-433

Originally I planned on building it first and then posting a few pics, but I will post as I go....hopefully you will find it more interesting that way:winker:.

Unfortunately when it was originally delivered, some of the longer wood pieces were broken (thanks UPS:curse:). I will get them tomorrow at the LHS and get going on this project.

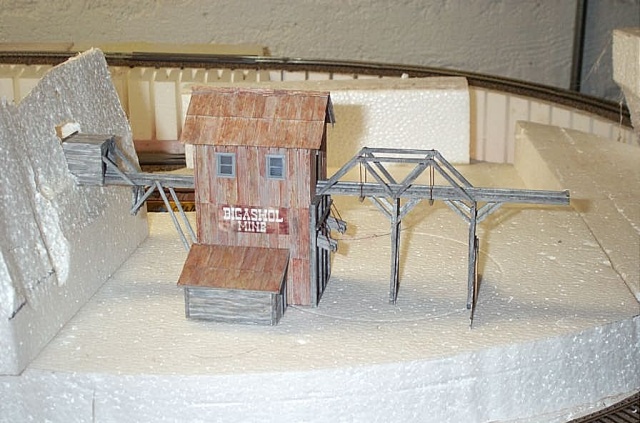
As a little insight to what I am thinking: I believe that I will make this structure a bit run-down, like the Mine is in its last few years of production.....however, I have been known to change my mind in the past, so that may change:rolleyes::mrgreen:. My main goal, as always, is to HAVE FUN!!!!

I'll be back when I get something done:wave:

Take care
 

TrainNut

Ditat Deus
Sep 15, 2004
1,731
0
36
54
AZ
Sounds like fun. Maybe instead of building just the structure, you can add a little of the surrounding scenario by building a small diroma (like in the picture) for now that you can "plug" into your main layout later. Welcome back!
 

UP SD40-2

Senior Member
Apr 29, 2006
2,709
0
36
58
Steve:mrgreen: , SO GLAD to see your doing some modeling:thumb::thumb: .
MY opinion, make it run down, its a wood structure, and if you ever added it to a layout(i hope:winki::mrgreen: ), this way it would better go with the engines you currently have:winki: .

I am really looking forward to seeing this project progress:thumb::mrgreen: .
 

Nazgul

Active Member
Jan 22, 2006
992
0
36
63
Ohio
Hello guys...

TN...thanks for the welcome back:thumb:
Maybe instead of building just the structure, you can add a little of the surrounding scenario by building a small diroma (like in the picture) for now that you can "plug" into your main layout later.

I like your idea but there really is no place for it on the future layout (except maybe as a partially obscured background building) and I don't have a place for a diorama......but I would like to place it in a finished environment, so I will continue to mull it over......thanks for the suggestion:thumb:

nkp174...Nice pics!:thumb::thumb:

Deano...my very good friend....good advice as usual! As I mentioned above, I don't think it will ever make it to the layout but, I will be going for the run-down look:thumb:

Small up-date:
My LHS did not have the wood I needed (it has to be the worst HS in the world, they have a tiny selection of stock:curse:) but I managed to strip down some larger pieces and got by with that.

The first step was to simply stain all the wood pieces. I used the ever popular India ink/alcohol wash ( I poured it in a tall thin container and submerged the wood for about an hour). I also aged it with a little dark gray chalk. When it is put together I will weather it further and loosen & split some boards as well.


Picture035.jpg


Not a very good picture but you get the idea.

Next step will be to start on the corrugated iron panels.....

Take care
 

jesso

Member
Jul 21, 2006
702
0
16
53
Washington, Utah
www.thetechfamily.com
I can already tell that it is going to look great! I like how your weathering looks.

I do however, have to argue with you about your hobby shop being the worst. I am fairly sure that yours would be a welcome upgrade to mine :) Unless you are into planes, the entire store in dedicated to that.

I'm glad you're back, everything you build has been inspiring to me!
 

Nazgul

Active Member
Jan 22, 2006
992
0
36
63
Ohio
Scott...I tried replying the other day but that was when the servers were being switched....any way......
I love seeing your creativity and ingenuity on display in all of your excellent work! Talk about inspiring:eek:!:thumb::thumb::thumb:
I must vow to your conviction that your LHS is worse than mine:winker: but mine has to be a close second:twisted:.


I cut the cardstock wall and roof sections out....here is a pic of those pieces. I intentionally pixelized the shot so that the wording on the parts would not be legible (I don't want to infringe on Campbells work):winker:

Picture0362.jpg


Next, I got started on cutting the corrugated metal sheets. This kit includes sheets of4 different scale heights: 12ft, 10ft, 8ft, (for the walls) and 6 ft (for the roofing). All the sheets need to be cut into pieces with a scale width of about 26" (24" plus overlap). That means cutting them about 5/16" in actuality.

Picture041.jpg


That's one done, only about 8 more to go:eek:!
The hardest part about cutting these panels is trying to see those tiny grooves!sign1

That's were I'm at now.....

take care:wave:
 

Doc Holliday

Member
Oct 27, 2002
613
0
16
Big Valley, California
I do however, have to argue with you about your hobby shop being the worst. I am fairly sure that yours would be a welcome upgrade to mine :)

At least you guys have them. I live in a city of 280,000 that doesn't have a LHS.

Looks like you're off to a god start.

Here's how mine (no pun intended) turned out.
bigashol_mine.jpg

Doc
 

CCT70

Member
Jun 25, 2003
519
0
16
At least you guys have them. I live in a city of 280,000 that doesn't have a LHS.

Looks like you're off to a god start.

Here's how mine (no pun intended) turned out.
bigashol_mine.jpg

Doc

Yeah, Doc and I are poo outta luck when it comes to shops here in Stockton. We used to have two train shops, one was in the old trophy room of the local bowling alley and was the size of a bathroom. Good folks, bigger selection than you'd think for a shop the size of an average bathroom, but the selection was still pretty small, and there was a place downtown where the guy was a crook and went out of business with a lot of VERY expensive brass consignment models. His prices were attrocious too. He was always looking to stiff someone too, so you really felt sleazy walking in the door, at least I did. I got burned there twice. Now it's a 20 minute drive to Railroad Junction in (s)Lodi, but Lodi is a yuppy town, the shop is one of the best I have seen, but the prices are really high (list) and the new owners don't know a whole lot about model railroading now that Roger (the original owner) has retired.

So... I use Ebay.
 

CCT70

Member
Jun 25, 2003
519
0
16
Scott...I tried replying the other day but that was when the servers were being switched....any way......
I love seeing your creativity and ingenuity on display in all of your excellent work! Talk about inspiring:eek:!:thumb::thumb::thumb:
I must vow to your conviction that your LHS is worse than mine:winker: but mine has to be a close second:twisted:.


I cut the cardstock wall and roof sections out....here is a pic of those pieces. I intentionally pixelized the shot so that the wording on the parts would not be legible (I don't want to infringe on Campbells work):winker:

Picture0362.jpg


Next, I got started on cutting the corrugated metal sheets. This kit includes sheets of4 different scale heights: 12ft, 10ft, 8ft, (for the walls) and 6 ft (for the roofing). All the sheets need to be cut into pieces with a scale width of about 26" (24" plus overlap). That means cutting them about 5/16" in actuality.

Picture041.jpg


That's one done, only about 8 more to go:eek:!
The hardest part about cutting these panels is trying to see those tiny grooves!sign1

That's were I'm at now.....

take care:wave:

SWEEEEEEEEEEEEET. Great to see you back!

I am looking forward to seeing what you do with this one, but since you aren't going to use it on your next layout, what are you planning to do with it? Photo diarama? Or maybe Ebay it to fund another project with the layout?
 

doctorwayne

Active Member
Sep 6, 2005
3,516
0
36
Canada, eh?
Steve, I've found that a NWSL "Chopper" is useful for cutting the Campbell corrugated siding - once you set the "stop" where you need it, you can crank out the panels pretty quickly. Because the "chopping board" on mine is pretty well worn, I put a sheet of .015 aluminum atop the area where the blade does the actual cutting, then placed the siding material atop that: a firm pressure on the blade handle ensures that it cuts through, and one blade should last long enough to do all the sheathing before it becomes too dull.
When I build anything using the corrugated aluminum, I first coat the back of the entire sheet with contact cement, letting it dry to the touch completely, then cut the individual sheets: it's a lot less messy than trying to coat each individual piece, and you have several hours "working time" with any good contact cement. Just make sure to place each cut piece very carefully and separately on a sheet of newspaper, glue side up, as you cut them. If they touch one another, you won't get them apart. :rolleyes::-D

Wayne
 

cnw1961

Member
Jan 7, 2006
846
0
16
65
Germany
Hey Steve, good to see you working on a model again. :wave::thumb: But don’t you think that this cute little mine is begging for a small diorama???? :twisted:
 

Doc Holliday

Member
Oct 27, 2002
613
0
16
Big Valley, California
When I build anything using the corrugated aluminum, I first coat the back of the entire sheet with contact cement, letting it dry to the touch completely, then cut the individual sheets: it's a lot less messy than trying to coat each individual piece, and you have several hours "working time" with any good contact cement. Just make sure to place each cut piece very carefully and separately on a sheet of newspaper, glue side up, as you cut them. If they touch one another, you won't get them apart. :rolleyes::-D
Wayne

Great idea! Wish I'd thought of that.
Doc
 

ocalicreek

Member
May 4, 2005
824
0
16
48
Puyallup, WA
groups.yahoo.com
Hey there Steve! I'll be watching the progress - glad to see you back in the saddle. I've been off n on all summer (if you can call it that with this wacky weather) so I can comiserate with you...but my son isn't into weightlifting yet. He's still into the little wooden trains so I can get my tracklaying & planning kicks there...even operation, if he lets me.

My 'toe in the water' has been the Shifter project. A few minutes here and there is good mojo. It's like the old procrastination trick - just start doing SOMETHING and hey, before you know it you may actually be working, er, modeling! Just plan the project out into small chunks where you can devote 5 or 10 minutes a couple times a week and before you know it you'll be there!

Looks great so far, keep up the good work!
 

Nazgul

Active Member
Jan 22, 2006
992
0
36
63
Ohio
Doc H....Thanks for stopping by!:thumb:. How's your AWESOME layout coming along????

Tom...It may become part of a diorama. I never thought about selling it however. How is your long stored layout shaping up? That is going to be sweet....again!:thumb::thumb:

Wayne...Unfortunately, I saw your post too late to help me on this project, but I will "file it away" for the next time I use the corrugated panels:thumb:. Thank you for the advice, it is much appreciated.:thumb:

Kurt...
"don’t you think that this cute little mine is begging for a small diorama???? :twisted: "
That's nice of you to offer to make me one (what a great friend you are!):thumb:....When can I expect it?:twisted::gaptooth:

Galen...
"My 'toe in the water' has been the Shifter project."
Are you posting the project? I haven't seen it:eek:ops:.
You are right about doing even just 5 or 10 minutes of modeling.....before you know it, you have actually accomplished.....something:winker:.


Well, I didn't get a chance to use Wayne's method of cutting and applying the corrugated panels.....I had already cut them and was using Walthers' Goo to attach them before I read the postwall1:rolleyes:.
It turned out fine but it would have been easier the other way.

Here is a pic of the walls and roof sections.....no weathering yet:


Picture042.jpg


Next, I need to paint and weather them......pics when I get them done:thumb:.


Take care:wave:
 

Doc Holliday

Member
Oct 27, 2002
613
0
16
Big Valley, California
Doc H....Thanks for stopping by!:thumb:. How's your AWESOME layout coming along????

Next, I need to paint and weather them......pics when I get them done:thumb:.

You're progress is looking good so far. Am anxious to see the weathered pics.

The BAD Western is significantly suffering from a serious lack of available time. I'll bet it's been at least six months since I did anything. :sad: I'm trying to get re-motivated but am actually having terrible thoughts about hanging up my train whistle.
Doc
 

Nazgul

Active Member
Jan 22, 2006
992
0
36
63
Ohio
Doc...it would be a shame to lose that layout....I always felt that it was kin to my (now defunct) layout. I know the feeling.........


Weathering....
First I sprayed all the panels with Dullcoat
After drying, I sprayed on a light gray.
When that was dry I gave it an India ink wash with the brush.
Next I added the rust (acrylic paint).
Lastly, I thinned the original gray paint and went over any areas that needed to be "toned down". After I put the structure together, I will probably "tweek" the rust and grime as needed.

Picture0432.jpg


Take care for now:wave:
 

UP SD40-2

Senior Member
Apr 29, 2006
2,709
0
36
58
WHOLLY SMOKES STEVE!:eeki: , STUPENDOUS job on the weathering:thumb::thumb: .

REAL GLAD to see you posting regularly on this project too:winki::mrgreen: .
 

Nazgul

Active Member
Jan 22, 2006
992
0
36
63
Ohio
Deano...Thank you very much, my friend!:thumb::thumb::winker:

This is just a quickie update:

I figured while I was painting, I would do the windows and door.

First the parts as they come (white plastic):

Picture050.jpg


First thing I did was Dullcoat everything. Next I airbrushed them black. After drying, I sprayed them with a thin coat of light brown (the shovel I kept black).


Here they are finished:

Picture0682.jpg


I told you it was a quickie!:winker:......that's all I got done


Take care:wave: