How to weather Little Johnny's trains

jon-monon

Active Member
Aug 15, 2002
4,590
0
36
59
Cobblers Knob, IN
www.2guyzandsumtrains.com
OK, as stated on the weathering thread in general, we're gunna go shopping for about $20 worth of stuff. You should also consider getting some old rillin stock that you don't care if it gets ruined. You need:

3 large bottles of flat latex poster paint (one black, one white and one brown). Any cheap latex paint will do. I got mine at hobby lobby for $2 ea., $6 down, 14 to go :D

Get an assortment of reasonable quality small paint brushes, hobby lobby or discount store. They have 6 or 8 in apack for $3 or $4. Leaves us with the other half of that $20, eh?

At the discount store, they should have a hobby section, seperate from the toys/models, and they have artsy fartsy latex paint assortments with the littel plastic bottles stuck together with flip up caps, about $3. Look for earthy colors (see the rust section in pt 2). In the same area they should have disposable plastic pallet to mix up paint on for a buck.

Over in the moddelers area locate a bottle of Testors Dullcoat, about $3. And over by hair care, grab three spray bottles for a buck each. If you come out a dollar short, throw the pallet back; it's a luxury :D

~~~~~~~~~~~~~~~~~~~~~~~~~~~~~~~~

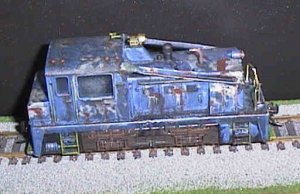
The first thing we'll do is a "dark wash". Half fill a spray bottle with water. In one of the spray bottles, add two or three tablesspoons of black paint and shake it up. Oops, put the lid on before you shake it, sorry. Then shake it up real good and then add a little squirt of dishwashing soap. This acts as a surfactant to break upo the surface tension and it makes it easier to undo the wash if we don't like it, or we get it all over mama's sink or something. In the other bottles, you can do the same thing with brown, or a mix of black/brown and maybe even try adding a little white to lighten it up for very dark cars.

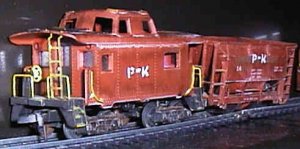
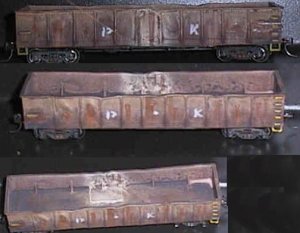
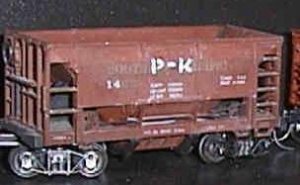
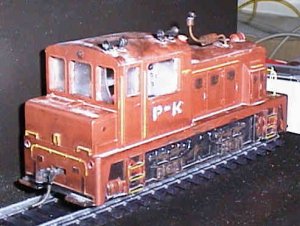
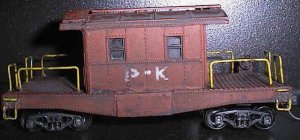
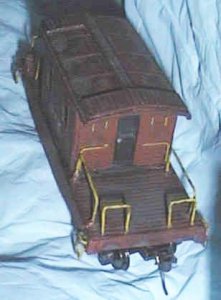
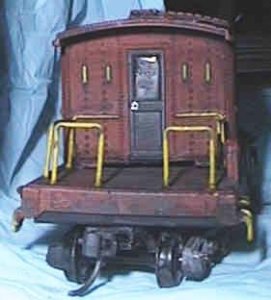
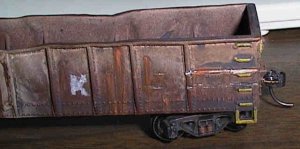
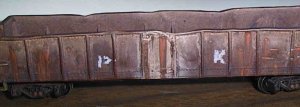
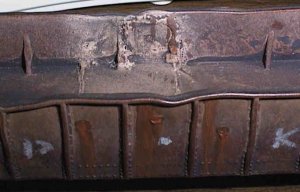
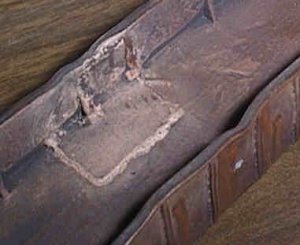
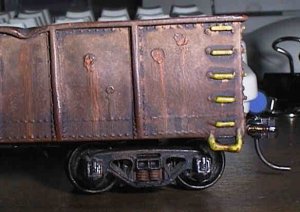
If youhave nice couplers and trucks, you should remove them or cover them up. Take a piece of rollin stock oputside and spray it down real good. Completely cover all surfaces, then let it build up where it wants to and drip or run if it likes. It looks like this:
 

Attachments

  • pk26.jpg
    pk26.jpg
    15.6 KB · Views: 259

jon-monon

Active Member
Aug 15, 2002
4,590
0
36
59
Cobblers Knob, IN
www.2guyzandsumtrains.com
pt 2

If you don't like the result, you can just wash it off. Once you are happy with the result, go outdoors and spray it with dullcoat to "lock it in". You have to lock in one step before going on ot the next, so if there's a mistake, you can wash off the mistake, without wiping out all the efforts.

~~~~~~~~~~~~~~~~~~~~~~~~~~~~~~~~~

Next I paint the underside grung. Grung is an approximate 50/50 mix of black and brown. I brush it all over the bottom side with a relatively large brush (1/4" to 1/2"). I don't worry about a smooth finish or getting every scale square inch. I don't have a picture, just do it, it'll look good in the end. Ugly. Lock it in.

~~~~~~~~~~~~~~~~~~~~~~~~~~~~~~~~~

OK, next we add some rust. Rust can be about any mixture of red, orange, brown or even dusty rusty grey. Older rust tends to get darker and fresher rust oranger. Get out those cheap paints, and mix up some rust. Try mixing orange and brown. Orange and tan. Orange/brown/tan. Experiment until you get several nice rusty colors. You might look at some real rust for inspiration.

Once you have your rust mixed and ready, use a small prush and paint the truck springs one color. With a teeny tiny brush (#0? I don't know, just the smallest I can find) add rust here and there in the many placed where paint might get knocked off, railings, steps, etc. Go ahead and free hand paint some streaks down from the rust, if you like. Hinges like to rust, or produce black crud. Dry brush the streaks if you want them to be more subtle.

Then get a rusty color, I like to use one different than we used on the springs, and dry brush, that is use a little paint, then blot out the brush on a rag, then brush a little onto the raised areas of the trucks. Just the raised areas on the outer surfaces. This really brings out the details. I use a 1/8 to 1/4" brush and dedicate it to this duty, because it tends to look like it just woke up after all that blotting.

Ever see those rust spots break out in the middle of a car door, or fender, a 2 or 3 inch circle that bubbles up, the paint peels and then you get a big ugly streak? Wnat that? Take a toothpick and touch the end in some rusty paint, then paint a dot where you want the rust. Do several. Do it rat over the logo if you like, do both sides. Let it "half" dry for a couple of minutes, then take a paper towel and wipe downwards to form the streak.

Like it? Lock it in! If not, you can wash it off.

This gondo received the full treatment. Before even painting it, it got tourched and bent up. An accidental burn through was patched with a piece of brass shim.
 

Attachments

  • temp.jpg
    temp.jpg
    28.1 KB · Views: 342

kettlestack

Member
Jan 18, 2002
859
0
16
84
Scotland UK
Visit site
Hey Jon, those little gandy dancer fellahs sure made a good job! How much training did the need before you cut them loose with a torch and paint??:) :D :D :D :D
I suspect they were the crane operators who loaded the Eodes into the gondolas :D :D
How's your employee liability insurance?? (chuckling here)

Errol
 

jon-monon

Active Member
Aug 15, 2002
4,590
0
36
59
Cobblers Knob, IN
www.2guyzandsumtrains.com
pt 3

You can do another wash at any time and the effect will be to subtle out the weathering you already added. Rust streaks and such will become more natural. Some may dissappear, but you can just add them back. Just be sure to Lock in with dullcoat when you are happy with it. These steps can be performed at any time throughout the process. Usually I do a wash at the end, but you don't have to. A repair can be fresh if you like and the rest of hte car more weathered.

Add a patch, or just repaint a spot. I like to paint over the old road name, and put on my own. I take a color that is close to the original. Not very picky at all here, +/- about ten shades. Then mix 50/50 with white, then paint it over the patch or repair area. The gondo patch above is a good example.

This old ore car got a thin coat of a close color brushed over the old roadname and part of hte number, allowing the "Southern Pacific" to show through. No secrets here.
 

Attachments

  • temp.jpg
    temp.jpg
    11.4 KB · Views: 240

jon-monon

Active Member
Aug 15, 2002
4,590
0
36
59
Cobblers Knob, IN
www.2guyzandsumtrains.com
pt 3

:D :D :D ya, those little plastic guys don't take care a nuthin. They drop Eoads on the sides and ding it all up and they won't wash it to keep it from rustin out!

You can add some details lke yellow, or white to all the grap rails, and steps. If you freelance, you can go wild here, or if you are strick to a prototype, better consult some photo's. Just grab a small brush and dip just the tip and drawit out on the raised surfaces. This one blows the budget, though, as I go with testors acrylics. Add some contrasting colors to parts on the underbelly, esp. the gizmos that stick down. Brake wheels can be painted yellow or white. I guess N scale flag painters could go for black/yellow stripes :)

Some people like to take a little gloss white, tan or other desireable light color and highlight , that is, they draw a line out on an edge that is not normally painted a contrasted color, to simulate sun glare. Looks good, I haven't tried it.

Add some glass. Break some glass. Black wash on the windows just makes them dirty. Blimblammin little plastic !@#$ard was suppost to wash up the winders fer me! :mad: See the whole story behind this rascal, click rat here!
 

Attachments

  • pk17.jpg
    pk17.jpg
    21.6 KB · Views: 271

jon-monon

Active Member
Aug 15, 2002
4,590
0
36
59
Cobblers Knob, IN
www.2guyzandsumtrains.com
randumb other thots

Airbrushes: I hear they are hard to clean. I guess I don't have a real one, because mine is real easy to use and clean. It's a cheap testors detailing brush. Cost about $30. I used it to paint the patch on the gondo. I don't know what other uses I'll find for it. It's a fun little gizmo, and it's easy to make is look like a little plastic guy took a rattle can to something. Or maybe he even used a proper spray gun.

Wheelsets: I paint the inside edge of wheels a dark flat brown. The outside depends on the vintage. There's a thread somewhere, all I remember is that t. knows. He can go out in his back yard and look if he can't remember :D :D :D

New damage: you can't see it on the gondo, but there is some new fresh damage that came out real good. A big scratch downt he side. I melted it in, then painted the exposed bare metal silver, then watered out some fresh orange rust and lightly hit it and streaked it down a little.

Foot traffic: you can dry brush in some dirty foot wear, esp. if on a wood surface, I don't have a very good pic, but this looked really bad after I did it, the subtled out very nicely after I washed it in black. You could do that on steps or foot hoops. Or use silver paint for exposed metal that doesn't rust because it keeps getting stepped on.

More on your wash: You might try distilled water if you get residue that you don't want. I get some, it shows up more in the pics than to the naked eye (hey! getcher clothes back on, you eye! Sheesh). I like the residue, but I'll bet some folks won't.
 

Attachments

  • sor-glass3.jpg
    sor-glass3.jpg
    34.2 KB · Views: 221

shamus

Registered Member
Dec 17, 2000
3,489
0
36
87
UK
Hi Jon,
Looks like you have been damn busy with an airbrush, nice paint jobs, but I feel sorry for the Gons all mangled up like that. :D

Shamus
wink.gif


SLOW

Member
Nov 18, 2002
168
0
16
65
buffalo ny
Visit site
Re:

Thanks!! That is a great help!! I do have an art background so I think I will have a lot of success with these methods. I just didn't think of doing it this way but it makes sense that it would work out well. This is SUPER!! I can't wait to get started!!

Michael
 

jon-monon

Active Member
Aug 15, 2002
4,590
0
36
59
Cobblers Knob, IN
www.2guyzandsumtrains.com
No prob., slow, just turn us on to some of those buffalo wings :D :D :D I brought in the gondo and the shack on a raft to try and get some better shots of the damage, I'lll try to post later. Also, I think I said early on, probably on the other thread, that this is "my way" of doin it, well, I certainly didn't invent the techniques. I found them on the internet, and I'll try to retrace some of my steps and find some of the links. With an artistic background, you'll have an edge. I don't have that nack, so I have to follow steps :(

Shamus: BTW, all that was air brushed was the repair patch on the gondo. The rest is all brushwork. Future paint jobs will probably get more air brush treatment. Last summer in MR there was an article on using an air brush to weather steam engines and I want to give that a wack.

I have not attempted any weathering on the couplers on any of my rollin stock, anybody got and hot and heavy tips on that topic??? I thot maybe paint them grime, then dry brush some nice rust to highlight them???
 

Lackawanna Jim

New Member
Nov 27, 2002
49
0
6
NJ
Visit site
Hey Jon;

Nice work! I really like your lettering, too... As far as weathering your couplers, I wish I had masked off my Kadees before weathering with diluted Floquil that I airbrushed on. Problem is, the ultra-flat Floquil makes the coupler faces bind up, enough that I have to hold on to the car to engage the coupler. So, out come the cotton swabs and the lacquer thinner... Any one else have this problem with Kadees that got paint on 'em?

Jim
 

jon-monon

Active Member
Aug 15, 2002
4,590
0
36
59
Cobblers Knob, IN
www.2guyzandsumtrains.com
This is the peer review I was talkin bout. I woulda said to paint em flat brown, then add a little grease here and there and some darker brown for oil stains. Then you'd be replacin all your couplers and sending me the bill! Then I'd be tossin it in the trash with all the others. Thanks guys, I'll be leavin thse couplers alone now :D :D :D