How to superdetail a PAtoroch Leman Russ

jherazob

New Member
Mar 25, 2008
66
0
6
You're right, the pictures are very clear by themselves, but still it would be nice to have an english version, i bet there's many "so that's what they wanted to do!" moments in that gallery
 

Wojtee

Member
Jun 8, 2008
151
0
16
Prague, CZ
I can try that, they taught me Russian long time ago (but it was the right age, because I still can read and understand (more or less) it.)... So first try here:
(I try to translate from top to bottom, from left to right)

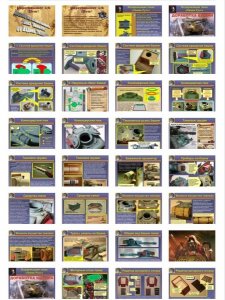
1/55 - Upgrade of basic model kit of tank Leman Russ by Vadim "Patoroch"

2/55 - Aim of the presentation - To show possible upgrades to the standard tank model. In the first plan, the photodocumentation is oriented towards those, who build (or have built) the Leman Russ. But the material is for everybody who can feel the vibration of the paper body of a war machine and can hear the clang of the cardboard tracks (wow, nearly poetry)

3/55
- Modernization of Leman Russ tank
Object of the work: Leman Russ Tank
Source materials: A set of details for the model
Developer of drawings: Patoroch
Construction materials: paper, cardboard, wood, plywood, foil, copper, aluminium and steel wire, polystyrene, opaque and clear plexiglass, various synthetic tissues, metalic and (?) meshes, imitation leather.
Used Glues: PVA (polyvinylacetate) for paper and cardboard, "Moment" a clear one for combination of materials, DCE (dichlorideethan (?)) for details from polystyrene.

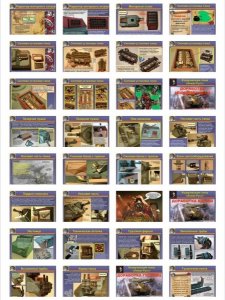
4/55 Upgrade of the turret

5/55 1) Turret turning system
Problems: Open hatch and make space for a figure
Secure the gun barrel in the turret, eliminate its sagging
Provide fluent turning of the turret around its axis
Eliminate moving of the turret from its vertical.

To solve these problems it was necessary to change the system of the turret turning. (left is standart, right is new one). The small print inside means "turret turning axis".

Would this be enough? Sorry, neither of these languages is my native, so I need to dose it to myself in smaller amounts ;)
In case someone is interested, I will continue this way ;)
 
Z

Zathros

Well, all I can say after seeing all that magnificence is I am officially depressed..........................O.K., I'm over it. Extremely beautiful work, Incredible. The only thing that could top it would be one that worked and cold shoot up things!! :)
 

Wojtee

Member
Jun 8, 2008
151
0
16
Prague, CZ
6/55 Points in the system of turning turret
A hole for setting of the guide sleeve
Turning cylinder with the bottom of the turret
A guide sleeve with the structure under turret

7/55 The base is made from corrugated cardboard, glued into blocks. Every empty place in the model is filled with these blocks (the hull, the track blocks)

Base for the guide sleeve in the tank body

8/55 Turning cylinder with the bottom of the turret
To prevent deformations, the cylinder is filled with washers of the corrugated cardboard
Everything is painted with black indian ink to cover the anchoring of the barrel and the spotlight bracket
View of the turret from below

9/55 Episodes of work on the turret turning
Strenghtening of the turret bottom with additional plate
Connecting the turning cylinder to the turret bottom
Fastening of the base made of corrugated cardboard
Connecting the sleeve to the under-turret structure

10/55 2. Outer fitting of the turret
Tasks:
1) Make barbette and a hatch
2) Fastening of hooks for turret removal
3) assembly of instruments and sensors
4) assembly of the gun
5) rebuild the spotlight
6) mount the ladder and staples for the crew acces to the turret
7) mount the antenna
8) attach the personal properties of the crew
 

Wojtee

Member
Jun 8, 2008
151
0
16
Prague, CZ
11/55 Barbette of a commander's hatch
Barbette is made by gluing the ring of paper strips to a needed diameter. Foil and paper are glued afterward, to look as commander's viewports. From the top is glued a thin shape to mask the layers of paper. Everything is glued-through with PVA glue and painted with gouache color to the desired camo.

Cutaway of the turret

1 - supporting ring - to prevent the barbette form falling through
2 - "depth" ring - imitates the armour thickness
3 - part masking the layers of the rolled paper
4 - supports for hatch hinges
5 - plate thickening the top of the turret

12/55 Commander's hatch
Hatch covers
Problem 1: Open hatch covers all free space on the turret
Problem 2: The covers do not have any support on the top of the turret
Solution:
Spotlight moved to turret side
Antenna is mounted on the box on the rear
The instruments are lowered, the eyebolts support the open hatch

13/55 Commander's hatch
a "wing" of the hatch
Door hatch
barbette
eye of the hinge

in the small frame: imitation of the welded conections
1 glued
2 without glue

The hinge of the hatch is made using a wooden toothpick. It is not divided to segments. Cut grooves are painted black, imitating the graphite lubricant. These grooves act like the gaps in a real hinge. Weldings are imitated using glue on correct places on the hatch door and on the barbette. The whole seems like it is made from more pieces.

14/55 Commander's hatch
View of the whole thing.
Tank drivers seldom wash hands (at the arrow)


15/55 Lifting eyebolts on the turret
How to make the eyebolts:
The hook is made from copper wire. The basis is made from a small piece of cardboard. Holes are drilled in the turret where needed. (1)
The bases are glued to the turret using PVA glue. (2)
The hooks are glued from the inside of the turret with the "moment" glue. Afterwards the copper and paper are painted with acrylics. (3)

You can see on the photo, that the eyebolts are used to support the hatch wings.

16/55 Tank gun
Tasks for making the gun:
- make new mask of the gun
- make the barrel and ejector
- make new muzzle brake with openings

The cause of the gun alteration:
In the kit the gun is segmented. The barrel is not continuous and is closed already at the muzzle brake. This significantly reduces the models appeal.

("comics" window)
On the enemies of Empire, load armor-piercing, FIRE!
We cannot, Sir! We have something stuck in the barrel!
 

Wojtee

Member
Jun 8, 2008
151
0
16
Prague, CZ
17/71 (what?! They added some more ?!)
On the photo on the right can be seen a "tech-heresy". The barrel is lengthened and strengthened by a plate. Somehow closing to the famous and popular "Vanquisher" gun. The design is not invented, but taken from plastic "Citadel" Kit of Leman Russ tank.

(picture, left to right: Muzzle brake; Patch; Ejector; Barrel; Mask)

(lower picture, top to bottom: Curved piece of cardboard; Details from the original kit)

Taken by a gigantomania, I wanted to make a monstrous caliber gun. The front of the turret had to be reworked for the new gun to fit (not sure with the translation here, but it does not seem that important regarding the technique:rolleyes:)

18/71
The hardest (in technological sense) part - the muzzle brake. To make it from rolled card showed as impossible. In such small diameters the thick card bends irregularly and breaks.
The solution: The detail is made from separately rolled rings of paper. The openings were made after the rolling of the tubes. Whole detail was then covered with PVA glue to make the appearance consistent. The rolling of such small diameters is rather tedious but the result is well worth it.
Pictures:
Rings of variable width
Rings with parts cut out

Rounding formed by glue

Final result after painting

19/71 Turret Spotlight

The diameter of the spotlight was taken from a car model my son happilly broke. Protests and domands to return the spotlight had been rejected with harsh words: "Everything to Front! Everything for Victory!"

The spotlight is mounted on a rod, drilled into a paper.

20/71 Instruments on turret

Standard instrument has a small recess from the horizontal. Made a new one, with new panelling and a visor.

This instrument was impossible with the hatch open. A lower one had to be constructed, plus another one on the other side.
 
Z

Zathros

You have put such great effort into this, I am putting up Thumbnails of Patoroch Pictorial Essay so some can realize the great effort and information supply going on here :)
 

Attachments

  • LRus1.jpg
    LRus1.jpg
    153.9 KB · Views: 51
  • LRus2.jpg
    LRus2.jpg
    149.3 KB · Views: 30
  • LRus3.jpg
    LRus3.jpg
    41.3 KB · Views: 42

Wojtee

Member
Jun 8, 2008
151
0
16
Prague, CZ
21/71 Means of communication

Photo: Operating position of the transmitter. It retracts into the turret when not in use.

Text:
No! This is not a militia car flasher! This is sending and recieving device of cosmic communication device "Sphere". It serves as means of information exchange between tactical force and the orbiting spaceship. "Sphere delivers intelligence info, calls for reinforcements or fire support. Its presence on a command vehicle ensures succesful combat performance as well as a last chance when the situation goes critical...

22/71 Means of communication

Photos:
General view of the radio station and antenna

In the radio compartment a basis for the antenna

Semifinished antennas - the needles from needle matrix printer

Text:
It is needed to pinpoint where the radio station is placed on Leman Russ. In various sources it "travels" on the turret or the tank hull. Therefore I deliberately placed it on a place - in a "cargo" box, hung at the back of the turret. It turned out to be a sector for radio.

23/71 Baggage for the crew

Photos:

Paper, cardboard

Copper wire

1,2,3 :twisted:

Text:
To "liven up" the dull turret boxes (1, 3) and the radio compartment (2) I made hinges and handles of the covers. The opening is a place for antenna. After removing of the antenna the compartment for the radio equipment is accessible.

24/71 Baggage for the crew

Photos:
A synthetic white cloth with a shallow texture was primed to light khaki. Then the camouflage was painted with guache colors.
The buckles on the belts were imitated with a metallic foil.
The belts made of thin strips of immitation leather. To achieve the effect of pressing the fabric by the belts, the roll was constricted by a few wraps of sewing thread before placing the belts.

Text:
Communications devices and modifications show this is a commander's vehicle. Therefore it should carry a command tent. It gives the possibility to make a command point for the tactical units.

25/71 Baggage for the crew

To make the impression of "moving flea market" I hung on the left side of the turret some belongings of the crew - canisters for water (anti-freeze, oil, spirit etc...) and a pack of rope. The canisters are plastic (I repent, I was too lazy to make these from paper), taken from a set of RAF pilots (by company ISM, scaled 1:48 ). The rope is from waterproof thread, its advantage - it does not lint. Used by anglers, available from them. I glued the pack with PVA glue with great effort, as the thread is rather tough.

26/71 Steps and handles on turret

To make the life of the crew a bit easier, I made for these tough guys a step and a handle. This way they get into the turret.

Access to the turret from the left side is not convenient. The door of the hatch exceeds the turret, because the axis of the hatch is moved to the left of the longitudal axis of the tank.

Inside:
1 - metallic mesh glued by a two-sided tape. Painted with acrylic paint, which was partially removed to look as a worn surface.
2 - the frame of the step has a groove for the mesh. Made from cardboard and painted with guache.

27/71 General view of the turret
The cut out kit suggests a machinegun mount on the turret. It is possible to place it in the front part, out of the zone of hatch opening. This is not exactly the case for improving the model, rather another standard task. The figure of tank commander and its placing was not addressed. Well, did not find the right one. But a place for him was made, and that was the main task in modification of the hatch.

28/71 GLORY TO THE EMPEROR!

29/71 Modernisation of Leman Russ Tank
Finishing of the engine.

30/71 Engine compartment of the tank
Photo on the left:
The default variant:
Task 1
Task 2
Frame + plastic jalousie

Planned variant:
frame + mesh + covering rods

Frames on the right:
Task 1:
Remake the upper cover of the engine compartment, change the jalousie to ventilating mesh.

Task 2:
Include the cooling intake with a mesh into side panel of the engine compartment.

Comics window:
He does not have permission for that from Mechanicum! We need to call a squad with flamethrowers immediately!