How do you keep it clean????

RI541

Member
Feb 20, 2002
634
0
16
Winchester N.H.
Visit site
That wood stove you got don't help, and if you running a forced hot air furnace I'd make some filters(cut down from bigger furnace filters) to go inside you floor registers.

I have two cats that have made the lay-out thier beds. I use a shop vac to clean up the dust and Willows hair, but it won't pick up Tikkis hair since its so fine, tried a lint roller but she's the mountian type cat.

Any ideas on this???
 

aartwmich

Member
Nov 30, 2002
383
0
16
65
SW Michigan
www.angelfire.com
The woodstove rarely gets used..I have hot water heat... NO air filtration, which is good and bad.

But aren't the hinged backdrops cool?? I'm feeling very clever having gotten those up today...probably won't feel so clever after the 5th coat of primer to start the scenery painting over AGAIN!!

----------------------------------------------------------------------------------

The best cure I found for cats is "Ed's cat-be-gone"

You call Ed and the next day the cat will be gone LOL :p :p :p
 

RI541

Member
Feb 20, 2002
634
0
16
Winchester N.H.
Visit site
The hinges are a great idea.

Oh, I was wondering if I could get a close up of your caboose, The one on the lay-out. I was going to ask in the "Face behind the name" post but I didn't want to get slapped:) :) :) :D
 

RI541

Member
Feb 20, 2002
634
0
16
Winchester N.H.
Visit site
Thanks twice,

First for posting that beautiful caboose and second for getting me off this chair and cleaning off the lay-out. I used the Kirby hose to vacuum it off. Scared the hell out of the cat.:D :D :D Guess I need to get out the squirt gun again,Now where'd the kids put that super soaker:D :D :D

I haven't got a web site but if you'd like to see my lay-out I've been posting in the N/Z scale section under the "My new/old lay out" thread This reminds me I've got to post there tonight or it might end up in the archives:) :) :)
 

aartwmich

Member
Nov 30, 2002
383
0
16
65
SW Michigan
www.angelfire.com
RI541...maybe you could leave the vacuum next to the layout and hook a motion detecter to the power source for it...then whenever kitty came near it would turn on the vacuum, :eek: THAT oughta teach it!!!! LMAO :D :D :D


Just looked at your layout in the thread you mentioned, damn nice!! I wish I had some elevation on my layout...but I won't rip up all Dads stuff to add it now ..maybe someday...
 

interurban

Active Member
Aug 21, 2002
4,407
0
36
76
Pickering. Ontario. Canada.
Visit site
Hi aartwmich,
Its Sunday morning and I am having a yawn and a peep on the Gauge just read your thread, great reading and a good few laughs from our friends:D :D :D :D
I like the side panels lets see them when the secenary is done please;)
Like a few of the guys/girls I use the vacume and move around the layout with a small brush.

THEN I have to open the vacume container and dig out all the dem little people I forgot to remove:eek: :eek: :eek: :eek:

Have a good clean day
 

TR-Flyer

Member
Nov 24, 2001
402
0
16
SC
Visit site
Hi:
If you're using canvas or plastic for your cover, sew in a couple of dowel rod pockets and span them the short distance across your layout. Make the rods long enough to reach from back drop to backdrop so they sit on top and they'll keep your cover from sagging in the middle and ruining your scenery. Attach the cover to the backdrop at one end with snaps or hooks and you can then just pull it over the top and lay it in place when it's time to go to bed.

Regards,
Ted
 

aartwmich

Member
Nov 30, 2002
383
0
16
65
SW Michigan
www.angelfire.com
TR-Flyer..That's a GREAT idea!! ;) Thank you! I was thinking of using dowels in there somehow to assist in placing the cover but you've just gelled that idea for me. I think I may even have a piece of lightweight muslin stashed away somewhere that would be big enough..and I have a sewing machine!! Woohoo I LOVE this forum!!
 

Vic

Active Member
Feb 1, 2002
1,699
0
36
79
Columbus GA
Visit site
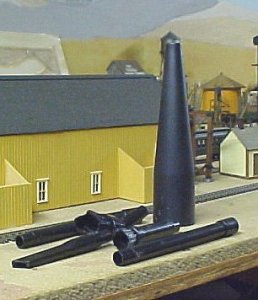
While we're on the subject of keeping layouts clean, here's a neat set of "whizbang" attachments for a Shop-Vac that work great around the layout. They're like little minature vacumn cleaner attachments, brush, crevice tool, wand. The cone shaped gizmo is the adapter for the Shop Vac hose and it reduces the suction to a usable level for use on the layout. I found these at Lowe's but I've also seen them at Home Depot and Wal-Mart.

Just in case I might suck up some really tiny important parts I stretched a piece of pantyhose over the Vac's intake to catch them. Being a single dude I did not have a ready supply of pantyhose :eek: :D I asked my GF for an old pair of her's and her reply was..."if you want pantyhose go buy your own" :eek: :D Just wait until the next time she wants one of my old T-shirts for a dust rag!!! :D :D :D :D ....The lady in the hosiery department of Wal-Mart was very helpful and directed me to the one's that were $1.00 a pair!!!:D :D :D :D She even laughed when I told her what they were for!!!:D :D :D
 

Attachments

  • mvc-008f.jpg
    mvc-008f.jpg
    28.8 KB · Views: 75

TR-Flyer

Member
Nov 24, 2001
402
0
16
SC
Visit site
Vic:
Thanks for the panty hose idea. I'll have to a,.... find some. Also will have to go and find the small scale vacuum equipment.

That large adapter looks like it could be adapted into a silo of smoke stack....hmmm.....

Ted
 

aartwmich

Member
Nov 30, 2002
383
0
16
65
SW Michigan
www.angelfire.com
UPDATE!!!

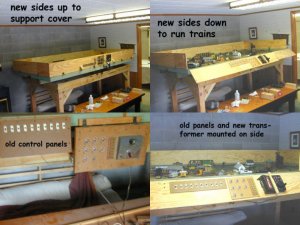
Well...I finally got the sides all up, the controls mounted and ready for the cover to be made. It's not pretty, but it's functional.

I cut up the old control panels, with some trepidation, and remounted them on the plywood. I had to kinda mickeymouse the new transformer to mount it without putting any holes in it; I cut out a hole that the curved bottom cover would sit into, then clamped it down with a piece of wood with foam on it and some wood screws, again not pretty but it works. :)

The corners of the sides are held up and together with hooks and eyes. I will eventually paint some backdrop scenery on the back and end sides.

I still have to figure if I can get a little more length out of the pigtails, without rewiring, for the track power and turnouts so I don't have to disconnect them to put the control side up.


Now...onto the cover. Once I can cover it up to protect it from dust and dog hair, I will start working on the enhancements of the sceniking on the table itself.
 

Attachments

  • table collage 1.jpg
    table collage 1.jpg
    95.6 KB · Views: 96

interurban

Active Member
Aug 21, 2002
4,407
0
36
76
Pickering. Ontario. Canada.
Visit site
Hey you did a darn fine job there.

Neat and tidy, dust and dog hair had better not find a way in there now:D

The wire can be easly made to measure by connecting fresh wire to your controller and fitting male and female push connecters
then if you need to remve said cotroller its simple:D :D :D :D :D ;)
 

aartwmich

Member
Nov 30, 2002
383
0
16
65
SW Michigan
www.angelfire.com
I don't know if I'm using the proper terminology here but.....The controller/transformer is actually hooked to the track sections switch bank with alligator clips for now, so it would be easy to remove the controller/transformer to use on a test track I have.

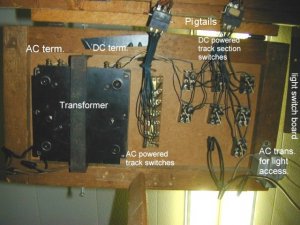
BUT the wires from the track section switch bank to the track sections themselves have a pigtail and these were setup for the old control panel that swung down instead of up, so the wires are not long enough for the new setup. I do not want to rewire all this, so for now I will have to hook and unhook the pigtails when moving the control panel side into the up/storage position.


Heres an underview of the old control panel that shows the old controller/transformer and the said pigtails.
 

Attachments

  • control panel bottom sm.jpg
    control panel bottom sm.jpg
    64.7 KB · Views: 91

davidstrains

Active Member
Aug 29, 2002
1,014
0
36
Stafford, VA
Visit site
well--I'm impressed. :) That looks like a very good job of setup and wiring. You might be able to splice short additional pieces of wire to your pigtails to make them work.

Good luck. keep us posted.
 

aartwmich

Member
Nov 30, 2002
383
0
16
65
SW Michigan
www.angelfire.com
Thanks David..but I didn't do the wiring, dad did it long ago and I don't want to redo it!! I'm amazed it still works, the insulation is rather dried out and I imagine it could fail at any moment, then I'll HAVE to redo it!
 

Vic

Active Member
Feb 1, 2002
1,699
0
36
79
Columbus GA
Visit site
Hi Tomboygirl.....I think I know what you want to do....you want the panel to swing up rather than swing down but the "pigtails" are not long enough.

What you call "pigtails" are actually 6 position Jones plugs which were a fairly common way of making multiple connections at the time that your Dad built the layout.

Fortunately they are still around although you may have to look for them. All you'll need to do is get a pair of them and make up two sets of jumpers the length needed to allow the panel to swing up. The 6 wire jumpers will plug between the ends of the "pigtails"

Hope this helped.:)
 

Vic

Active Member
Feb 1, 2002
1,699
0
36
79
Columbus GA
Visit site
HI Tomboy, Radioshack used to have them but they have changed so much in the last few years I don't know:(

Try some electronic supply places or just maybe try a search on the i-net. I have some but they are 4 position and wont work for what you want to do.

Good Luck:)

PS...My friend David just walked in and said to check Allied Electronics on the internet....he didn't have the URL but just type that in the Google search engine.
 

aartwmich

Member
Nov 30, 2002
383
0
16
65
SW Michigan
www.angelfire.com
Hey Vic.... thanks :) for the start in searching for ANOTHER 'antique' component...at least now I know what the darn thing is called...lol

I searched Allied Electronics, and several other places, for Jones plugs and had minimal success. I think I will ask some of the 'wire weinies' at work where I can go locally to maybe find these plugs. If that doesnt work, I will start emailing the online vendors.

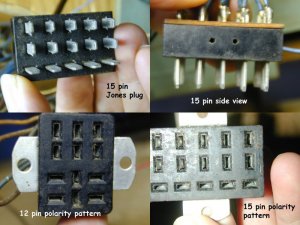
Here a closeup of the plugs dad used. There are two of the 15 pin plugs, one for the track power and one for the turnout switches. There is one 12 pin for the lighted houses and signal lights.
 

Attachments

  • jones plugs collage.jpg
    jones plugs collage.jpg
    90.3 KB · Views: 79

TerryR

New Member
Tomboy,

That's a Cinch-Jones connector and they come in all sizes. They used to be the standard plug for the control cables in stage lighting rigs and AFAIK they still are for the smaller ones. You might want to try a music store (A bigger one that sells stage lights).

They aren't a terribly good connector as the socket part tends to get flakey after a few hundred disconnects. They should be OK for a relatively static installation like this though.