

HMS Alert 1777
- Thread starter mpakier
- Start date
You are using an out of date browser. It may not display this or other websites correctly.
You should upgrade or use an alternative browser.
You should upgrade or use an alternative browser.
- Status
- Not open for further replies.
Hello
I had long break in building this ship. There was many reasons: more work,
small vacations, another model (Ambrose diorama).
Now I finished the second layer on the hull. I think I made few mistakes
here. I had to trim parts 36l and 36p. Probably I left too big gaps between
parts 30 to 36.
The bigger problem are the hull frames that you can see here.
I'm using different glue then this in the kit and I was
not careful enough when gluing. I use water glue that makes the paper
soft. Then I was pushing too hard and the paper slightly changed it's
form.

I want to show you something more. Here is a link I found on other forum.
It's HMS Alert 1777 scale 1/48.
http://homepage3.nifty.com/shiphome/alert/alert-page1.html
It has different colors then my card version. This reminds me a discussion
about wood colors that we had here few weeks ago. On the 1/48 all wooden
parts looks the same (I mean deck and others).
Here you have some pictures how it was made.
http://homepage3.nifty.com/shiphome/alert/alert-page2.html
Michal
I had long break in building this ship. There was many reasons: more work,
small vacations, another model (Ambrose diorama).
Now I finished the second layer on the hull. I think I made few mistakes
here. I had to trim parts 36l and 36p. Probably I left too big gaps between
parts 30 to 36.
The bigger problem are the hull frames that you can see here.
I'm using different glue then this in the kit and I was
not careful enough when gluing. I use water glue that makes the paper
soft. Then I was pushing too hard and the paper slightly changed it's
form.
I want to show you something more. Here is a link I found on other forum.
It's HMS Alert 1777 scale 1/48.
http://homepage3.nifty.com/shiphome/alert/alert-page1.html
It has different colors then my card version. This reminds me a discussion
about wood colors that we had here few weeks ago. On the 1/48 all wooden
parts looks the same (I mean deck and others).
Here you have some pictures how it was made.
http://homepage3.nifty.com/shiphome/alert/alert-page2.html
Michal
Hello again.
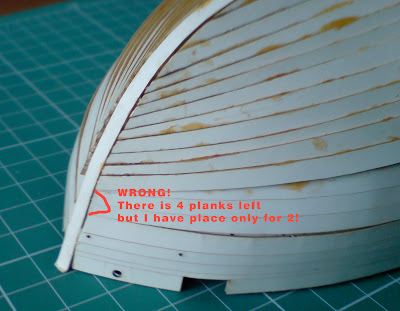
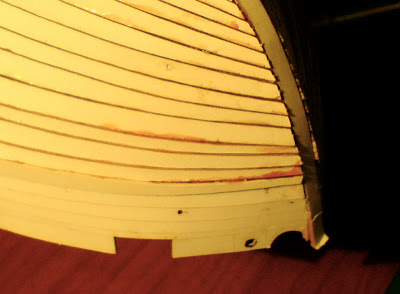
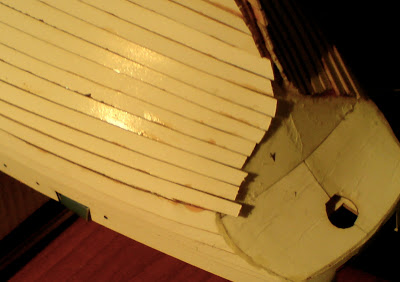
I'm finishing planking the hull. There is still few (4 on both sides exactly)
planks left but I made few mistakes which I want to show here so other
will have the possibility to make it better.
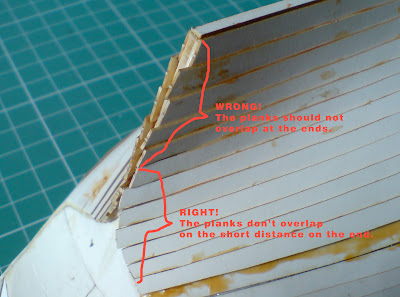
First mistake is mainor one. Planks should overlap but on the short
period they should not. It is clearly stated in the build instruction
but only according to the front of the model. So few first planks
in my model overlap on the back.
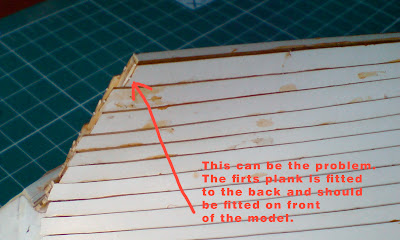
There is also much bigger problem. I made probably mistake with the
first plank. It should be aligned on the front of the ship (but to what?).
Instead I had aligned it on the back.
Now I have not enough place on the front for the 4 planks left.
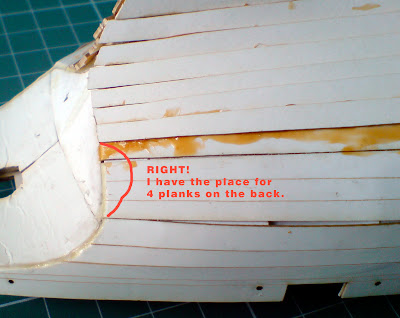
I think that I will be able to repair it (by modifying the planks size) but
if someone will build this ship, he should be careful with the first plank.
Michal
I'm finishing planking the hull. There is still few (4 on both sides exactly)
planks left but I made few mistakes which I want to show here so other
will have the possibility to make it better.
First mistake is mainor one. Planks should overlap but on the short
period they should not. It is clearly stated in the build instruction
but only according to the front of the model. So few first planks
in my model overlap on the back.
There is also much bigger problem. I made probably mistake with the
first plank. It should be aligned on the front of the ship (but to what?).
Instead I had aligned it on the back.
Now I have not enough place on the front for the 4 planks left.
I think that I will be able to repair it (by modifying the planks size) but
if someone will build this ship, he should be careful with the first plank.
Michal
Perhaps an experienced ship modeller could advise what should be used as a DATUM or RFERNCE marker to set the line of planking?
Does one go with the keel of the deck?
D
Does one go with the keel of the deck?
D
In fact it is explained very well in the build instruction of the kit, but...
I was reading the instruction very carefully and the result is as you can see.
But it is this kind of instruction (at least for me) that you can fully understand
only after you fall yourselves into all traps.
Michal
I was reading the instruction very carefully and the result is as you can see.
But it is this kind of instruction (at least for me) that you can fully understand
only after you fall yourselves into all traps.
Michal
Hi, Michal! She is looking very good, mate.
The process or method by which wooden ship planks are measured and fitted on a hull is called "spiling." It's actually a simple concept, but one that is sometimes difficult to explain in words. Here is a link to a webpage that discusses how it is done, and has a good number of photographs showing the process...a picture IS worth a thousand words. I hope this helps. If not, let me know.
http://www.dlumberyard.com/lively/LivelyPg5.html
Here you will find a manual which also explains the process:
http://naturecoast.com/hobby/ms2240.pdf
Take a look at page 14 on, talking about planking the hull...pretty good diagrams which I hope will help.
Cheers!
Jim
Hello again.
I finished the planking. I had to modify the size of last 4 planks
and now it is OK. You can see it on the pictures.
The next step is painting the hull. I'm afraid doing it. The planks are all in glue
and I'm sure the glue will be visible after painting. Now I'm testing what
will happen on a piece of cardboard. When I find a good way I will show you.
Michal
After few tests and some googleing I found the way to remove the
unwanted glue from the planks. The glue is cold "butapren" but it can
be a local name. It's chlorine-rubber glue. It's not easy to remove
because even after drying it has a consistency of rubber so you
can't sand it. The way I found is to use nail polish remover.
Probably other solvent could be better but this is good enough.
Michal
"butapren" is old Polish name for rubbery glue.
It is very good stuff, but has disadvantage of being yellow/brown sort of. In Austria I have found something similar called UHU Kraft Alleskleber. There two types and one of them is such rubbery one. Other one gel type is transparent.
In the past, when doing card models, I used to simply cut the excess with sharp blade or knife. You can also try Aceton. However I cannot image how you want to use chemicals on card base.
- Status
- Not open for further replies.