

hello all,
been lurking around here so finally decided to join.
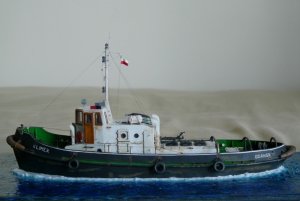
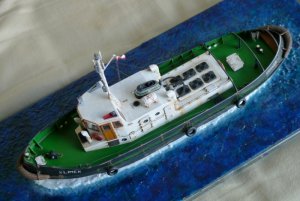
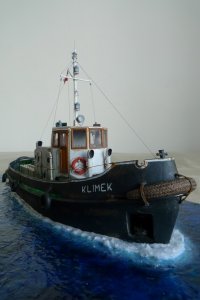
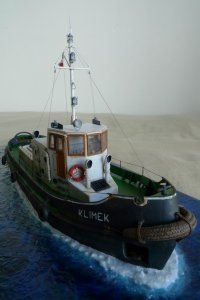
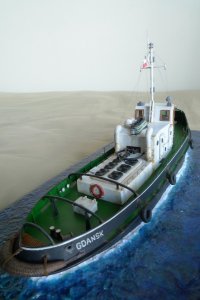
just finished my first model after about 30 years. took almost 2 years of building after job and on weakends but finally finished my model of the 'klimek'. goal was to become familiar with tools and techniques and spruce up my skills. pictures attached. a few 'technical' details that you all may like to know:
95% cardstock. some wood parts (the funnel and the ventilators), the mast is styrene tube and the usual wire, thread and clear styrene. all parts scratch-built except the chains and the surface of the bow and stern rope fenders. scale is 1/50 ish (plan says 1/50 but there is a hand written notation on the side that says 1/52.60!). downloaded it from freshipplans.com, printed on card, soaked in thin ca, then cut, sand, glue, and paint. the water base is various shades of blue and white paint covered by a layer of clear silicone shaped into waves.
started the next project. the taurus tug, enlaged to 1/72 based on the pro-model paper kit. looking for build logs/threads for this kit but surprisingly haven't come across any yet. leads in this regard will be highly appreciated. goal for this model is a clean build and to keep improving my skills.
after the 1950's 'klimek', started another more modern tug. based on the pro-model 1/100 scale taurus. since the approach on this one is to use the kit as template, i enlarged and printed out a b&w copy on 140lb/.42mm cardstock. scoured the internet and luckily found many photos including two really useful panoramic ones, as well as a general plan of the boat. intention is to add as much detail as possible. the goal for this project is a clean crisp build (learned a lot on the 'klimek'). hope to keep this thread going. all comments welcome. anyway this is what i have so far...
all set to go

the spine is 3 layers of .42mm card, the ribs 2 layers, all hardened and glued with thin ca

the fit is nice and tight after sanding and filing the slots

the hull sides. i find the flex ruler useful for cutting gentle curves. won't work on sharp curves and the knife tends to dig into the soft plastic if not careful. anyone have a better ides?

chopped off the bottom of the hull since i like waterline models

cut out the deck. on this part decided to try minwax wood hardner to harden the card. 2 layers of .42 mm card glued together. minwax is wattery so soaks into the card very well but requires multiple coats. has toluene so i use a respirator to be safe. didn't turn out as stiff as ca but works. much cheaper than thin ca. 1 pint about $10.00

assembling the anchor housing. wanted to try lego bricks to build a jig. first attempt worked well. the parts fit nice and square. don't know if this method will work with all parts but was fun playing with the bricks, i must admit
 . by the way my home-made glue applicator in the background.


the glu applicator is an ordinary sewing needle with the eye ground off

sides attached to the hull. using squadron green putty to fill in some gaps. anyone know the difference between the green and the white?

next episode to follow...
been lurking around here so finally decided to join.
just finished my first model after about 30 years. took almost 2 years of building after job and on weakends but finally finished my model of the 'klimek'. goal was to become familiar with tools and techniques and spruce up my skills. pictures attached. a few 'technical' details that you all may like to know:
95% cardstock. some wood parts (the funnel and the ventilators), the mast is styrene tube and the usual wire, thread and clear styrene. all parts scratch-built except the chains and the surface of the bow and stern rope fenders. scale is 1/50 ish (plan says 1/50 but there is a hand written notation on the side that says 1/52.60!). downloaded it from freshipplans.com, printed on card, soaked in thin ca, then cut, sand, glue, and paint. the water base is various shades of blue and white paint covered by a layer of clear silicone shaped into waves.
started the next project. the taurus tug, enlaged to 1/72 based on the pro-model paper kit. looking for build logs/threads for this kit but surprisingly haven't come across any yet. leads in this regard will be highly appreciated. goal for this model is a clean build and to keep improving my skills.
after the 1950's 'klimek', started another more modern tug. based on the pro-model 1/100 scale taurus. since the approach on this one is to use the kit as template, i enlarged and printed out a b&w copy on 140lb/.42mm cardstock. scoured the internet and luckily found many photos including two really useful panoramic ones, as well as a general plan of the boat. intention is to add as much detail as possible. the goal for this project is a clean crisp build (learned a lot on the 'klimek'). hope to keep this thread going. all comments welcome. anyway this is what i have so far...
all set to go

the spine is 3 layers of .42mm card, the ribs 2 layers, all hardened and glued with thin ca

the fit is nice and tight after sanding and filing the slots

the hull sides. i find the flex ruler useful for cutting gentle curves. won't work on sharp curves and the knife tends to dig into the soft plastic if not careful. anyone have a better ides?

chopped off the bottom of the hull since i like waterline models

cut out the deck. on this part decided to try minwax wood hardner to harden the card. 2 layers of .42 mm card glued together. minwax is wattery so soaks into the card very well but requires multiple coats. has toluene so i use a respirator to be safe. didn't turn out as stiff as ca but works. much cheaper than thin ca. 1 pint about $10.00

assembling the anchor housing. wanted to try lego bricks to build a jig. first attempt worked well. the parts fit nice and square. don't know if this method will work with all parts but was fun playing with the bricks, i must admit


the glu applicator is an ordinary sewing needle with the eye ground off

sides attached to the hull. using squadron green putty to fill in some gaps. anyone know the difference between the green and the white?

next episode to follow...
")