Has to be a Helix

Pitchwife

Dreamer
Apr 23, 2001
1,728
0
36
71
The middle of nowhere Oregon
Visit site
Mike, I really like your idea of using nuts and washers instead of tubing for spacers on the threaded shaft. It would give a lot more control and flexability. That's the beauty of forums like this, many minds coming together with a lot of good ideas.
Gary, I bet you got your idea from a recent issue of MR. There was an article about a layout that did exactly what you are talking about.

Clark
 

Gary Pfeil

Active Member
May 7, 2001
2,510
0
36
Boonton NJ
Visit site
Clark, Which idea is that? The helix is 4 years old already, I guess you mean the thought of a seperate scene totally unrelated to the rest of the layout? I honestly don't know which you mean but you know what they say about great minds thinking alike!<G>
And nuts with washers on threaded rod seems like the way to go, use some loctite when positioned correctly.

Gary
 

Pitchwife

Dreamer
Apr 23, 2001
1,728
0
36
71
The middle of nowhere Oregon
Visit site
Hi Gary. Sorry about being vague. I was refering to your idea of a short winter scene. In the August issue of MR they showed a layout that for the most part was a summer scene. However in one corner they had a short section, probably not more than two feet with tunnel portals on each side that was a winter scene. It was visually seperated from the rest of the layout so it didn't detract from the overall effect. Although I am no fan of winter and my world will be forever summer, it looked pretty nice.
 

Gary Pfeil

Active Member
May 7, 2001
2,510
0
36
Boonton NJ
Visit site
Hi Clark, I'll have to look for that article, I'd like to check it out. About 8 years ago when I lived in an apartment with a 10x11 room available for a railroad, I considered a layout with one wall having each season. Didn't do it but still have the urge to do a winter scene. It's pretty much a daydream for now, there is so much to do first!

Gary
 

Pitchwife

Dreamer
Apr 23, 2001
1,728
0
36
71
The middle of nowhere Oregon
Visit site
Hey Rich. I just tried it again and couldn't get the page to load. All I get is "this page cannot be displayed" message. Don't know what the problem is. I'm using IE5.1 if that makes any difference. I'll keep at it. Sounds like a good download.
 

Pitchwife

Dreamer
Apr 23, 2001
1,728
0
36
71
The middle of nowhere Oregon
Visit site
Hi Marty
I tried the helix calculators and either I did something wrong entering the figures, or I don't remember my trig functions. That or there is another factor that I'm not taking into consideration. I guess that the only way I'll know for sure is to build a prototype model and see how it comes out. I'm keeping my toes crossed. :)
 

Pitchwife

Dreamer
Apr 23, 2001
1,728
0
36
71
The middle of nowhere Oregon
Visit site
Rich, it came through and works just fine. Still not exactly the figures I came up with on my own, but close enough. The grade is a little steeper than what I came up with, but it will be hidden, so as long as a loco will pull it there shouldn't be a problem. This would be a valuable tool for anyone contemplating building a helix. Thanks for both yours and Marty's help.
Clark

ps: this photo from the Widow Creek Layout Photo spread shows something that I would never have thought of, an intermediary entrance and exit. This really shows some smart design work.
 

Attachments

  • untitled-10.jpeg
    untitled-10.jpeg
    36.4 KB · Views: 135
Seen Pictures of your Helix

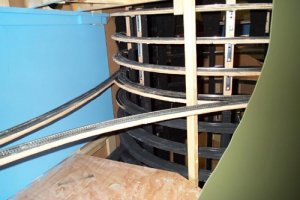
Clark, I have built a double track helix (24 and 26" radius). The grade is certainly a consideration. I model the 50's, and do not use dome cars, I measured my tallest equipment and found that I could get by with 2 5/8" clearance. The other major factor is the thickness of the roadbed. I used 3/4" plywood. so my total rise per revolution was 3 3/8" This works out to about 2 1/4% grade. Mine has been in operation for a couple years with no problem. Realize however, the trackwork needs to be perfect the first time, you will not be able to relay it later. I had 16" wide 4' long shelves which I cut into 1/4 of a circle. I used a router to remove 3/8" from the top of one end and the bottom of the other end of each 90 degree piece. These were screwed and glued together. I assembled three pieces, then laid track on them (also ran a buss wire and soldered feeds at this point) when finished with track and wiring on the first three sections, I assembled the next three sections and so on. I used pieces of 1x3 to separate the layers as I went. When complete, I ripped 2x4's in half to get 2x2 and these then had slots cut into them (I set my tablesaw blade at 1/2" and made several cuts side by side to obtain a 3/4" wide slot 1/2" deep) The slots were 2 5/8" apart. I then tapped these into place on the 3/4" roadbed and they maintain my clearance as well as serve as a means to hold the helix in place on my benchwork. I should mention that I am no carpenter and my helix isn't pretty, but it works.

Gary

Gary, being an old cabinet builder, I've seen pictures of your helix, and I think it is just fine, anyway it's not supposed to be a piano case right? Will you be building a mountain scape around it and or inside of it?

Duane
 

Gary Pfeil

Active Member
May 7, 2001
2,510
0
36
Boonton NJ
Visit site
Thanks Duane, you sure brought a really old thread back to life! I still have done nothing around the helix, though I still think I'll build that winter scene I mentioned someday. However I am geting ready to build the turntable which goes over the center of the helix. I am glad to report the helix still operates near perfectly, I've had no troubles with the annual drastic swings of humidity in my unfinished basement.