Got my bridge in, but need some input!

TruckLover

Mack CH613 & 53' Trailer
Apr 14, 2006
4,073
0
36
34
Rancho Santa Margarita, Cali.
Here is how it should be Steve, Hope you didn't glue them down yet :cry:

09330000003185.gif


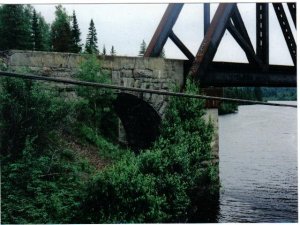
As you can see, Jim was right about the bridge sitting on the wrong part of the abutment. It does in fact rest on the little lip unless of course you did that on purpose?

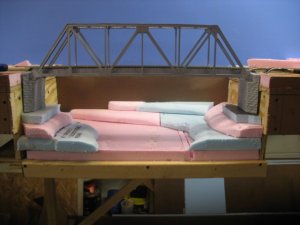
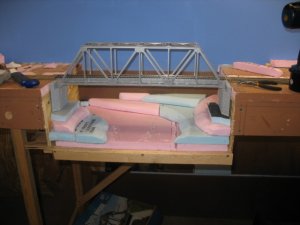
BTW, that river and the banks/slopes are looking good. Nice river path too!!
 

doctorwayne

Active Member
Sep 6, 2005
3,516
0
36
Canada, eh?
I think that Jim is right about the abutments, but that shouldn't be too difficult to correct.
Your valley walls are lookin' pretty good, :thumb: although if you want to make the stream appear to turn as it goes off into the distance, there are a couple of simple changes you could make. If you wish the stream to turn to the left, remove some of the lowest level of foam where it comes near to the backdrop. Leave the half "bump" at the front that protrudes out int the "water", and also leave the full "bump" behind that. Simply continue the direction of the back edge of the full "bump", which will remove all of the "bump" at the backdrop. Continue this curve so that a very small amount of the second level of foam, right against the backdrop, is also removed. To complete the illusion of a curve in the streambed, you'll also need to extend the right bank at the rear of the scene, near the backdrop.
Rather than try to describe this, here's a (really crude) drawing. Lop off the rear of the left bank, then extend the rear of the right bank. When you get the ground cover in, plant lots of trees and bushes, making it appear as if the stream disappears behind the left bank.

untitled_217487.bmp


Sorry about the "artwork". :eek:ops:

Wayne
 

fseva

New Member
Nov 27, 2006
40
0
6
74
trainsteve2435 said:
OK, heres what i have gotten done so far. Im not sure how to desguise the tops of the supports, so please give me your suggestions.
It seems like you want this section to be a real focal point, and you've got a great start to a really nice riverbed! I personally would recommend rock castings around your bridge abutments, but that might require you to cut back the base a bit. Then, I would remove the abutments and temporarily replace them with blocks of wood the same shape and size. Then, you can apply the castings while still wet, and it won't matter if you get some plaster on them. I'd go right over the edges. After you remove the wood, you should be able to slip the castings right in.

The suggestion that you use a dam at the wall end sounds really cool! It would, however, require you to paint "water" out to your horizon line. If you can handle that, it might just be the way to go.

BTW, you did something to the back wall to hide the masonite, and you did a really good job!
 

fseva

New Member
Nov 27, 2006
40
0
6
74
Model the back end of a waterfall!

The "dam" suggestion just made me think of a pretty cool solution - at the back wall, make the water look like it's going over "falls"! Then, when you get to painting the backdrop, all you need is to paint a small river in the distance!

I'd remove some of the foam at the back end to allow for your faux-water to actually go over the edge. But make sure it can't get any farther! :D
 

jr switch

Member
Oct 11, 2006
204
0
16
81
northern Indiana
Trainsteve---just looking at the pics again and had an idea. What if you came out from the backdrop, in the center, with a wedge made from the foam, not as high as your present walls. Put a thin piece of foam in the creek bed on each side to raise the riverbed a little, creating two separate creeks coming together, over small waterfalls or just some rapids. Go really heavy on brush along the banks right at the backdrop, with trees out over the creek banks a little between backdrop and bridge. Plenty of trees and lots of bushes and underbrush to conceal the lack of distance to backdrop. Slant the creekbeds up a little as they reach the backdrop and have the creek banks come closer together as they go around the bend at the backdrop and out of sight. This might give the illusion you want without trying to create a sharp bend in a river. Just a thought-----JR
 

Stu McGee

New Member
Jul 14, 2004
62
0
6
75
Sicklerville, NJ
One of your better bets is stone work and rip mrap which is commom to New England. Check out the river that runs through Manchester, NH. I think it is the Amoskeg(?).. Lots of stone work, very vertical, and the rip rap "protects" the side from erosion.
 

kirkendale

New Member
May 24, 2004
79
0
6
Steve, I know you may not want or have room for the stone arch leading up to the bridge, it does make a nice detail, but the pictures are to help with the abutments.
kj
 

ocalicreek

Member
May 4, 2005
824
0
16
48
Puyallup, WA
groups.yahoo.com
As you cut away some of the benchwork to make room for the abutments (just cut twice as much off one side, not half as much off each - cut once instead of twice!) consider cutting away more of the benchwork down either side of the roadbed. Otherwise you'll need not only the chooch footings, but some other retaining wall or natural rock to hold back the vertical drop off each side. In other words, you might want some transition slope alongside the track on either side of the bridge. The abutments are to hold back the earth and provide solid footing for the bridge itself. The way it is now you need abutments for the whole width of the layout, from front edge to backdrop, on each side.

Just a couple thoughts...otherwise it's looking really cool! Keep going!

Galen
 
Jun 18, 2004
487
0
16
55
barboursville, wv
:wave: Ok, after reading all of your suggestions, i went to work to try and come up with something more suitable. Here is waht i came up with. BTW, thanks so much to everyone for all the great suggestions and ideas, they really got me thinking. Please feel free to keep suggesting and commenting, it really helps someone like me.:thumb:
 

Attachments

  • bridge5.JPG
    bridge5.JPG
    59.4 KB · Views: 143
  • bridge6.JPG
    bridge6.JPG
    59.2 KB · Views: 144

doctorwayne

Active Member
Sep 6, 2005
3,516
0
36
Canada, eh?
That's a big improvement. :thumb: Once you get some trees and underbrush in there, it'll really look like the creek/river either goes somewhere, or comes from somewhere. Nice work.

Wayne
 
Jun 18, 2004
487
0
16
55
barboursville, wv
Thanks everyone for the kind comments, they really make a person feel good about his or her work. As far as scale, yes, its HO scale and the foam came from my local Home Depot here in W.va. Thanks again and i hope to have some more progress pics later tonight.:wave: