Going Merry from paper replika

terrinecold

Member
Apr 15, 2012
303
1
16
Hello,
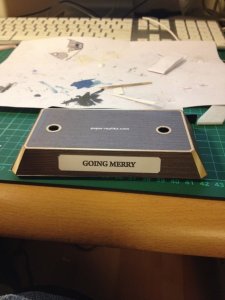
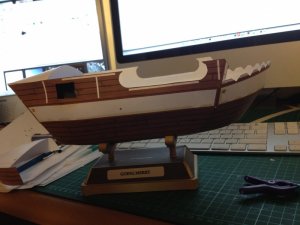
here is a thread to document my next build, the going merry from One Piece. The model was downloaded from www.paper-replika.com

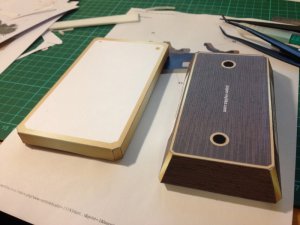
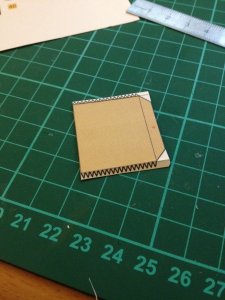
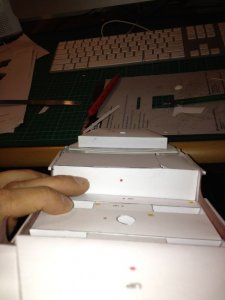
One thing I learned with my previous 2 models (storm raven and dreadnought) is that it is best to double print the model and build 2 in // one test build and the real one.

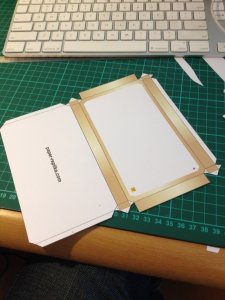
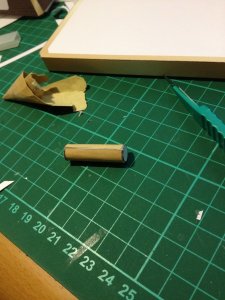
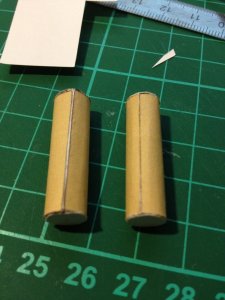
I have already printed once all the parts on heavy paper (250g/m2) with a laser printer. I am reprinting on lighter paper (160g/m2) on an inkjet. The lighter paper will be used for test and to better understand the way the model is done and the heavier paper for the real build.
 

terrinecold

Member
Apr 15, 2012
303
1
16
Here is the link to the first part of the model:
http://paper-replika.com/index.php?option=com_content&view=article&id=6581:going-merry-ship-one-piece-paper-model-part-1&catid=131:anime-cartoon&Itemid=200144
Not sure if I should follow the orders the parts are numbered or the one in the instructions. I'll go with the instructions. It starts with the base which seems boring.

First error in the instructions:
they show 2 parts 35, in the part file they are numbered 35 and 42. This is easily corrected.

Since this will be the base I think some reinforcements will be needed. I'll see where I can put some foam boards.
 
Z

Zathros

hat;s going to be one smart looking model. Don't be surprised if a lot of your friends ask you were you got it from. Kids love to play with this things. The little Lego guys work well with these. :)
 

terrinecold

Member
Apr 15, 2012
303
1
16
part 41 won't be holding anything as the ship's weight will be on the parts 40 which rest on part 37. But 37 needs to be reinforced. I glued some 3mm depron on the back of the top side of 37 and 3 "legs" of depron which were cut to the right height (8mm for a total of 11mm). I think it should be sufficient reinforcement.
The photo bellow show those 2 parts next come the 2 40s which are the pillars which will hold the ship.

I will finish the complete stand with the 160g/m2 paper before I redo it in the heavier one.
 

Attachments

  • IMG_0458.jpg
    IMG_0458.jpg
    90.8 KB · Views: 25
  • IMG_0459.jpg
    IMG_0459.jpg
    77.7 KB · Views: 24
  • IMG_0460.jpg
    IMG_0460.jpg
    78.9 KB · Views: 26
  • IMG_0461.jpg
    IMG_0461.jpg
    133.5 KB · Views: 25

terrinecold

Member
Apr 15, 2012
303
1
16
for part 40, I think that all the little tabs will be hard to fold individually so I fold them after the rough cut and before cutting them one by one. This is the first time I do that, we'll see if the result is worth it.

OK first part 40 is done and having a practice build first is paying its dividend. I just learned that I should not have glued part 41 before being done with the part 40s. I need to fit them in the holes and once the part is glued, increasing the size of the hole is very hard.

I wonder if the part should be build in order of their number?

Also as you can see in the picture I removed the tab of part 40 and instead glued a piece of paper inside. However I didn't perfectly join the side of the cylinder so there is a seem where there should not have been any. Well that is why I have a practice build. In any case the second part 40 (to the right in the third picture) is much better, the only seam that can be seen is actually the cut line as I cut in the middle of the line so the difference in color shows

Zathros, you are the one who advices me to forgo the tabs for folded strips. Is there a good way to replace the tabs for the top of cylinders such as those part 40 (sorry you would have to refer to the model, if it is to much bother, just tell me).
 

Attachments

  • IMG_0462.jpg
    IMG_0462.jpg
    97.7 KB · Views: 13
  • IMG_0463.jpg
    IMG_0463.jpg
    101.8 KB · Views: 12
  • IMG_0464.jpg
    IMG_0464.jpg
    86 KB · Views: 18

terrinecold

Member
Apr 15, 2012
303
1
16
cannons have been built and mounted in their position. The internal structure is built and is being dry fitted, the end of the "part 1" (basically the hull) of this model seem pretty close, there is still 31 parts to go then part 2 (deck mostly) and part 3 (rigging)
 

Attachments

  • IMG_0485.jpg
    IMG_0485.jpg
    149.3 KB · Views: 12
Z

Zathros

She's really coming along nicely. I love ship models, real or fanciful, sailing always feels like a fantasy to me anyways! :)
 

terrinecold

Member
Apr 15, 2012
303
1
16
Hull is almost done. Note that I have made a big mistake when positioning the internat structure. I tried a new kind of glue! UHU Creativ for polystyrène. It is a kind that you have to lay on both side wait for 10mn and then bring them together. The problème is it sticks instantaneously. Hence the structure is not correctly positioned, as I was putting it in place a part on the right touched the hull and got stuck and now on the right side the structure is 3mm too high. Hopefully I will keep my resolve to build a second one to take into account all the mistakes I made on this first one.
Otherwise I still have the keel and a few pieces of bellow deck reinforcement before part 1 is done, hopefully tomorrow morning
 

Attachments

  • coque GM avec deco.jpg
    coque GM avec deco.jpg
    147.7 KB · Views: 35
Z

Zathros

That UHU glue sounds great but scary too!! It looks good. You could always just cut the piece out and put it back in? :)
 

terrinecold

Member
Apr 15, 2012
303
1
16
what do you mean cut the piece out, how would you do it? I'm attaching another picture so you can better see what the part looks like and advice.
 

Attachments

  • IMG_0490.jpg
    IMG_0490.jpg
    133.1 KB · Views: 18
Z

Zathros

1st) Are you referring to part 1A?, if it is, I would lightly scribe a line from across the deck on the front and back of the piece to be cut, referencing from the sides of the ship, to make it flush, and take a very sharp ex-acto knife, cut by making repeated scores on the lines, lightly cutting until it releases. Then fashion or reuse the top, making some new tabs to attach it by. top, and you will be all set. If I am referring to the wrong part, a variation of the same technique should work.
'
2nd) I am sorry but I missed your question about tabs in cylinders. What I suggest is taking scraps pieces of paper and rolling this 2mm wide or so scrap piece till it is wide enough to form a gluing surface. Slip that inside the cylinder, having put glue in there first, and this will allow you to glue the cylinder cap in place. If you let the piece unroll (see picture below such that is sits like a spiral inside in the cylinder, you will have a better surface to glue on. Just run a bead of glue across the spiral where you feel is necessary. :)
 

Attachments

  • tubespiral.jpg
    tubespiral.jpg
    27.6 KB · Views: 9

terrinecold

Member
Apr 15, 2012
303
1
16
thanks to Zathros's advice and some surgery (I use a surgical knife), the going merry's internat structure is repaired.
I really feel like Usop! Anyway the 2 pictures are part 1A after it went under the knife then part 1A being dry fitted for a prosthetic top. I didn't include a picture with the top glued as there isn't much différence compaired to when it is being fitted
 

Attachments

  • GM surgery.jpg
    GM surgery.jpg
    99.5 KB · Views: 14
  • GM surgery 2.jpg
    GM surgery 2.jpg
    63.1 KB · Views: 16
Z

Zathros

She's s a bit cockeyed, but that's what happens to ship that have a hard working life! By the time you get her altogether, she will look great! :)
 
Z

Zathros

In New England, "cockeyed" means a bit twisted, not plumb or square. :)
 

vbsargent

Member
Apr 16, 2008
175
3
16
MD, USA
@Zathros- that's a clever trick for gluing the cap to a cylinder! I'll have to remember it.

@terrinecold- This is looking good. It looks like a fun build, even with the challenges that you are encountering.
 

terrinecold

Member
Apr 15, 2012
303
1
16
definitely fun and the challenges are part of the fun. Don't forget that I am a beginner, I am learning. I still think I'll need to redo it afterward or I won't be satisfied with the result. The question is will I have the courage to do that instead of going forward to another model
 
Z

Zathros

I'd advise you to go to another one. I can suggest a couple. There is one that, if completed, will teach you a lot. Lilla Weneda, by Digital Navy. This model is FREE but is one beautiful model. It is a joy to build and a stunningly beautiful model. I actually doubled the size of this model. It is 30" long now. The original size is fine. A wonderful model, as are some others on that page. If you are interested in something else, there are some great ones in our "Downloads" section. If you let me know of something more specific, let me know, and maybe I can point you in that direction.

http://digitalnavy.com/

Lilla4.jpg