GMD-1 Kitbash (Unfinished)

Lighthorseman

Active Member
Jul 24, 2002
1,240
0
36
57
Out in the sticks
Visit site
After TrainClown's CN yard pictures, the comments about the GMD-1 he photographed reminded me of a kitbash I'd tried over a decade ago; one that was eventually shelved, and practically forgotten.

There were a couple of releases of this unique ugly-duckling locomotive made. All wre brass, prohibitively expensive, unavailable, and terrible runners.

I thought they were really neat, and wanted one. I had seen some versions done...none well; usually 2 bashed SW-7s on a GP 9 frame.

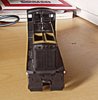
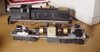
Here's a picture of where my kitbash came to a halt, and in the next threads, I'll explain what I did, and why I gave up.
 

Attachments

  • GMD1 Bash Side.jpg
    GMD1 Bash Side.jpg
    18.9 KB · Views: 286

Lighthorseman

Active Member
Jul 24, 2002
1,240
0
36
57
Out in the sticks
Visit site
The GMD1 wheelbase was longer than an SW7, but noticeably shorter than a GP9. What to do? I thought I'd build a shell, and then lengthen an Athearn SW7 frame. The SW7 shell, however, was incorrect, so I picked up two MP1200 (???) Athearn shells at my LHS.

The Cab - I spliced the two cabs together to get the correct windows on each end. I filled the round cab windows, and puttied and sanded them. This, however, revealed that the cab was too wide, but I was willing to live with that.

The Shell - Taking the two MP1200 (???) shells, I used one for the long hood, and one for the short hood, just sort of eyeballing the dimensions, and cutting where it just "looked okay". There was an awful lot of filing away of detail done to the nose, and would eventually also have to be puttied and sanded smooth. I used a part of the unused shell roof section to cut a flat part, as the GMD1 does not have the sloped section of roof on the long end just before the cab. The white strip is a length of styrene, to thicken up the lower side sill, and to provide a flat mounting surface for the cut-up shell bits. As I was nowhere near good enough to get doors right, I didn't even try to match door numbers or heights at all. It had doors. The prototypes have doors. Good enough. I;m no rivet counter...I'm just after something that is a reasonable facsimile of a GMD1.

Here's the other side.
 

Attachments

  • GMD1 Bash RHSide.jpg
    GMD1 Bash RHSide.jpg
    24.7 KB · Views: 287

Lighthorseman

Active Member
Jul 24, 2002
1,240
0
36
57
Out in the sticks
Visit site
Here's why the project got shelved and eventually forgotten.

The Frame - As the SW7 was too short, and the GP9 was too long, I decided to lengthen the frame of an SW7. Once the rough shell was figured out, I chopped up two frames, and tried to epoxy them to a piece of stainless steel sheet, cut out to fit around the motor. Sadly, this just didn't work. As you can see in the picture, the frame is sagging where the two parts meet. Now that I look at it, perhaps some CA or a teeny tiny screw might help. At the time, I thought that the perfect solution would be to build a frame that fit, and with a combination of styrene and filing, fashion a correct-looking fuel tank...and then CAST a frame in some sort of low-temperature metal, pewter, or what-have-you. I still think that's the best idea. It would also allow for more than one casting to be made, had I ever wanted more than one.

Who knows. Perhaps I'll sometime revisit this project. Even if I didn't run it, It would still look neat on a display shelf.
 

Attachments

  • GMD1 Bash Shell And Frame.jpg
    GMD1 Bash Shell And Frame.jpg
    39.4 KB · Views: 276
Why not build a frame master then cast it in resin? That would solve any isolated frame issues you would encounter with DCC (if you're using DCC) and it would give you the strength of one cast piece. It wouldn't be nearly as heavy as metal, but you might be able to fill the shell with lead.

Other than that, I think this looks like it was a good start. All that good work you did up to the frame is still usable. But, I understand why you stopped when you got to a sticking point. The frames of my pair of C39-8s is what's holding me up. Otherwise, both models are off to a good start. However, in my case, I've decided to go with Atlas C40-8 frames, so no casting for me.;)
 
F

Fred_M

Or you could build a frame from brass Steve, ala. Ray's U33b. Fred
 

Russ Bellinis

Active Member
Feb 13, 2003
4,501
0
36
78
Lakewood, Ca.
Visit site
I think some 1/4" long flat head 2-56 screws with counter sink holes in the aluminum flat stock then screwed into threaded holes in the two halves of sw frames would stiffen it enough and line things up to proceed.
 
Glen Haasdyk said:
I would have thought that the body would have been the more difficult part. Could you tellus what you used to kitbash it?
Lighthorseman said he used MP1200 ??? shells, which are actually SW1500 shells. Now, it's worth mentioning these are the later SW1500 shells, not what Athearn used to call an SW1500 (which was changed to SW7 when their true SW1500 was released). If you're familiar with the Athearn SW1500, it's pretty easy to spot what was done in this kitbash. In fact, I'd call this kitbash downright ingeneous. Way to go, Lighthorseman.
 

Lighthorseman

Active Member
Jul 24, 2002
1,240
0
36
57
Out in the sticks
Visit site
pdt said:
...Lighthorseman said he used MP1200 ??? shells, which are actually SW1500 shells. Now, it's worth mentioning these are the later SW1500 shells, not what Athearn used to call an SW1500 (which was changed to SW7 when their true SW1500 was released)...

Right you are, Sir! Thanks for the correction. I used two SW1500 shells, (decorated for Norfolk Southern, I think, as they didn't have any undecorated shells) and the truck sideframes came from the SW1500 as well.

PDT is quite correct. Athearn used to call an SW7 an SW1500. Confusing, innit? The easiest key is the lights on the end. The SW7s have one biggish light, and the 1500s have lots of little ones. Here is a shot of the long hood end, showing the lights. Not a great shot, sorry.
 

Attachments

  • GMD1 Bash Long Hood End.jpg
    GMD1 Bash Long Hood End.jpg
    47.6 KB · Views: 264

CN1

Active Member
May 6, 2003
1,059
0
36
Steve this is an excellent project. :thumb: Keep at it you're getting close.
Keep us updated on your progress. :wave:


How's the weather? :eek: :mad: Is everything OK in your neighbourhood? :confused:

Are you coming down for Stampede? :confused:

If you do send me an email. :wave:
 

TrainClown

Member
Apr 17, 2003
861
0
16
66
Saskatchewan, Canada
Visit site
WOW Steve! That is so cool! Just like the ones here. Now I want to bash one too........and...... I like steam better...........so........I must be going insane. :rolleyes:

Keep 'er going mon. A worthy project to be sure.

Or you can give up.............and sell it to me.

Yeah........yeah, that's it! Sell it to me. ;)

Or trade it to me. I got a 2-8-0 I'll trade ya. Yeah, that's it.

A trraaade. ;) :rolleyes: :D :thumb:

TrainClown :wave:
 
P

philip

frame question

Steve,

That frame issue can be fixed easily with J.B. Weld. Does that add on piece for beefing up the chassie interfere with removing or replacing the shell. motor,trucks or driveline?

I do know the project is worth a second chance. Nice looking shell. :thumb:


phil the pill
 

shaygetz

Active Member
May 2, 2003
3,612
0
36
64
www.freewebs.com
mykroft said:
No need to bash one today. Kaslo makes a Resin GMD-1. They also make a frame/power kit. Which might come in handy for this one.

Mr. Kitbash says, "No, no, NO, NOOOOOOO, No No....! You can be a model railroader without a credit card." :D :D :D :thumb: :thumb: :thumb: