[Free Model #4] paperguitar.com R330/340

Wendigo

New Member
Jan 10, 2008
48
0
6
Ok, let's put my skills to the test!

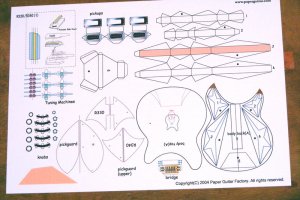
I've chosen the R330/340 model from http://www.paperguitar.com because
I want to modify it into a R360 and it seems to me that these models are similar. Why R360 - R.E.M.'s guitarist Peter Buck had one of those (on 09.09 that guitar was stolen after the band performed at Helsinki) and that's the aim for my model.

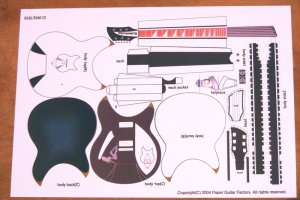
First the recoloring:
 

Attachments

  • 2008_09230001.jpg
    2008_09230001.jpg
    151.2 KB · Views: 13
  • 2008_09230002.jpg
    2008_09230002.jpg
    136.8 KB · Views: 19

Toddlea

Member
Aug 14, 2006
78
0
16
54
Sparks, Nevada
I'm glad to see someone is doing one of these. I have built one myself and they fit great. Don't forget to post your build in the Free Model #4 thread. Good Luck!
 

Wendigo

New Member
Jan 10, 2008
48
0
6
Building will follow the instructions steps.

Step 1
Joining the two body sides and then glued them to Body back (A)
!look at all these tabs :eek:ops:!
2008_09230003.jpg2008_09230005.jpg

Step 2
Parts 1-6 attached to Body Back (A). Since the interior is partly visible, part 3 has a wood pattern on the inside. Also, I added a part with the same texture on the bottom.
2008_09230007.jpg2008_09230008.jpg2008_09230009.jpg2008_09260001.jpg
 

Wendigo

New Member
Jan 10, 2008
48
0
6
Continued

Waiting for Body Back (B) to glue
2008_09270001.JPG

And here are Body top(B) and Body back(B) in place
2008_09270002.JPG2008_09270003.JPG
 

Wendigo

New Member
Jan 10, 2008
48
0
6
The tinny parts

Step 4: Pickups, knobs and the bridge

Those knobs were tedious for me!
2008_10030001.JPG2008_10030002.JPG

Step 5: Pickguards

2008_10030003.JPG2008_10030004.JPG2008_10030005.JPG2008_10030006.JPG
 

Wendigo

New Member
Jan 10, 2008
48
0
6
Step 6: assembling the body top (c) and back(c) parts

The top
2008_11020001.JPG

The back
2008_11020002.JPG

Step 7: The neck

A test of one of the tuning keys - the cylinder is not yet glued on that axle!
2008_11020004.JPG
 

Wendigo

New Member
Jan 10, 2008
48
0
6
Continuing the neck

Somehow at that time I haven't understood the instructions quite clearly so I folded the paper in a wrong way but now it's not visible because I corrected that. The part right beneath the frets is reinforced with 1mm thick cardboard so that I could shape it easily.

2008_11020005.JPG2008_11020006.JPG2008_11020007.JPG2008_11020008.JPG

Here are the tuning keys: the test one completed and the rest of the parts:

2008_11020009.JPG
 

Wendigo

New Member
Jan 10, 2008
48
0
6
It's done...

Tuning keys attached to the headstock

2008_11020026.JPG2008_11020027.JPG

Pickguard, bridge, pickups, knorbs, a switch and the strings

2008_11020023.JPG2008_11020022.JPG

The headstock revisited

2008_11020025.JPG2008_11020024.JPG
 

Wendigo

New Member
Jan 10, 2008
48
0
6
The back and the neckjoint:

2008_11020029.JPG2008_11020028.JPG

Here I wanted to get a picture of the wobbly strings:curse: but couldn't get the focus right:eek:ops:

2008_11020030.JPG

The model with the guitar stand...

2008_11020031.JPG2008_11020032.JPG

... and inside a display case

2008_11020033.JPG
 

Elliott

Senior Member
Jul 18, 2006
645
1
36
Very nice Wendigo!! Great build of an unusual subject (at least here). Thanks for an interesting thread. Good luck in the contest.
 

Wendigo

New Member
Jan 10, 2008
48
0
6
jaeike: The strings are made from zinc wire .6 mm diameter.

Elliott: thank you for the wishes :wave: