Free Model #4 - Alexey Horoshavinn's KV-2

Status
Not open for further replies.

charliec

Active Member
Jan 18, 2004
384
1
36
75
Brisbane, Australia
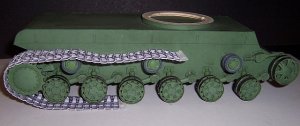
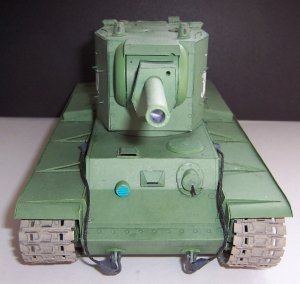
More progress on the suspension......

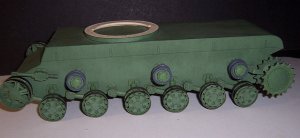
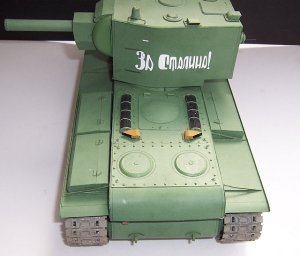
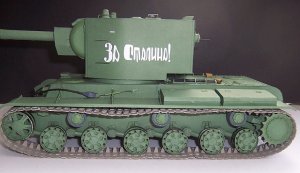
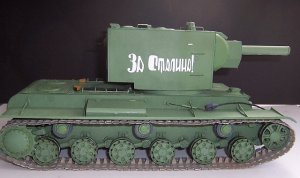
Drive sprockets, mud breakers and swing arm buffers.

The designed swing arm buffers weren't anything like the original so I scratch built them by rolling up a solid cylinder of 80 gsm 4mm high and 3mm diameter, cut out a section to fit the base plate in.

The sprockets have Drafmodel lasercut nut shapes. As designed the outer plate on the sprocket assembly was just a flat disk - the original has a dished plate. I formed this by soaking the part in Meths (denatured alcohol for US readers) then worked the shape on a measuring spoon with the ball from an old mouse. It's important to stabilise the printed surface with Krylon spray otherwise the inkjet ink will be attacked by the alcohol.

Regards,

Charlie
 

Attachments

  • susp_3.jpg
    susp_3.jpg
    85 KB · Views: 9
  • susp_4.jpg
    susp_4.jpg
    91.3 KB · Views: 8

charliec

Active Member
Jan 18, 2004
384
1
36
75
Brisbane, Australia
Suspension is finished.....

The return rollers are a bit strange - KVs had 2 types of return rollers: an early type with rubber tires and a later type with steel rims. The design models somewhere between the two. I doubled the thickness of the rim and went for the rubber tired type. Rather than try to support the return roller assembly by gluing it onto the hull I added bamboo skewer axles into the hull - seems to work pretty well.

The idler assembly is well designed but not easy to build. The design has a hemispherical hub but this doesn't seem right from images of KVs - I replaced this with a disc. Internally there are supposed to be small struts between the idler wheels - there's no indication on the wheel parts where these fit - I skipped them.

I put a section of track on the wheels to check whether it will fit.

Regards,

Charlie
 

Attachments

  • susp_5.jpg
    susp_5.jpg
    73.5 KB · Views: 11
  • susp_6.jpg
    susp_6.jpg
    68.7 KB · Views: 14

charliec

Active Member
Jan 18, 2004
384
1
36
75
Brisbane, Australia
I think it's finished.

Some notes about finishing the rest of the model:

- I went with as designed tow cables - the end parts of the cable are too wide to fit into the shackles and the attachment hook on the side of the hull. I think I should have gone with simple loops at the ends of the cable.

- The supports for the mudguards are too weak - I'd suggest using CA to stiffen these.

- The bulged part of the engine hatch is modelled as a series of conical rings, replaced this with a single piece formed by soaking in alcohol and worked to shape.

- There is a light which looks something like the German "Notek" light modeled. Images of KVs seem to indicate this wasn't always fitted - I left it off.

- The headlight body is turned out of a piece of dowel - the modeled petal form just didn't seem to come out right.

- The trash screens on the engine air inlets were made from thread. I'm still working on how to get this looking right.

- The nut shapes on the rear deck are Drafmodel nuts. I would have added these over the rest of the model but ran out of the nut shapes.

- The lifting eyes on the rear deck were made by drilling a hole into rear deck and forming the loop from fine wire around a 1mm drill, twisting the wire ends together and gluing this into the drill hole.

Overall this is a pretty good model. The fit is generally good with no nasty surprises in construction. I think some parts are not structurally strong but this can be easily fixed.

Regards,

Charlie
 

Attachments

  • kv_front.jpg
    kv_front.jpg
    114 KB · Views: 8
  • kv_back.jpg
    kv_back.jpg
    111.8 KB · Views: 11
  • kv_left.jpg
    kv_left.jpg
    96.9 KB · Views: 6
  • kv_right.jpg
    kv_right.jpg
    96.6 KB · Views: 8
T

Tim Crowe

That's a really great build! - I admire your patience with all the wheels.
 

outersketcher

Illustrator, Tinker
Apr 3, 2006
58
0
16
53
So Cal, USA
www.outersketcher.com
Charlie, I love your tip about using alcohol to shape the paper! Gonna run off and try that this weekend. As to your screen... recently my wife received a wrapped gift from a friend that had a ribbon made of a meshlike material. It looks like very thin, wire mesh, but more flexible and comes in different.... uhh... mesh sizes. I'm currently hording three different sized mesh ribbons that I use on my models. They do need painting of course, but they look VERY realistic!

They can be found at your local flower shop, gift shop or craft shops.

Nice work, I cringe everytime I think of you slaving over those track links.. : ) And that's even knowing you chose the simpler method! ; )

David
 

charliec

Active Member
Jan 18, 2004
384
1
36
75
Brisbane, Australia
Finding the right size mesh is (imho) a matter of luck. The trash screens on the KV were made with heavy thread dipped in acrylic varnish then wrapped around a piece of matte board. Once made the mesh was bonded together by putting some heavy Al foil above and below the mesh then touching it for a few seconds with an iron. It seems to work well in terms of constructing the mesh but needs work in selecting the right thread thickness. It should mean I can make just about any grill pattern at will.

On the other forum there is a part thread on shaping parts - one of the techniques is to make the part oversize, form the part, then trim off the excess - this neatly removes the inevitable crinkling at the edges you get when you shape the part. I haven't tried this with alcohol but it should work.

Regards,

Charlie
 
Status
Not open for further replies.