[Free Model #3] Tucker Sno-cat build

outersketcher

Illustrator, Tinker
Apr 3, 2006
58
0
16
53
So Cal, USA
www.outersketcher.com
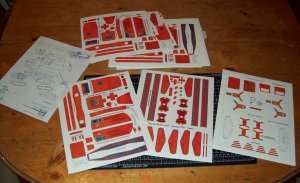
This is one of my favorite free models currently available on the net. I particularly like the high detail photographs of the completed model that the designer posted as reference. This has become a wonderful resource for me to confirm and compare my build to that of the designer's build.

...very nice...

Here's the link to the site where the sno-cat model is located.

And this is the home page..

Just go to "paper" near the bottom of the home page to see some nice built photo's of the model.

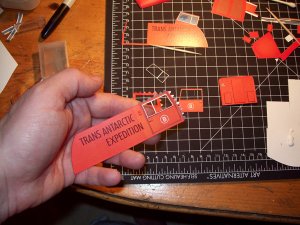
This particular model is of one of three Tucker sno-cats that were used by the British scientific exploration team led by Sir Vivian Fuchs as they crossed the Antarctic.

Here's a quote about that venture taken from an article by By Simon Usborne.

"When the British explorer Sir Vivian Fuchs was commissioned to undertake the first overland crossing of Antarctica, he needed a vehicle tough enough to withstand 100 days of travel across more than 2,000 miles of ice and snow.

Capable of operating in temperatures below minus 30C, the US-built bruiser that is the Tucker Sno-Cat was the machine for the job.

Leaving Shackleton Base in March 1958, the Sno-Cat, which had been developed 10 years earlier in Oregon to traverse soft snow and maintain telephone lines, fired up her engines and carried a ton of equipment and passengers inside, hauling another ton of gear in sledges behind her.

The Sno-Cat traveled an average of 22 miles per day and allowed Fuchs and his team to conduct various experiments on their mission across the South Pole. Their seismic survey measured the thickness of the ice cap and established the existence of a solid base of land beneath it.

Ninety-nine days later (a day short of its estimated travel time), the Cat arrived at Scott Base in one piece, earning itself a place in the Antarctic history books."

Read the full article here.

Sir Vivian Fuchs's Obiturary...

An absolutely EXCELLENT website devoted to the Tucker Sno-Cat

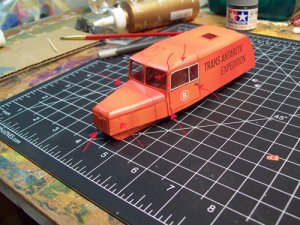
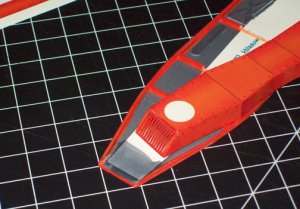
The Model 743 Tucker Sno-Cat available as a free model has the letter "B" painted on it's doors. This Sno-Cat was also known as "Rock-n-Roll" and was the vehicle that Fuchs himself drove. The actual vehicle now resides at the Tucker facility in Oregon and is reputed to be slated for a complete restoration.

There was a fourth Sno-Cat that was lost in an ice crevice, killing it's driver.

For more info about the other Sno-Cats


After all this research... the question that burns most in my little head is
HOW ON EARTH DID THE TEAM GET THE SNO-CAT "ROCK-N-ROLL" OUT OF THE SPOOKY LOOKING PREDICAMENT IN THE FOLLOWING LINK!!!

Nuther great Sno-Cat site


Here are some wonderfully, detailed and up close shots of one of the real vehicles.

Okay, that's it for the research.

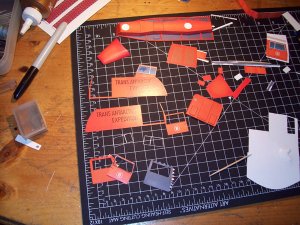
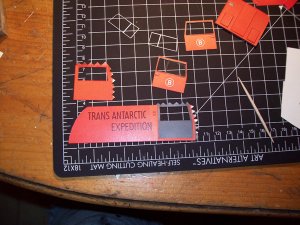
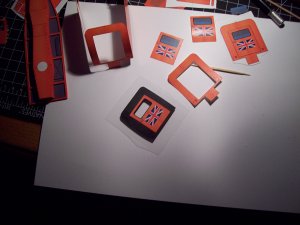
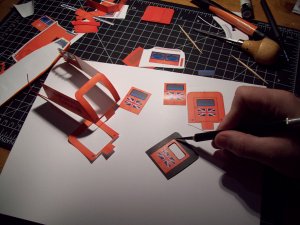
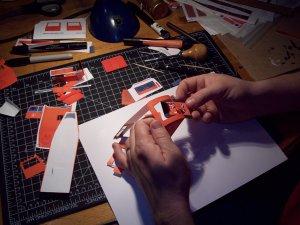
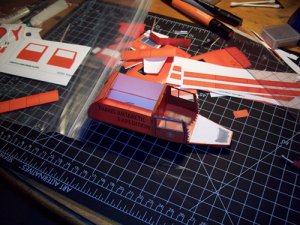
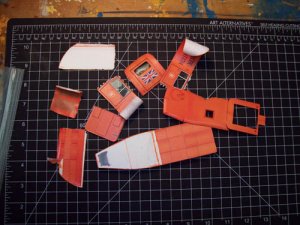
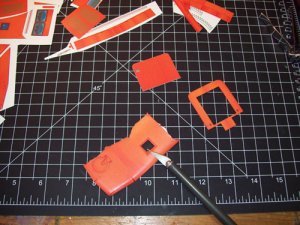
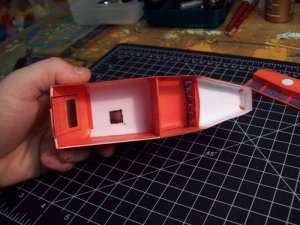
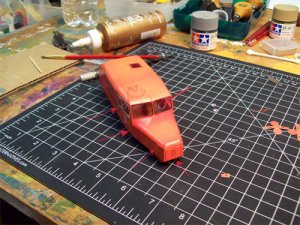
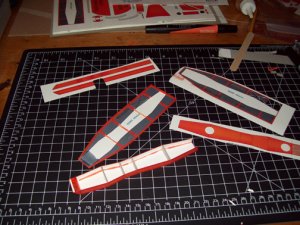
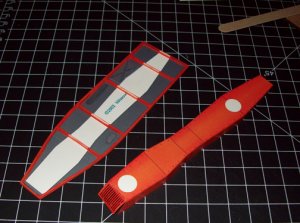
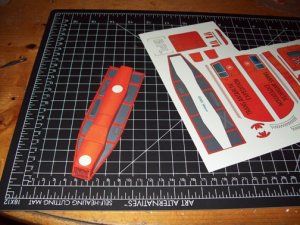
I'm well on my way into the model and I'll post pictures of the build in the next post.

David
 

outersketcher

Illustrator, Tinker
Apr 3, 2006
58
0
16
53
So Cal, USA
www.outersketcher.com
The Tucker Sno-Cat build...

My goal is to find out how much detail I can squeeze out of a simple model without adding anything to the original designer's artwork and maintaining the spirit of Toddlea's Free Model #3 contest. I plan to do this by laminating the same pieces over one another where needed and cutting out grills and holes when possible to provide depth.

The model consists of only two parts sheets and one sheet of instructions. There is also a third, optional parts sheet to allow the builder to add some detail to the cab interior and suspension... but there are no instructions on what to do with the parts. Shouldn't be too hard to figure out.

As you can see in the picture, I actually printed out three copies of each sheet so that I could laminate the pieces as I assemble the model.

I sprayed each sheet with clear acrylic spray and cut out all the main body and chasis parts. I've left the pontoon and track assemblies alone for now.

Next, I cut out several prints of the chasis frame and prepared seperated laminated pieces in grey. The frame itself represents four layers glued together and carefully cut out. Boy, I went through several x-acto blades doing that piece!


Cutting out those tiny grill slots at the front of the main tunnel was a bit of work. After several failed attempts, I managed it by spraying a light touch of spray glue to the back of the grill so that it had a slight "tack" to it. Pressed it down onto a piece of chip board and that kept the grill lines in place for me to carefully slice out the spaces. Once the spaces had been removed, I gently pulled the part off the chip board and colored the back of the grill. Frankly, I think it turned out rather well.


Instead of resting the main tunnel on top of the frame, I opted to cut down into the frame sections and nestle the tunnel into the assembly. It's not supposed to be that way, but I like how the frame sections interact with the main tunnel now much better.

This was also my first venture into butting the parts together with back tabs. It's definately more work, yes, but I do like that the parts meet each other at an equal level. My next step will be to add a tiny droplet of glue to each rivet along the frame assembly. The glue will dry clear of coarse. But the droplets will add a little more to the illusion of detail with out hiding or changing the original artwork. At least I hope it'll look good!.. : P
 

Attachments

  • The model sheets.jpg
    The model sheets.jpg
    292.8 KB · Views: 50
  • chasis frame and bits.jpg
    chasis frame and bits.jpg
    286.5 KB · Views: 39
  • inside progress-1.jpg
    inside progress-1.jpg
    275 KB · Views: 40
  • chasis assembly-1.jpg
    chasis assembly-1.jpg
    238.1 KB · Views: 40
  • front grill view.jpg
    front grill view.jpg
    237.5 KB · Views: 40
  • completed chasis.jpg
    completed chasis.jpg
    276 KB · Views: 43

Gearz

Member
Mar 13, 2006
258
17
16
OZ
Nice to see something other than a main stream subject :thumb:
popcorneater.gif
 

Art Decko

Member
Oct 26, 2006
183
0
16
Shanghai, P.R.C.
Very cool subject choice! :thumb:

Nice to see something other than a main stream subject :thumb:
popcorneater.gif

I couldn't agree more. I often feel dismay that most modelers and designers concentrate so much on building machines that were designed for injuring and maiming people.

The Sno-cat is an excellent example of one of the many, many vehicles that are every bit as cool as a panzer, but were designed for more noble purposes. I wish there were more models of vehicles designed for exploration, firefighting, construction, rescue, freight haulage, recreation, transportation, record-breaking, etc. In fact, there are many more possible subjects in these fields than there are military equipment.

Thanks for sharing this thread, can't wait to see how it turns out! :)
 

logicman

Greybeard
Apr 30, 2008
275
0
16
Kent, UK.
Great subject choice!

I was at school when the expedition went out - part of the International Geophysical Year projects. I made an Airfix model of the "Auster Antarctic".
(Wish I still had it.) - Auster T7 Antarctic airplane pictures & aircraft photos - RAF Museums

I managed it by spraying a light touch of spray glue to the back of the grill so that it had a slight "tack" to it. Pressed it down onto a piece of chip board and that kept the grill lines in place for me to carefully slice out the spaces. Once the spaces had been removed, I gently pulled the part off the chip board and colored the back of the grill. Frankly, I think it turned out rather well.

That's a good tip. We have 'picture of the week', why not 'tip of the week'? This one would get my vote. :thumb::thumb::thumb:
 

outersketcher

Illustrator, Tinker
Apr 3, 2006
58
0
16
53
So Cal, USA
www.outersketcher.com
Thanks for all of your comments! I purposefully chose this model for it's simplicity and for the EASE with witch it can be detailed. I'm limiting myself to only lamination and embossing of the original prints this time 'round for the contest however... no extra stuff added.. It's killing me tho. Wanna add detail...so..badly.. : )
 

outersketcher

Illustrator, Tinker
Apr 3, 2006
58
0
16
53
So Cal, USA
www.outersketcher.com
Worked on the doors this weekend. I wanted to show that the doors are separate entities from the body. I wanted the observer to look at the model and say to them self..." by golly, I can see the rubber insulation around the gaps of the doors!"

So this was my attempt to create that look using only what's available from the parts sheets themselves..... and some clear acetate. :rolleyes:

Each door is a layering of cut-out window trim, the door panel itself, a door panel colored black to mimic the rubber insulation, a sheet of clear acetate and the interior door panel.

The model designer didn't provide interior artwork for the model, so I am using the outside panels to line the interior. Not exactly correct to the original snocat... yeah. But the model itself looks a heckuvalot better. I covered the Brittish flag with plain, orange "panels" taken from another area of the model sheet. And since you will only be able to see the rear interior from the skylight in the roof and the rear window itself... it's all the realism I need to pull off the ilusion of an interior door panel. I plan to use the same method to cover the side walls and floor of the cargo area.

So...After all that careful cutting and measuring and delicate edge coloring... do the doors look like they are nestled into the frame with just a bit of the rubber insulation showing itself here and there?

hhhhmmm...... doesn't look much different does it.... Dunno if my brilliant plan worked. Well, at least the doors are on now.:rolleyes:

Those tiny white pieces of window trim were a special trip through hell to cut out.

David
 

Attachments

  • door assemblies.jpg
    door assemblies.jpg
    361.3 KB · Views: 30
  • rubber panel installed.jpg
    rubber panel installed.jpg
    324.9 KB · Views: 29
  • assembled door w:trim.jpg
    assembled door w:trim.jpg
    317.7 KB · Views: 32
  • rear door components.jpg
    rear door components.jpg
    237.5 KB · Views: 29
  • rear door part1.jpg
    rear door part1.jpg
    283.6 KB · Views: 30
  • rear door part2.jpg
    rear door part2.jpg
    296.8 KB · Views: 31

logicman

Greybeard
Apr 30, 2008
275
0
16
Kent, UK.
I covered the Brittish flag with plain, orange "panels" taken from another area of the model sheet.

Gad, Sir!
How dare you!
I shall write a letter to The Times forthwith.
Your thoughtless actions may well provoke an international incident!

sign1
 
M

Mark_1984

I covered the Brittish flag with plain, orange "panels" taken from another area of the model sheet.

People have been shot for less - countries invaded even. The SAS are polishing their rifles as we speak :p

It is a mighty fine build - those thin white window frames do indeed look devilishly difficult.
 
T

Tim Crowe

Definitely off my Christmas card list - and you can have Madonna back!

Great build by the way :thumb:
 

SCEtoAux

Member
Jul 28, 2004
175
22
18
USA
That is a nice looking vehicle. I remember seeing some of those kind of vehicles and was astonished at how big some of them are. :)
 

redhorse

Member
Dec 28, 2007
104
0
16
McKinney, TX
Just read about the setback, good luck with the rebuild. I'm looking forward to seeing this one finished, I'm really impressed with the build so far.

PS: I like your cutting mat, does it work better than the green olfa ones? It looks better!
 

outersketcher

Illustrator, Tinker
Apr 3, 2006
58
0
16
53
So Cal, USA
www.outersketcher.com
I made a big mistake. Was so "into" getting the stupid thing built that I just started assembling the snocat without even bothering to follow the builders directions. And so, I ended up with the chasis, body sides and back, but had no way to install the top! AAAAAAAUUAAHAGHAUUAGHglglglg!!...

I tried to force it to work.. I really did... but had to admit that there was no way to do it.

So... I had to tear it apart and salvage what I could. Luckily, the tear down and salvage went very well and I was able to reuse many of the sub assemblies that I'd so painstakingly built.

Using the salvaged sub assemblies, I rebuilt the body...starting with the top _first_ this time. Went together well. Those compound curves are tough to simulate accurately tho.

By far the most difficult piece to build was the front windshield and frame. Such thin frame edges next to the "glass" made it a holy terror to cut out. Add to that the fact that I needed to cut the same part out THREE TIMES.... the interior piece for the cabin, the outer piece with only the "glass" area cut out to show off the rubber, and the final, outer trim piece, with both the "glass" and the "rubber" cut out.... the latter two pieces are sandwiched to each other and then placed over a piece of clear acetate. The inside peice was glued to the back of the acetate making a complete, windshield sub assembly.

I'm not willing to admit how many of those I went through till I had three usable pieces... nor how many x-acto blades I used up in the process either. ; )

But the body is together now and looks good.

You'll see that although the designer did not provide an inside cabin roof piece, I was able to continue the color of the painted metal by simply reversing a section of the outer roof and gluing it upside down into the cabin roof. I think it looks great.

The last photo is my attempt to point out the little pieces of extra laminated details pulled from the prints. I'll go into this more next post.
 

Attachments

  • big mistake.jpg
    big mistake.jpg
    122.5 KB · Views: 262
  • tear down.jpg
    tear down.jpg
    75 KB · Views: 271
  • salvage.jpg
    salvage.jpg
    117.9 KB · Views: 261
  • doing it right.jpg
    doing it right.jpg
    97.3 KB · Views: 265
  • completed body1.jpg
    completed body1.jpg
    124 KB · Views: 267

logicman

Greybeard
Apr 30, 2008
275
0
16
Kent, UK.
That's a major setback, but you've coped well.

You could have ploughed ahead and not mentioned it.
It's great that you did, though - it alerts others to the need to
read the instructions - or at least think ahead.
It also says a lot for your honesty, and I admire that.

Those thin bits that need folding - I fold those with a lot of
waste still on the part, then cut off the waste after.
It's still fiddly, but a bit more manageable.

Anyway, great going! :thumb::thumb::thumb:
That's a good, clean, square build.


Enough said, which is a very rare statement when it comes from
logicman.

:wave:
 

outersketcher

Illustrator, Tinker
Apr 3, 2006
58
0
16
53
So Cal, USA
www.outersketcher.com
Okay, I only have the one photo this time. I spent some time carefully cutting out door handles, door hinges and hood hinges and latches from an extra sheet of parts. I was even able to cut out a set of windshield wiper blades from the parts sheet as well. Hey, the designer included them in his artwork.... I'm installing them on my model. ; )

Each little piece was installed with a tiny drop of glue and much holding of breath.

The seats, steering wheel and dash are all installed as well.

I'm amazed at how effective just an extra layer of detail can add to a relatively simple model. The simple addition of a tiny strip of paper now says "hinge" and makes the door.... just... "feel" more like a door in my mind now.

I still have to build and install the headlights, exhaust pipe, roof hatch, and storage bins... but, I'll do them after I get the traction pontoons completed.

Next post, the traction pontoons...
 

Attachments

  • completed body2.jpg
    completed body2.jpg
    108 KB · Views: 263