Free model#3 Skips BumbleBee Camaro Concept.

Status
Not open for further replies.
P

paulhbell

Oh my god!

Mothers day on Sunday, Oh s**t, I forgot. Just kidding, had mothers day in march (I think). sign1

Floor pan, do you guys in the US call it that, is done. No problems at all. :thumb:

More pics from this evening. Glue still wet, hot off the press.

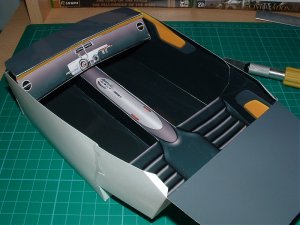
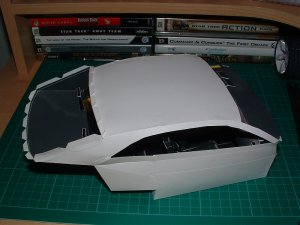
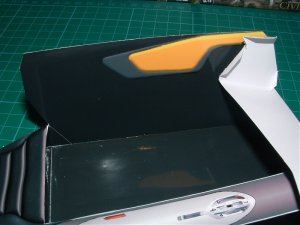
Pic 1: drivers side wall front, page C, part 3.

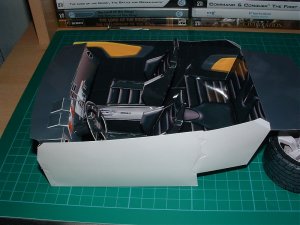
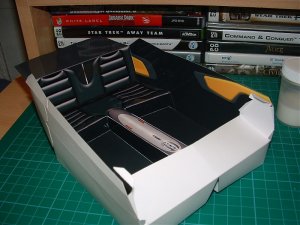
Pic 2: inside floor and back seats complete.

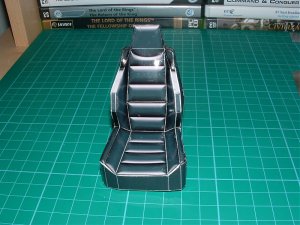
Next up dash and seats.
 

Attachments

  • DSCF0113.jpg
    DSCF0113.jpg
    141.4 KB · Views: 4
  • DSCF0115.jpg
    DSCF0115.jpg
    174.5 KB · Views: 5

Master-Bruce

Active Member
Aug 15, 2007
1,012
12
38
Looks cool Paul, very clean.

I need to let you know of a small error on my part!! It doesn't effect what you've done yet. :)

I miss labelled the window surounds on page Y. They are the small strips that joint the interior to the exterior. I've labelled the front and rear surrounds the wrong way around. :( So the front is labelled as the rear and vice versa.

I've already changed the PDO of the model so I'll make new PDFs for the release so no-one else will encounter this.

Also, this fixing of the interior to exterior is giving nothing some trouble. Probably even more fiddly for him as his build is half the size of yours.

I have a method in mind that should make this part easier for you. I didn't think of it until it was too late for nothing so I'll email you the idea in a few minutes. ;)

Don't worry about speed buddy. I'm not in a hurry, just so long as we all know the model's Ok. Plus you still have 51 days for the comp deadline. ;)
 
P

paulhbell

More updates.

Not got as much done today as I thought I would, bloody good weather.sign1.

Photo 1:- Dash nearly done.

Photo 2:- One seat done, easier to make in this scale skip (compaired to enterprise and not as many). It's a nightmare to keep the glue off the glossy paper, I find it easier to let the parts dry over night then give them a rub down. This tends to take the 'extra' glue off.

Photo 3:- Car bottom. I wanted to get an idea of the full size of the model, so I put the floor pieces together. It's sat on an A3 cutting mat. It comes out at 407mm (approx 16 inch). BIG
 

Attachments

  • DSCF0116.jpg
    DSCF0116.jpg
    177.2 KB · Views: 9
  • DSCF0117.jpg
    DSCF0117.jpg
    203.7 KB · Views: 6
  • DSCF0118.jpg
    DSCF0118.jpg
    154.8 KB · Views: 6

Master-Bruce

Active Member
Aug 15, 2007
1,012
12
38
Looks great Paul! You're right about the seats! LOL :)

You're right about the size too! An A3 cutting mat you say? WOW! It's giving a much better idea of the size and I got from checking the length up against my ruler!

Thanks for the update buddy. I'm loving watch both of them come together. :D
 

Nothing

Longtime Member
Sep 13, 2006
656
5
36
53
yankee44.webs.com
out of respect for paulhbell's comp build thread i think we should limit this thread to comments concerning his build. thank you. please dont take offense to my comment.
 
P

paulhbell

Wheels? I think you mean wheel.

Photo of one wheel and seats in place, I'm not that happy with how the wheel looks, my fault not skips. I should have made the tyres from my usual card instead of glossy paper wall1.

I've not done a lot over the last few days, so I better get a move on.
 

Attachments

  • DSCF0120.jpg
    DSCF0120.jpg
    169.1 KB · Views: 12
  • DSCF0121.jpg
    DSCF0121.jpg
    169.9 KB · Views: 5
P

paulhbell

Another update from me tonight, 2 updates in one day after nothing for a few days :shock:.

Inside roof and rear window surround put on. The front of the roof was a bit tricky for me (big fingers), so it must have been hard for nothing at half scale.

I will have all the interior finished tomorrow, only window surrounds to do. Then I start with the exterior body work and another wheel/tyre.

I am on my own next week, everyone's on holiday in Holland balloon6. I think about a week to finish :woot1:.
 

Attachments

  • DSCF0122.jpg
    DSCF0122.jpg
    149.5 KB · Views: 7

CardStalker

Member
Oct 20, 2006
45
0
16
61
PA, USA
Paul, on the clear sheets you printed that the ink did not dry, try using a hair drier to make the ink more solid. It still won't stick to the plastic sheet, but after that spray it with a clear coat spray. That should seal it to the sheet.
 
P

paulhbell

Thanks for the tip, the ink did eventually dry, after about 3 or 4 days after printing. But the ink dried into spots and was not shaded from dark to clear. I have got hold of some inkjet acetate, so everything should be ok now. Going to try and print that sheet tomorrow. Bed time over here, very early morning call for me.
 

Master-Bruce

Active Member
Aug 15, 2007
1,012
12
38
Looks amazing Paul. Yeah the glossy tyres look a tad odd but they build looks spot on! You're doing a great job buddy. :D

Thanks for the updates mate, I'm really pleased with how both builds are looking.
 

CK Styles

Senior Member
Jul 10, 2007
103
0
16
Lincoln, NE USA
Office Depot sells overhead projector transparencies for inkjet printers. They work perfectly and dry within seconds. As stated earlier, the transparency must have a "rough" side to print to. With that in mind, I always print a mirror image on these sheets so the smooth glossy side is facing out (espicially important if there are numbers or words involved). They sell them by the sheet or by the box (to expensive by the box). Hope that helps!~!
 

CJTK1701

Banned
Dec 12, 2006
242
0
36
Looks great paul. looking forward to more updates. This is a great model Skip. How's that 70's camaro coming?:mrgreen:
 

NSCXP2005

Member
Mar 8, 2007
34
0
16
CK Styles,

Do you know if these transparencies would work for the models windows?

Code:
http://www.ryman.co.uk/Ryman-OHP-Colour-Inkjet-Film-Pack-25-0224010461.asp

NSCXP2005
 

CJTK1701

Banned
Dec 12, 2006
242
0
36
They should, I used to use them when teaching. They should be able to print up virtually anything. There was a guy on e-bay selling screen captures from Star Trek, so you should be able to print virtually anything you want. :mrgreen:
 
Status
Not open for further replies.