[Free Model #3] - Building the Bald Eagles

metoo

New Member
Sep 15, 2007
28
0
6
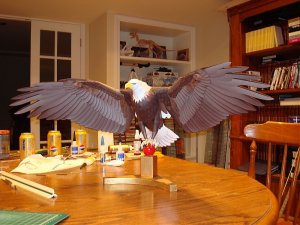
Time to get started on the eagles from canon. Canon 3D Papercraft - Bald Eagle

Got the printing all done and have sprayed the prints with sealer.
I will be making 3 of these eagles. One printed as downloaded on 110# card, one printed at 4 pages per sheet on 90# card and one printed 16 pages per sheet on 24 # paper.
The reason for 3 is because I wanted to make a very small scale one and when I do that I have to print the parts at the original size to be able to see the part numbers. Since I would have it printed out anyway, might as well build it too. Ok I know that is only 2 but....the more I looked at the one printed 4 pages per sheet, the more I realized that was still bigger than I wanted. Dada, a 3rd one in the making.
The reason for mentioning all 3 here is because I will be constructing all at the same time.
Tonight I will get started on preparing the parts to be cut.

The 'manage attachment' doesn't seem to work, so I put the pic in the gallery and linked to it. I sure hope it works.
100_0053comp.JPG


Kathie
 

Rutek 63

New Member
Jul 23, 2007
2
0
6
Scarsdale NY
Hi Kathie, Welcome to the contest. You have a very interesting approach to the subject. It really sounds like fun. :thumb:
Good luck!

Peter
 

greenelf1967

Member
Mar 31, 2007
28
1
16
Borrowstourness/scotland
Hi metoo, i made this model about a year ago,it's quite impressive when it's made i think the only trouble i found was making the feet (claws)...but it will be intresting watching somebody else making it.....:)
 

exzealot

Member
Jul 3, 2007
142
0
16
67
Lake Orion, MI
Hi Kathie,

I was inspired with your build thread, so I decided to put one of these guys together over the weekend. Here is a picture of how it turned out.

A couple of notes for you: The orientation of the wings to the body (via bent box sections) is confusing. I think the wings are supposed to be bent back like shown on the bottom of page 8 of the instructions. Note that my wings are bent forward (as in a hovering position). Both are realistic, but I believe the intent was for the wings to be bent toward the back of the bird. I must have put the box sections in 90 degrees out of phase. But it looks good anyway.

Also, by far, the most difficult part are the feet. It will be interesting how your small scale birds turn out.

Good luck on your build.

Ken
 

Attachments

  • Eagle.jpg
    Eagle.jpg
    215.4 KB · Views: 77

Samardza

New Member
May 20, 2005
6
0
1
Salisbury, MD
need help

kenlwest
I've run into a problem with my build of the eagle, I hope you can help.
parts 74 and 74 appear to need a double bend to go on, is this accurate?
the illustration in the instructions seems to sho it but does'nt show the bendind directions.
Any help would be appreciated.
 

exzealot

Member
Jul 3, 2007
142
0
16
67
Lake Orion, MI
Samardza,

Parts 74 and 75 are best described as the shoulders of the bird. The upper (circular) region of the part is rolled so that it forms a bridge between the wing assembly and the body. The lower region (vertical feathers), simply lays flat under the inside portion of the wing and slightly covers the inner side of the bird.

Hope this helps,

Ken
 

metoo

New Member
Sep 15, 2007
28
0
6
I'm finally back

Sorry to have been so slow in replying to the posts here & not showing much of my build. I have been ill, better now and catching up.

Thank you so much to those that have shown me pics of their eagles and letting me know about what areas to be watching out for. It is nice to know that I have others to ask help from if I run into problems.

I do have all the pieces cut out for all three that I am building. I still have to color the edges of the pieces for the 2 smaller ones but have them done for the original size one.

Hopefully I will be caught up with things enough to actually start building this weekend.

Kathie
 

metoo

New Member
Sep 15, 2007
28
0
6
I forgot to mention how impressed I am with both the eagles I have seen built. Ken and greenelf1967 you both did great jobs on your eagles.
Greenelf1967, it would be nice if you could post your pic in the thread here too. It is interesting the wings can be put on 2 different ways. It looks like greenelf1967's are going back as compared to Ken's going forward. Both are magnificent!
Kathie
 

metoo

New Member
Sep 15, 2007
28
0
6
Well I finally got caught up with things and was able to start again on the eagles.

Friday I got finished with coloring the edges:
100_0066.jpg


Getting ready to put together the heads:
100_0067.jpg


Got the heads and necks done Saturday. Note the little head sitting on the toothpicks:
100_0068.jpg


Getting ready to build the body frames:
100_0069.jpg


Got the scoring all done for the three body frames:
100_0070.jpg


The pieces are put together for the interior body frame, but will have to wait until tomorrow evening before I put them all together. I found on pieces 9 & 10 that if I glued the angled edge of the curve first and let it dry the other edge will curve perfectly when gluing it. I also found it is not true if I glued the straight edge first and then the angle edge. I had to mess with it a lot more then.
100_0071.jpg


Well thats it for now.
Kathie
 

SCEtoAux

Member
Jul 28, 2004
175
22
18
USA
That little head on the toothpick looks tasty.:D ;)
Keep up with the little tips & tricks. :thumb:
I might try that eagle out one day and they will be of great help.:)
 

exzealot

Member
Jul 3, 2007
142
0
16
67
Lake Orion, MI
Kathie,

Wow! That little guy sure has a small head! I found that the eyebrows were a little difficult to get the correct "scowel". Yours looks great. Suggestion: You may want to build the feet for the little bird next just in case they prove to be impossible. The feet were challenging for me even at full scale.

Keep up the good work!

Ken
 

metoo

New Member
Sep 15, 2007
28
0
6
Well here is what I did last night.

Finished putting together the body frames:

100_0072.jpg


Gathered the pieces for the tail & part of the body [instruction page 3]:

100_0073.jpg


Got all the scoring and shaping done. I found that using my felt-tip pen and coloring in the white area that the darks are glued onto makes a less noticeable dart. I had a choice of going either a little lighter or a little darker than the color of the parts. I choose going lighter. In hind sight I should of gone darker. The other thing I found was that if any of the red cut line was still on the part, it really shows. This was true of pieces that had very miniscule red on, even such a small amount that I didn't know it was there until I glued the pieces.

100_0076.jpg


Got the tail feather on and starting on the body [instruction page 4]:

100_0077.jpg


I didn't glue piece #19 all the way on as I wasn't sure it was correct considering the fact that it shows that #18 is to be glued to the top and #18 is already on the bottom of the body. I will be waiting until I go to the next step to see what will be happening.
I'm thinking these look like really weird fish at this point.

100_0078.jpg


Here I have all the pieces ready to go for instruction page 5:

100_0081.jpg


Will have more time tomorrow to work on these.

Peter, thanks for the encouragement.

Doug, I don't think that little appetizer would taste too good, too much ink.

Ken, on the pattern it showed a cut line under the brows. I found that if I didn't cut this but made a valley fold it worked pretty good, I did have to cut a small area for the eyes to fit in though. As for the feet of the little one, if I find them too impossible I will skip the feet and have it landing in a tree or something where the feet would be hidden. I am used to making small things though so hope I can manage.

That's it for tonight,
kathie
 

gian7675

Member
May 17, 2007
49
0
16
48
Cebu City, Philippines
Nice build you're doing there metoo! :thumb:

3 Bald Eagles all at the same time...wow...a Papa Eagle, a Mama Eagle and a Baby Eagle sign1

I'm one of many who'll be looking forward to the completion of this Free Model entry build of yours. Again nice! :mrgreen:
 

metoo

New Member
Sep 15, 2007
28
0
6
Thank you gian7675 for the encouragement.

Well, I found a little more time and got a little bit done. I did the legs down to the scaly part for the claws. Haven't put them on the bodies yet because I might do the feet first, depending on how they connect. The instructions say to attach the larger part of the leg to the body and them attach the smaller leg part to the larger one. Instead I attached the smaller part first as it is easier to pull the smaller part though the larger part rather than trying to push it into the small openings.

100_0082.jpg


Kathie
 

metoo

New Member
Sep 15, 2007
28
0
6
Thank you Gippo for the encouragement.

Well here I go again. I decided not to build the feet yet but to follow the order of the instructions (kind of).

Before doing anything else I decided to color the back of piece #21 as I really didn't want the white showing that much. I did it pretty sloppily with black then went over that with brown felt pen (not shown in pic).
100_0083.jpg


Then came time to attach the legs.
100_0084.jpg


Now it was time to attach number 21. In hind sight I would not have put this on until I was ready to put the wings on as it just gets in the way.
100_0085.jpg


Now on to number 20 chest feathers. I did it per instructions, but I think it would look better if I hadn't glued the center bunch of feathers done and only glued the ones above the legs. Also on the big one I should have colored the white area under where the V shaped feathers above the 'darts' are as the white shows. It is not a problem with the smaller ones.
100_0086.jpg


Now to the side underfeathers: It took me awhile to figure out how these fit on (the directions could use some improvement for beginners like me).
The rounded top needs to slip under the top tab that has '22' on it (not glued under the top tab as it will have to move later) at the same time the longer edge feather has to slip under the loose chest feather while gluing it to the chest feathers piece. Hopefully these pics will show you better than my words. Also before I put these on I rolled the round top by rolling on the edge of my table.
100_0087.jpg

100_0088.jpg

100_0089.jpg


Now for #22 back feathers: I only connected the 2 ends to the chest piece that are part of the shoulder as I want to have a easier time moving the shoulder parts of the side feathers when I put the wings on. I will glue it to #21 when I figure where the shoulder pieces will be. Kind of looks like a mess right now with feathers sticking up .
100_0090.jpg


That's it for this time. Next will be the wings.
Kathie