Eastern Tn logging on the DG CC & W RR 1928

Bill Nelson

Well-Known Member
Dec 14, 2008
2,680
467
78
Clarksville Tn
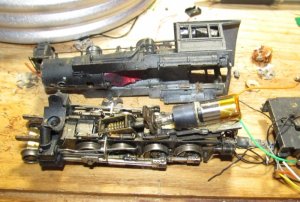
The first time I did this, the motor was burnt up, so there was no down side. most modern motors have tiny little shafts, so you have to do lots of work to support the worm, This is radical, but I know the worm set up will be right.


Bill
 

Bill Nelson

Well-Known Member
Dec 14, 2008
2,680
467
78
Clarksville Tn
This is actually easier than many motor destruction jobs, as there are bearings on either side of the worm, in the axle hung gear box.


this third bearing just keeps the gearbox from rotating.


I came up with this plan originally when replacing a motor on a PFM shay. that locomotive had one bearing on the far side of the worm, when putting in a gear reduction motor, I needed to support the other side of the original motor shaft, so I used one of the bearings from the original motor. I have also used this technique to remotor my Gem 2-4-4-2. The original motor was mounted on a spring, and the gearbox it hooked to was hung on a sprung axle, and could rotate. There was a spur gear on the motor that meshed with a spur gear on the tower, every time the locomotive stopped and started the spur gears meshed at a different angle, If they landed parallel to each other the locomotive would start at 15% throttle, and if they landed way out of whack it would not start until 60% throttle. I disabled the sprung drivers, and fixed the gearbox so it could not rotate, and mounted the motor directly to the frame, with much better results. The spur gears are still as loud as homemade sin, so loud you would swear there should be a trail of brass shavings behind it , but it will pull 18 cars up the 3.3% grade to Crocked Creek. Sadly the DCC at the club won't feed it enough current to be very useful there, as 2-4-4-2s do a wonderful little dance under a load.


Nelson
 

Bill Nelson

Well-Known Member
Dec 14, 2008
2,680
467
78
Clarksville Tn
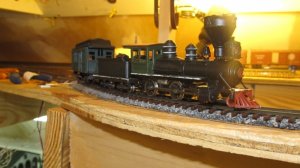
SMLA-1  #6 nw mtr.jpg I'm getting the motor situated, and it seems like it is happy. Next I have to upgrade the electrical pick ups, replace the driver springs with some NWSL wimpy springs, so I;ll get real effects from the sprung drivers, and then it will be time to start to put this thing back together, and perhaps do some paint work.

This locomotive has had a lot of cosmetic work to back date it, I have replaced the steel cab with a wood cab. it has had several stacks on playing with the woodburner look. recently more of my road locomotives have been done as coal burners with the mill switcher and woods engines remaining wood burners, so this locomotive may get a straight stack again.


Nelson
 
Last edited:

Bill Nelson

Well-Known Member
Dec 14, 2008
2,680
467
78
Clarksville Tn
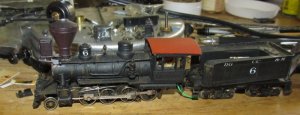
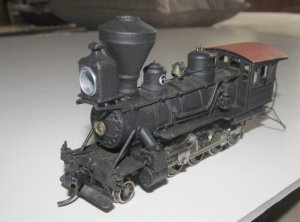
SMLA-1 #6  w stk.jpg I couldn't bring myself to put a straight stack on this locomotive, so I went through all of my other options, It has had a 1860's style balloon stack, a cabbage stack , and a funnel style stack, none of which looked just right. This time around it got a large Radley Hunter, surplus from an AHM J W Bowker. with the attending headlamps. I have used these tacks and headlamps on my two MDC shays, and Just the stacks on my 2 Riverossi Heisler, so this stack has a family look to it .


I'm not sure what kind of paint work I will do, I don't really want to repaint the tender, I may graphite the boiler and the stack, and touch up the headlamp., or perhaps I could repaint the stack and the headlight with a brush, and graphite the smokebox, and hope I can get the stack and headlight close enough. there are several places that need touch up as well.

This locomotive is packed with lead, and with the gear reduction motor, and The wimpy journal springs I plan to put in it, it ought to be somewhat of a hoss for a tiny consolidation


Nelson
 
Last edited:

Bill Nelson

Well-Known Member
Dec 14, 2008
2,680
467
78
Clarksville Tn
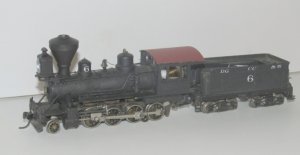
SMLA-1 ol # 6  wo t.jpg I have # 6's wires hooked up on the locomotive side, and have done some touch up fixing paint chips and de emphasizing some of the weathering, and the color differences between the stack and headlight and the rest of the locomotive.


I still need to do some wiring and cosmetic work on the tender to get it's all wheel pick up more reliable, with less rolling drag.

the top speed is quite reasonable with this set up, and it crawls, it is much quieter than the Ma=& Pa locomotive's set up as well.

Bill Nelson
 
Last edited:

Bill Nelson

Well-Known Member
Dec 14, 2008
2,680
467
78
Clarksville Tn
It is a handsome critter, ad odd, a Consolidation no longer than my Americans., and with drivers so small they look like thy should belong on an Hon3 consolidation.
 

Doctor G

Well-Known Member
Sep 1, 2008
1,415
298
78
Clarksville, Tennessee
Neat!

I got one of the Motorman's (micro-locomotion.com) Faulbauer 1016 motors with a 4:1 gear ratio installed in a Riverossi Heisler.

I removed the factory motor, and pressed the gear off of it, the hole in the gear was slightly large for the shaft on the gearbox end of the micromotor, so I stripped some very small multistrand wire of it's insulation, folded the multitrand wire over the shaft and pressed the gear onto the shaft and the wire, the multstrands got spread out enough so the gear is not off center, and the shaft and the wire add up to enough to make the gear tight on the shaft.


The end of motor fit a round indention in the frame perfectly, and that put the motor at just the right height over the driven gear. the other end of the motor was in the hole for the original motor in the frame. to support the motor I put it in a brass tube. I filed off a notch in both ends of the tube, and pressed the motor into the tube, and then glued the motor/ tube in place


it runs very well and very slow I will edit it to add the you tube link as soon as it hits so check again if it is not there when you look at it.


http://www.youtube.com/watch?v=TBcqC5g8dKw&feature=youtu.be

Neat trick Bill.

Having remotored a Heisler in the HO past I too had run into the diameter differences. The multistrand wire is a nice solution. I cannot remember what I did years ago???? I think it was a thin shim of tubular metal and ACC glue.

Any hows way you done good. Liked the You tube flic too.

Tom
 

Bill Nelson

Well-Known Member
Dec 14, 2008
2,680
467
78
Clarksville Tn
Heisler #17 is now at the club with the decoder I stole from Southern Rwy #722 in it. It works ok, but the DCC only gives it about half the juice DC did. with the half power and the dramatically slower speeds, it stalls on those #### **** Atlas switches with the dead frogs; so I will need to add some pickup to the insulated side of one or both the rear trucks, or possibly go hog wild and try to get pick up odd off all wheels. I'm going to try to get Dave to research CVs, and see if we can give it more juice at full throttle, otherwise, the decoder might come out, and it may go back to work on my home layout.
 

Bill Nelson

Well-Known Member
Dec 14, 2008
2,680
467
78
Clarksville Tn
SMLa-1 #6 w tndr a1.jpg #6

I got the electrical pick up for the insulated wheels on the tender rebuilt on #6 , I did some repairs to the tender, got the tender attached to the locomotive and wired up.

It runs well, and only needs some paint work and some cosmetic, and detail work before it is ready to go back to work on the valley division.


I'm very pleased with the new look of this locomotive., I definitely need to get into the cab, and paint the wires motor and the white bandage tape, so they are not a distraction
 
Last edited:

Bill Nelson

Well-Known Member
Dec 14, 2008
2,680
467
78
Clarksville Tn
Tennessee is a long way from California, and we are here to talk about model trains,

that said, look at a map of California, and the most prominent features you will see is the Pacific Coast, and the Sierra Madre mountains.

The prevailing winds are easterly, so moisture comes off the ocean, and is dropped at higher elevations as the air is pushed against the mountains, much of it as snowfall in the colder months.

The Climate is generally dry, but snow melt during the spring and summer provided water to feed the rivers and streams.


The land is very fertile in places if irrigated, so a lot of agribusiness has grown up in the area, that and massive population increases mainly along the coast create a massive demand for water, largely at great distance from the mountains, where the supply is greatest, creating lots of interesting logistical and political problems, as more and more folks compete for a limited, vital resource.


check elsewhere to be sure I know what I'm talking about, cause while I am very knowledgeable about a lot of stuff, I also have a remarkable store of ignorance as well. ask me a model train question next time, and I will know exactly how badly I'm misleading you.

Bill Nelson -my dad was a professional Forrester, and an amateur geologist, and I paid attention some of the time.
 

Bill Nelson

Well-Known Member
Dec 14, 2008
2,680
467
78
Clarksville Tn
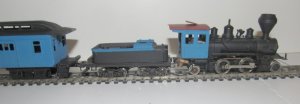
SMLA_! M & N G # ?.jpg M & N G trn for State line.jpg over on the Bill and Tom's excellent adventure thread I have been working on a pair of passenger cars. I have been posting over there, as I'm going to loan the cars to Bob's possum hollow outfit, but they are being build to be interchange cars for the standard gauge Marietta and North Georgia, up in State line. working on color matching brought out the M & NG State line switcher, originally as a color reference, but now it is getting some work done on it as well.


I'll have to get with Mack, and get a suggestion for a number for this locomotive, and make a call as to weather this is a woodburner or a col burner (it could go either way with this stack) the short tender would look really good with a monster wood rack.

since the locomotive landed on the workbench I have made adjustments to the tender truck electrical pick up contacts, getting much wheels that roll much more freely, yet still pick up electricity. I have added a front coupler, but still need to build a freight pilot around it.


when I was doing some touch up, to the coaches I added blue to the tool boxes on the tender, and to the tender flare.

Now I have to go get some mowing done before my hockey playoff game tonight.

I have a bras kerosene headlamp I removed from one of my consolodations on a rebuild, I'd like to use it on this locomotive if I can find a piece of the ornate bracket that is currently awol on my workbench (at least one hopes it is on the workbench).


Bill Nelson
 
Last edited:

Bill Nelson

Well-Known Member
Dec 14, 2008
2,680
467
78
Clarksville Tn
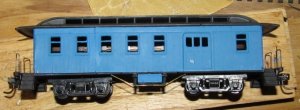
SMLA-1 cmbn w hndrls & trssrds.jpg I got the hand rails and truss rods installed on the combine. this kit made no provisions for the turnbuckles. Turnbuckles are tiny, and if modeled in scale are a **** to get on, sometimes you have to drill portions of them out, a process that has a hight failure rate.

I represented turnbuckles on these cars with some insulation stripped off some small wire, it was so small, I had to widen one side to get it to slide on the brass rod I used for truss rods. mono filament line was provided in the kit, but to get that tight, you need to weave it through holes in the floor to make all the truss rods, and then tie it to itself. That shows in the car body, and Eventually I want these cars to have a rudimentary interior.
 
Last edited:

Bill Nelson

Well-Known Member
Dec 14, 2008
2,680
467
78
Clarksville Tn
I popped a KD #5 on the front of the little M & N G 2-4-2 only to find that the coupler box interfered with the pilot truck. so it is time to do some re-engineering, either coming up with a thinner coupler box, mounting a coupler without o box, or building a pilot without a coupler, installing a link and pin socket, with a dummy knuckle coupler in the pin socket. In ON3 I have put a working KD in a link and pin socket, but that was a lot easier, as the coupler was twice the size, making the tolerances on modifications less scary, and the coupler it self was plastic, and easier to re shape as needed.


I have the handrails and the truss rods on the cars, so a little touch up painting, and they will be ready to go to the club , to go into temporary service on the Possum Hollow railway. I have gone through the trucks, and replaced all of the magnetic axles, that is not an issue at the club, where we don't use magnetic uncoupling, but critical on my home layout.


Bill Nelson
 

Bill Nelson

Well-Known Member
Dec 14, 2008
2,680
467
78
Clarksville Tn
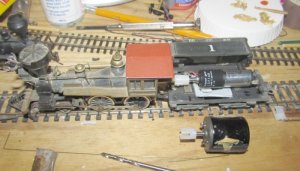
SMLA-1 another motor  for #1.jpg SMLA-1 another motor  for #1.jpg SMLA-1 another motor  for #1.jpg another motor for old #1

I was clearing off the work bench, and # 1 was there for a motor experiment. I had tried one of the gear reduction motors I had bought from the Motor man @ micromotor.com, and I had tried one of the samples he had sent me, both of those options were too slow. this second sample he had sent worked like a charm, giving me much better super slow speed, while only knocking a little off the top speed, so old #1 in her 45th year of continual service, is getting her fourth or fith motor (I have lost count). in front of the locomotive is a cannon copier motor that was in it. for some unknown reason, this motor was capable of super slow speeds on the workbench, with my cheap ****y Bachman power pack, but did not have as good slow speeds on my layout with my fancy expensive DCC walk-around throttles I pulled the bachman power pack off the workbench as it's reverse switch was getting flakey, and have a MRC power pack there now. If the slow speed works as well on the layout as it does on the work bench, I will probably make a you tube video.

#1 was a part of my first Ho train set, and as such is properly numbered. The Mantua General has had it's frame milled out to open it up between the drivers and the pistons for a more prototypical look, the smoke stack headlamp and cowcatcher have been replaced with brass parts, and a brass whistle has been added. The original mantua tender was replaced with a much better looking AHM tender, which has then had multiple motor exchanges.
 
Last edited:

Bill Nelson

Well-Known Member
Dec 14, 2008
2,680
467
78
Clarksville Tn
The cannon Copier motor is back in #1, the much lighter and longer gear reduction motor took up some space used for lead weight. with a lighter tender, electrical pickup was compromised enough that the super slow speeds achieved with jumper cables on the test track, were not there under track power, so I'm going back to the previous motor, which wasn't bad.
 

Bill Nelson

Well-Known Member
Dec 14, 2008
2,680
467
78
Clarksville Tn
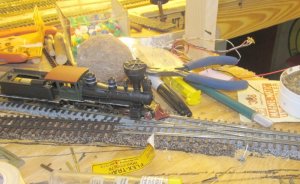
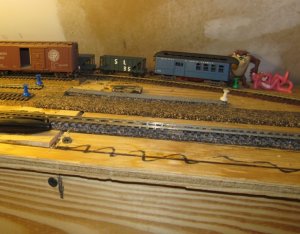
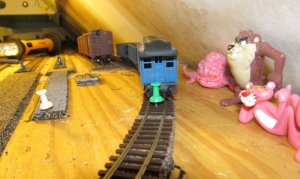
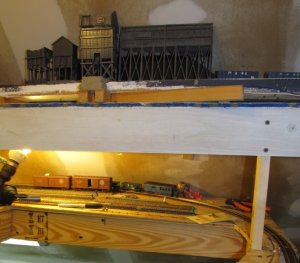
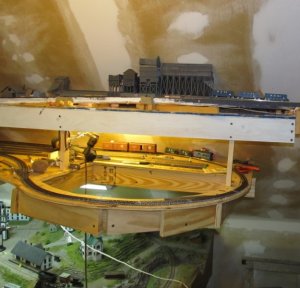
SMLA_1 GA stgs lp #1.jpg SMLA_1 GA stgs lp #2.jpg SMLA_1 GA stgs lp #3.jpg SMLA_1 GA stgs lp #4.jpg On vacation this week, and have been busy around the hose doing some clean up projects, and my wife and I have had the kayaks out on the Cumberland river a couple times. Tonday, after some furnature moving, and some extrior trim repair, I got enough out of the way I was able to work on the layout.

I am considering a major rebuild, so work in my Southern staging area, Harlow, Camp 6, Montgomery Furnace, Terrapin, Perry's Gizzard, or Ridgemont, is not on my short list, as those areas may be removed and replaced; Leaving only Crooked Creek TN., Murray, TN., State Line, GA . and Gegokayoossa, NC.

of those areas the biggest unfinished project is my attempts to add a return loop to the narrow gauge @ Georgia staging. Since I have a narrow gauge return loop in Gegokayoosa , this will allow me to have loop to loop operation on the narrow gauge. The narrow gauge main between them is currently too steep for my tastes. Most of my locomotives can pull appropriate trains up the steep grade, but the Blackstone C-19 W sound isn't stout enough to get much up that 6% grade with 18 inch radius curves. So if I do a rebuild, the narrowgauge main will be lenghtened considerably, giving me a much longer run, and the ability to get the great sounding C-19 up the hill with a respectable train.


I had put off putting down the flex track up against the ceiling because there wasn't much room. When I had built the Georgia staging I put the last track, an Ho standard gauge track, close to the ceiling, with just enough room to get my fingers between the car and the ceiling to retail a car if needed. Later I realized this gave me just barely enough room to sneak a narrow gauge track between the standard gauge track and the sloped ceiling. It was a bear putting that track in, but now I have it hooked up to the other side of the loop, witch peels off the outside track of the Georgia staging yard, which happens to be a narrow gauge track.

The Georgia staging return loop has a 17 inch radius, unlike the Gegokayoosa loop, which has a 16 inch radius. My Keystone/NWSL shay cant negotiate the Gegokayoosa loop, and I'm hoping it can deal with the Georgia staging loop.


Most of the loop is in place, I do have two Narrow gauge switches I have to get the ground throws and wiring in order for, and then I have to cut out a section of dual gauge track, and rebuild it with a switch to split the narrow gauge out, for the back side of the return loop. I'll have to build in the polarity reversing circuit as well. It is always a challenge to build switches in dual gauge track, and I'll have to be sure the polarity reversing for the Georgia staging loop doesn't **** up the Georgia staging staging tracks too much.

great fun; I have had so much fun with the return loop in Gegokayoosa, having another will be nice. The hollowed out space allows acess to the back track to be merely difficult instead of impossible, I am working on a Styrofoam mountain filler, that will ma ke a big chunk of lift out scenery that will extend all the way up to the iron mine A gegokayoosa.

over in the work area, Sir Toppum Hatt is busy elsewhere, and so Taz, The pink Panther, and Crang the evil brain are supervising the work in progress .
 
Last edited:

Bill Nelson

Well-Known Member
Dec 14, 2008
2,680
467
78
Clarksville Tn
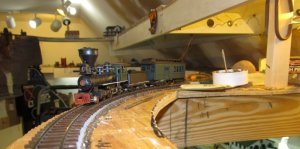
SMLA-1 #3 @ Ga loop #1.jpg SMLA-1 #3 @ Ga loop #2.jpg SMLA-1 #3 @ Ga loop #3.jpg train on the Georgia staging loop!

I had gotten DPDT switches hooked up as ground throws on two switches on the Beginning of the Georgia staging HON3 return loop last weekend.


This morning after work I got them wired into place to power the frogs, and to route power to the selected route. as a result I can now run trains out onto the loop. #3 an FED 4-4-0, with a locodoc motor conversion was the first locomotive out there. This loop is about shoulder high, and is the narrowest point in the front aisle, so it is kind of scary out there with no fachia yet. I'm thinking even when there is a fashia , it will be against the rules to park anything on the outside of that loop.

I have the hole cut through the plywood for the larger DPDT switch that will power the switch that will split out the narrow gauge from the dual gauge to close up the other end of the loop and reverse the polarity of the loop to match whichever end of the loop the switch is thrown to. with this set up it will be necessary to stop a train once it enters the loop, throw the switch to the opposing route, and then reverse the locomotive with the trottle in order to continue forward, a minor inconvenience, but that avoids throwing the polarity for the rest of the RR , and having to think about what that might do to all the rest of the dual gauge track up in Stateline and Ridgemont.


Bill Nelson
 
Last edited:

Bill Nelson

Well-Known Member
Dec 14, 2008
2,680
467
78
Clarksville Tn
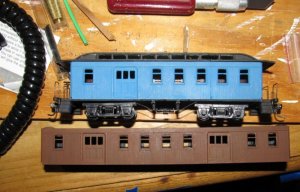
ASL nw M&NG project car..jpg another M & N G car project.

many long years ago I started to cut up a MDC baggage car to make a combine for the M & N G's standard gauge interchange at State Line Tn. then last year, I stumbled on another similar kit to cut down to make a matching coach (some of that is documented in the Bill and Tom's excellent adventure thread in this logging section)


Tyler came back from a trip to Wisconsin, and brought me this piece of shell. he was planning on making a combine, but since I had done one, that took all the fun out of it.


With this shell I'm going to attempt to make a RPO/Baggage car to match the combine and the coach I already have built. this will be a challenge as I don;t have anything but the shell, and will have to find some appropriate trucks, and build the subfloor, steps and roof. I have some brass end beam castings.

when I cut and paste this car , it will have one window then the first baggage door, one more window, a second baggage door, and two more windows, so I will be cutting out three windows. I have some baggage doors sections left over from the other car shortinings, and I may be able to use them to build a narrow gauge combine caboose.


Bill Nelson
 
Last edited: