dreadnoughts (Patoroch with Newobmij recolor)

terrinecold

Member
Apr 15, 2012
303
1
16
Hello,
for about a week I have started on a couple of space wolf dreadnoughts.
Initially I planned to do just one but since I messed up the print settings of the first one (it came out low quality) and I had to reprint it I figured I'd built both in parallel using the low quality print as a rehearsal before each components.


I waited till I have something at least partially recognizable before posting.

My conclusions right now is that while I have improved my technics since I started this hobby I have still some ways to go in particular when looking at Patoroch models.

Anyway here are some pictures.
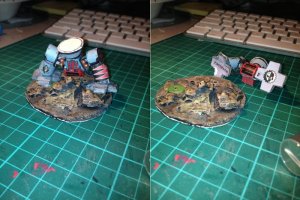
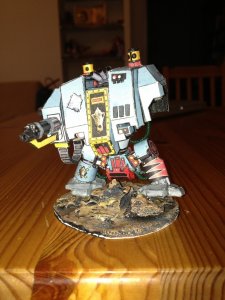
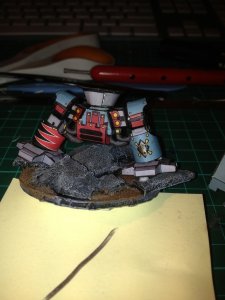
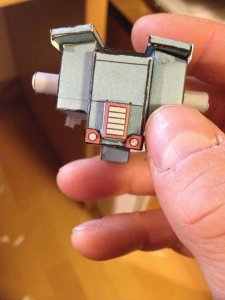
Picture one:
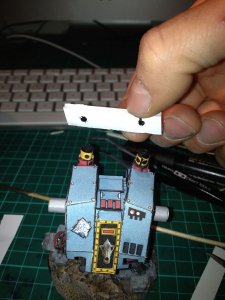
state of the dreadnoughts, both of them the lower parts are finished and I made some bases. the upper parts are in progress. Since I intend those models to be playable I have reinforced them where I could. For instance there is foam boards inside the legs and there is a piece of toothpick going through the hip bone and into the legs. I initially intended to use it as an axis to make the legs posable until I stuck it on the base but some glue binded it. In any case it went ok as I just had to take the legs position into account when building the bases.
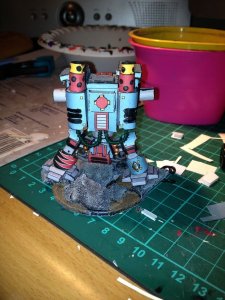
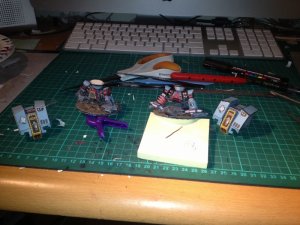
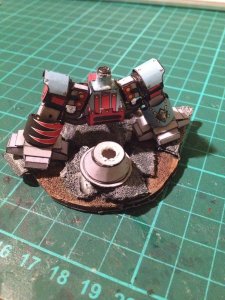
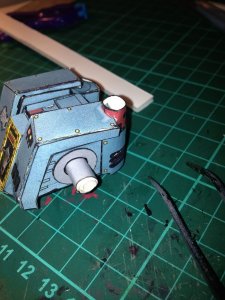
Picture 2 and 3:
the legs of the dreadnought 1, I had done a mess of the feet when I put superglue on them to reinforce the paper. For this reason I tried to paint the feet other with mixed results, it does look better when not taken in pictures with a flash. Those pictures are a day before pic 1 and I had not yet installed the hoses which go from hips to legs. That was a mistake by the way those are a pain to install once the model is glued to a base.
I went for a "lunar/wasteland/cavern" theme for the base, don't know what you think.
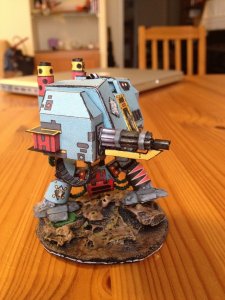
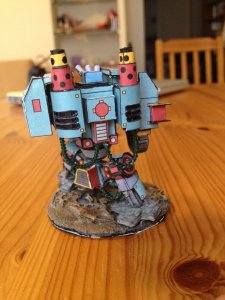
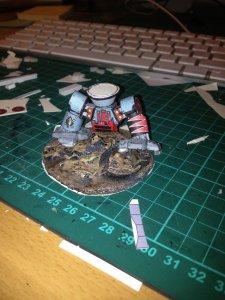
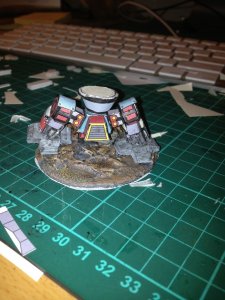
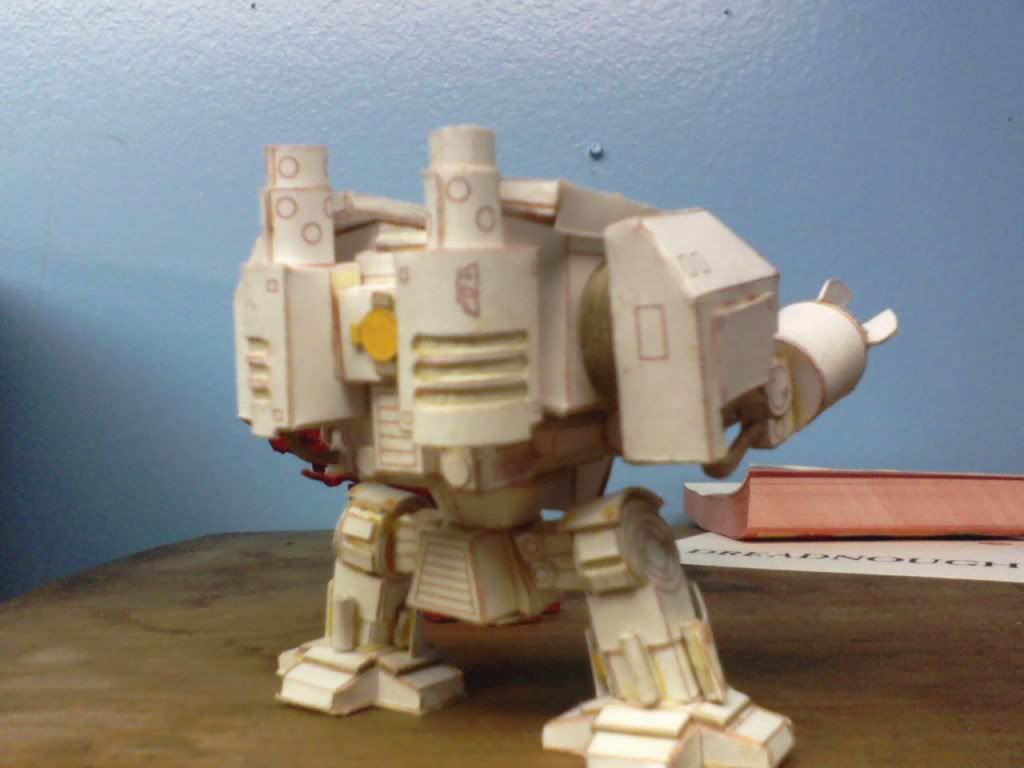
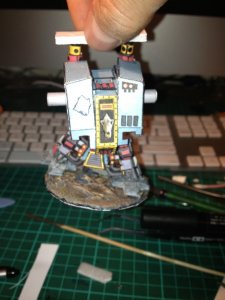
Picture 4 and 5:
the legs of dreadnought 2, note that for both dreadnoughts I made the pistons of the legs more detailed than on the template by making 2 rolled cylinders one into the other so as to model a piston with the rod and cylinder for moving the foot. I like the result on dreadnought 2, on dreadnought 1 the superglue mess make it look not so good.
I went for a different look for the base of dreadnought 2 again tell me what you think.

Conclusion, I may end up doing a third one using a different template that I have done by someone named Bile, it is black and white only but I saw some completed and painted pics that look better.
I also have pdos from another model which may look better and is texture I would also like to build it, it is from Flarebaffled I believe.
 

Attachments

  • dreadnoughts torso and legs.jpg
    dreadnoughts torso and legs.jpg
    175 KB · Views: 89
  • dreadnought 1 legs1.jpg
    dreadnought 1 legs1.jpg
    109.5 KB · Views: 36
  • dreadnought 1 legs 2.jpg
    dreadnought 1 legs 2.jpg
    108.2 KB · Views: 88
  • dreadnought 2 legs front.jpg
    dreadnought 2 legs front.jpg
    77.6 KB · Views: 68
  • dreadnought 2 legs back.jpg
    dreadnought 2 legs back.jpg
    80.6 KB · Views: 40

aleks

Member
Jul 28, 2011
122
10
18
Italy
great builds, the 2nd better than the 1st. The first base looks like a mess, I don't like it. second is good.
when I start building mine (I plan to buil every pre-heresy d. from Patoroch), I'll follow your guidance for the reinforcement.
now, bring us more pics ;-)
 

terrinecold

Member
Apr 15, 2012
303
1
16
thanks, I agree with your comments. The first base is really not that bad when looked at in person but the look I wanted initially was the second, the problem with the first is that the primer I used made the Depron which was used to simulate rocks melt. I made the best of it by changing the color I painted it. For the second I first applied some matt varnish (after testing it on a little bit of Depron) and only when that was dry did I spray the primer.
Also I build each component first for the dreadnought number 1 then for the number 2 which explains the difference in quality.
Regarding the reinforcements unfortunately I didn't document them with pictures (my bad I should have known better).
For the legs, the tibia, the round knees and the femur were filled with Depron. Same for the pelvis. Once the femur and pelvis were glued I used a handdrill to drill a hole through the 2 and stuch a toothpick in there. I did the same through the side of the knee.
Regarding the feet. On top of the sole I glued some Depron with the same shape then a second piece on the center (shape of the ankle) before gluing the actual 3d foot. Not sure if the way that foot is constructed is really the best way I looked at Bile version and the end results, he just glued several layers of thicker cardboard with the right shapes on top of one another, I think the result looks at least as good and it will be more robust.
I don't like the way I glued the armor on the tibia either. It is better than what is done in Patoroch explanation (they seemed to be glued to the foot which is just wrong but looking at it now I think the approach from FlareBaffled ( see his pdo in the download section) is better, he has some disk supports with the leg going through them to support the shape. The problem though with his model is that he doesn't model the small piston responsible for the ankle movements which I think look cool.
Also I left the join between hips and pelvis free to rotate so the torso will be able to change its facing.
 

aleks

Member
Jul 28, 2011
122
10
18
Italy
no problem with then lack of pictures... the hints are good enough, so I can try to make it my own way.
but... please post a pictures of the rotating torso building process, so I can steal your knowledge!
 

terrinecold

Member
Apr 15, 2012
303
1
16
that is easy enough to do I'll send some tonight, but if you just follow the template without gluing what shouldn't be that is the result as there is a pivot between those 2 parts.
An important note. The backside of some paper parts are visible (shingards armor plate for instance) those should be colored in black before gluing (like on my dread 2 and not like on dread 1). If you look at the back pictures of the 2 dreads you'll see that on dread 1 you have a good view of the white backside of those armor plates while on dread 2 you can't even see them, the black makes it almost invisible on the picture and unremarkable when looking with the naked eye.
I also advise to look at the picture on GW site of the back of their dread leg to see what detailing can be done. I clearly could improve on what I did.
 

terrinecold

Member
Apr 15, 2012
303
1
16
close up of the hip assembly, 2 things to notice:
1) the cylinder jutting from the pelvis is not hollow, it was filled with a rolled up piece of paper itself glued on itself. This makes it solid and makes the attachment to the pelvis much stronger
2) there is a mess of superglue on top of the pelvis which will need to be sanded at some point
3) I had to enlarge the hole in the hip as it was too small, I think the model is meant for fairly thin card maybe 140 or 160g paper and I use 210 which makes for some issues when thickness is not taken into account such as there. Now whenever an axle needs to be made I first try the size before gluing the cylinder
 

Attachments

  • dreadnought 2 hip assembly.jpg
    dreadnought 2 hip assembly.jpg
    133 KB · Views: 22

terrinecold

Member
Apr 15, 2012
303
1
16
now I am making part 6 and reinforcing the inside with Depron + 3 layers of 210g paper. I just try first if I can put one or 2 Depron layers in their and complete till it is packed with paper.
 

Attachments

  • dreadnought reinforced part 6.jpg
    dreadnought reinforced part 6.jpg
    85.9 KB · Views: 20

arkon

Member
Aug 22, 2011
186
1
16
texas
parts 6 n 7 are for the backpack in between the exhaust stacks

here is a pic of mine

006-1.jpg


hope that helps, i can take other pics if you need.
 

terrinecold

Member
Apr 15, 2012
303
1
16
I thought so, as you can see I have glued part 7 in place as their was in fact a rectangle the exact same size on the back. Part 6 seemed a bit small compared to the top rectangle of the central back which is why I wasn't sure. Thanks for the picture
 

Attachments

  • dreadnought back fitting part 7.jpg
    dreadnought back fitting part 7.jpg
    99.8 KB · Views: 12

terrinecold

Member
Apr 15, 2012
303
1
16
OK I am continuing on the backpack/engine, unfortunately as I do it I realize that the armor plates on the torso are not glued in the correct position, there are interferences. I think this will be the case on the "good" dreadnought too. I decided to continue anyway with the torso assembly, if it is too horrible in the end I'll redo them. They are not too complex anyway. Also I think I should be able to use the surgical knife to selectively remove the shoulders and only redo those.
In any case you can see that I had to cut off part of the exhaust pipe so it can fit. I also realized I could punch holes in those pipes, unfortunately I have one puncher which is slightly too small and one slightly too big.
 

Attachments

  • dreadnought 1 chimney.jpg
    dreadnought 1 chimney.jpg
    109.6 KB · Views: 16

terrinecold

Member
Apr 15, 2012
303
1
16
last post before going to work, I have tested the carrying system.
As those of you familiar with war40k may know the dreadnought is supposed to be transportable by the stormraven (right now they don't have compatible liveries but it shouldn't be too much of a problem, specially since space wolves and grey knights colors are pretty close anyway, I may have to paint the dreadnought but since it is the test one it shouldn't be a problem.)
If you look at the stormraven picture (spin here)
http://arqspin.com/s/369t3u0m992qt the dreadnought is supposed to be held by some kind of magnetic grapple or tractor beam thingy underneath the tail just behind the rear transport door.
So behold my solution:
small magnets are embedded in the exhaust pipes, corresponding magnets are dug in little holes in the foam board (I dug the hole with a drill, dropped the magnet in it with glue poured glue on top, added a bit of foam rolled between fingers on top of the hole and glued another layer of paper on top of the foam board so no more hole is visible.
Those are very small but strong magnets, I did a carrying test, by fixing the torso to the legs using patafix (blue/yellow tack I think for americans) and it holds the weight with no problem there will be the arms to consider but I still think it will hold. I'm planning on printing again the rear boom for the storm raven, stripping the card from the side of the foam board where the magnets are to make them bare again and gluing the printed paper instead of the original card, then I'll glue the whole thing under the storm raven to have a nice grapple.
What do you think?
 

Attachments

  • dreadnought carrying system.jpg
    dreadnought carrying system.jpg
    91.7 KB · Views: 13
  • dreadnought carrying test.jpg
    dreadnought carrying test.jpg
    78.4 KB · Views: 20

Wojtee

Member
Jun 8, 2008
151
0
16
Prague, CZ
It is a good idea, but I am not sure they would carry the Dreadnought by the exhausts. It seems as too weak point ;)
And it looks funny, how the grapple ripped him off the ground with the ground still attached - you will have to figure a way to make him detachable ;)
 

terrinecold

Member
Apr 15, 2012
303
1
16
Definitely looks funny like that. An idea is that I could have a piece going down from the grapple and touching the top of the head. It would be the model for the real grapple even though on the model the magnets are in the exhausts. I put them there because those are convenient locations.
You are of course right too about the ground. I'll have to cut him off the base and magnetize the feet too.
 

terrinecold

Member
Apr 15, 2012
303
1
16
Some progress. First I have finished the back of both dreads. By looking at the GW miniature I decided to add more hoses on the back. I modeled them with twisted wire and since I am happy with the result I'll probably change the hoses under the pelvis to this same type of hoses. I am looking at how to make a smoke launcher. Second I detached dread1 from his base, I embedded magnets in the base and the feet and now it can be detached from it (for when it will fly under the stormraven). I have started the modeling of the stormraven's grapple, there is an extension going down and hooking underneath the backpack of the dread. Although it is really hanging by the magnets it looks like it is held by a clamp on the back which addresses Wojtee's comment. No pics of that as I need to dress it up first before I show it. Also as you can see I have completely redone the bottom of the left foot and not yet the sole of the right, this will be fixed.
 

Attachments

  • dreadnought 1 base magnetization.jpg
    dreadnought 1 base magnetization.jpg
    187.1 KB · Views: 32
  • Dreadnought 2 back.jpg
    Dreadnought 2 back.jpg
    114.9 KB · Views: 50

terrinecold

Member
Apr 15, 2012
303
1
16
just a quick update, I had these dreadnoughts in my to build pile for a while and I just found out that they are an older design from Patoroch who has now updated his design including with many different liveries and options. I may end up building a hybrid of the two as the new design seems better documented and more modular.
 
Z

Zathros

These are so nice, it would be a shame to waste this. It would always make a great base for a battle damaged wreck diorama, if you chose not to rebuild it. :)
 

terrinecold

Member
Apr 15, 2012
303
1
16
They won't go to waste I'm finishing them and will just make the other ones in addition.
I haven't seen any build thread for the new series of dreadnought from Patoroch, I wonder if anyone did do one. What seems interesting is that they appear to be at least partially modular. Meaning there is a core grey one then a bunch of colored one but it seemed that only some of the parts are present in the colored ones ( the one which have a marine specific color).
 

terrinecold

Member
Apr 15, 2012
303
1
16
another update. At this rate this pair of dreadnought will be finished by end of the week end.
I have done a bit more detailing on number 2 (sorry no pictures) and finished the right arm with assault cannon for dread 1 + the left shoulder and the smoke launcher. I have also fixed the pelvis to the torso. and replaced the flat paper cabling between the legs with twisted wires
Finally there are some progress with fixing the dreadnought grapple on the stormraven. No pics of that as it is still ugly.

So the 3 pics show the dread number 1 (supposed to be the ugliest of the 2).
I am trying to show both the posability (mostly the torso can rotate as well as the arms, as previously mentioned I tried to make the legs mobile but some of the cyanoacrilate went were it shouldn't have and locked them) as well as some of the details.

I am not completely happy with the coloring of the dread, mostly some of the edging is not neat enough. I am wondering if I should try painting it once it is done. I'll probably try painting the white one which my son made a while back (see the thread here http://www.zealot.com/forum/showthread.php?t=172010)
 

Attachments

  • IMG_1049.jpg
    IMG_1049.jpg
    108.5 KB · Views: 22
  • IMG_1050.jpg
    IMG_1050.jpg
    101.7 KB · Views: 75
  • IMG_1048.jpg
    IMG_1048.jpg
    98.4 KB · Views: 83