CSS Fredricksburg

cdavenport

Member
Sep 1, 2006
167
0
16
71
Athens,Georgia
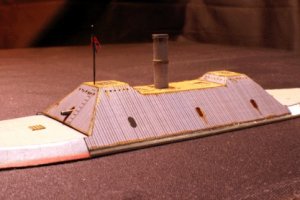
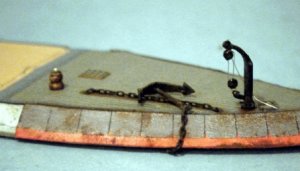
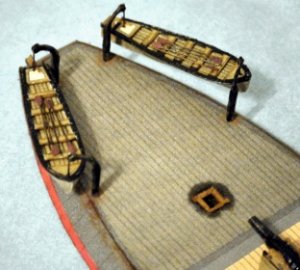
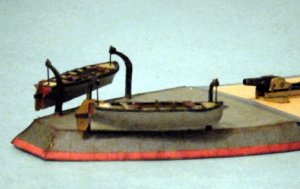
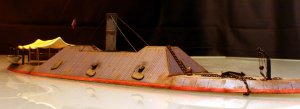
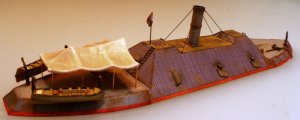
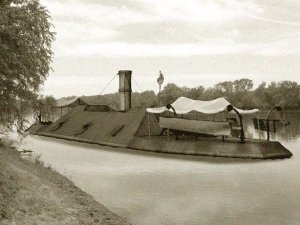
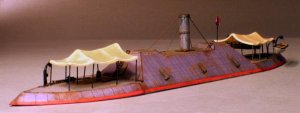
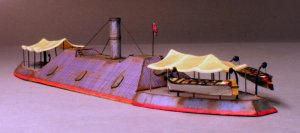
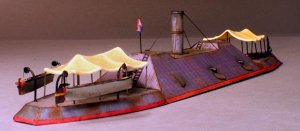
I am building the 1/250 CSS Fredricksburg available online from a cardmodel design source.

It's a very simple waterline model that builds into a honey of a vessel. I am working towards building a diorama depicting the vessel under replenishment. I have already spent more on accessories than the model...waay more. Oh well.

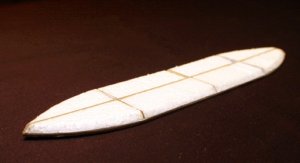
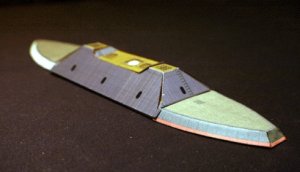
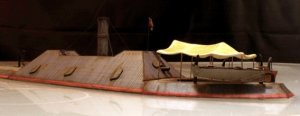
You will notice that I reinforced the hull with styrofoam; I like to have something solid to glue to. This prevents any problems with the seams and allows me to have smooth transitions between seams. You'll see once everything is glued down. At this point, I am still dry fitting.

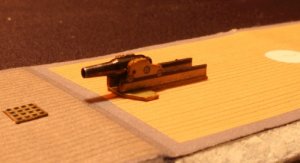
I am not very good at making very small parts from paper. So, I am turning the guns from aluminum. It takes just a few minutes versus many to roll paper, sand it, paint it....ad nauseum. A purist I am not.
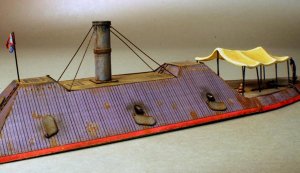
 

Attachments

  • Hull 640.jpg
    Hull 640.jpg
    40.9 KB · Views: 97
  • Casement dryfit.jpg
    Casement dryfit.jpg
    48.2 KB · Views: 89
  • Model casement.jpg
    Model casement.jpg
    49.2 KB · Views: 47
  • Model Brooke Rifle.jpg
    Model Brooke Rifle.jpg
    49.4 KB · Views: 49

cdavenport

Member
Sep 1, 2006
167
0
16
71
Athens,Georgia
You're gonna hate me; I blackened it with a permanent marker. In the process of handling it, some of the permanent ink wore away to reveal aluminum highlights underneath.

This technique comes from the School of Dumb Luck of which I am president!
 

cdavenport

Member
Sep 1, 2006
167
0
16
71
Athens,Georgia
Nearing Completion

Nearing completion. I made major progress by rebuilding the casement so that the seams are more accurate.

On the bow, I scratchbuilt the anchor and capstan, the former from brass rod and paper, the latter using a lollipop stick turned on a Dremel tool. I had some scale chain that seemed to work just fine. I even fashioned a block and tackle rig out of fine copper wire and paper to which I added a grapple fashioned from brass wire.

Further aft, I finished the lifeboats by repainting and weathering them in oils, adding scratchbuilt oars and rudder for each.

I think I overdid the davits, though. I used brass wire as a core so that the wire pierced the hull thereby making the assembly quite robust. But, they seem a bit large in diameter. No matter, I'll leave them as they are.

I weathered and rusted the armor at the knuckle and any metal such as the grapple, chains, anchor, and davits with oils.

All of these items, save for the chains and grapple, are supplied in the kit, but I am really enjoying myself, and scratchbuilding is how I raise the bar on enjoyment.
 

Attachments

  • anchor capstan davit.jpg
    anchor capstan davit.jpg
    48.9 KB · Views: 36
  • Life boats.jpg
    Life boats.jpg
    44.6 KB · Views: 32
  • Life boats side view.jpg
    Life boats side view.jpg
    49.7 KB · Views: 83

sharklord

New Member
Mar 28, 2008
9
0
1
Florida, USA
Superb, Major D! Fantastic!

What "scale", or gauge, or whatever, was the chain? I need to find some for some 1/250 ship projects I have.

thanks,
Sharklord
 

cdavenport

Member
Sep 1, 2006
167
0
16
71
Athens,Georgia
If you go to a shop that specializes in railroad you will find it in accessories. I imagine you will also find it online.

The problem is that the chain is scaled by the number of links per inch. You would need to do some calculation.

OR, Chuck's Easy Way: Purchase a bunch of different sizes; you're bound to use it for something during your modeling career (I bought my supply of chain over 20 years ago just because I figured I might need it someday....and I was right!). I just put the various sizes against the ironclad until I saw one that "looked" right.
 

cdavenport

Member
Sep 1, 2006
167
0
16
71
Athens,Georgia
Sun Shade

Many CW photos show the ironclad crews protected by sunshades, so I decided to replicate this feature.

I wrestled with a few materials such as facial tissue and japan tissue, and of course, card stock, none of which was entirely satisfactory. The problems were either too much grain in the tissue, which would be unacceptable in this scale, or not enough flexibility to simulate draped canvas. I actually made one from card but used it as the master because there was just no way to get this complicated shape to look like one continuous sheet of canvas.

So, like usual, I cheated. I made a master from card strengthened with CA and vacformed copies from--"gasp, choke, abomination!" Plastic.

The Fburg is nearly complete as far as the ship goes. I have some detailing left to do to make her photograph well. But, these series of shots depict one of the sun shades "dry fit" into place. There will be another on the forward end.

One photo shows the sunshade master and one of its vacformed copies detailed in oils.
 

Attachments

  • Sunshade 2 600.jpg
    Sunshade 2 600.jpg
    123.7 KB · Views: 31
  • Sunshade 3.jpg
    Sunshade 3.jpg
    75.8 KB · Views: 36
  • Sunshade 4.jpg
    Sunshade 4.jpg
    123 KB · Views: 31
  • Sunshade 600.jpg
    Sunshade 600.jpg
    44.4 KB · Views: 33

paperwarrior

New Member
Sep 9, 2009
13
0
1
Oklahoma, USA
Many CW photos show the ironclad crews protected by sunshades, so I decided to replicate this feature.

I wrestled with a few materials such as facial tissue and japan tissue, and of course, card stock, none of which was entirely satisfactory. The problems were either too much grain in the tissue, which would be unacceptable in this scale, or not enough flexibility to simulate draped canvas. I actually made one from card but used it as the master because there was just no way to get this complicated shape to look like one continuous sheet of canvas.

So, like usual, I cheated. I made a master from card strengthened with CA and vacformed copies from--"gasp, choke, abomination!" Plastic.

The Fburg is nearly complete as far as the ship goes. I have some detailing left to do to make her photograph well. But, these series of shots depict one of the sun shades "dry fit" into place. There will be another on the forward end.

One photo shows the sunshade master and one of its vacformed copies detailed in oils.

That is an awesome sunshade!!! :thumb: You've inspired me for my kits. :rolleyes:

Thanks tons!!
 

cdavenport

Member
Sep 1, 2006
167
0
16
71
Athens,Georgia
Finito Benito!

For CT's sake I figured I better complete this build before I go on to something else. I still have the diorama base to do, but I can do that on my own time.

Of all the things to happen, I dropped the model TWICE in as many weeks. The first time busted a davit which I rebuilt. The second toasted yet more davits. Since I was never completly satisfied with the way I used CT's parts, I removed them and turned new ones from brass.

It's a wonderful model, CT. Thanks for the opportunity to build it!

The first is a vintage photo of the Fredricksburg on the James River. The remaining shots are of my model.
 

Attachments

  • On the James River B&W 600.jpg
    On the James River B&W 600.jpg
    59.8 KB · Views: 53
  • IMG_3047 600.jpg
    IMG_3047 600.jpg
    24.4 KB · Views: 27
  • IMG_3048 600.jpg
    IMG_3048 600.jpg
    87.3 KB · Views: 25
  • IMG_3050 600.jpg
    IMG_3050 600.jpg
    29.8 KB · Views: 25
  • IMG_3051 600.jpg
    IMG_3051 600.jpg
    32.8 KB · Views: 30
  • IMG_3052 600.jpg
    IMG_3052 600.jpg
    44.4 KB · Views: 50

Elliott

Senior Member
Jul 18, 2006
645
1
36
Looks good Chuck (may I call you Chuck?). You know, with your skill I think you could make a diorama of the first picture and shoot it in graytones so that it would be indistinguishable from the original.
 

cdavenport

Member
Sep 1, 2006
167
0
16
71
Athens,Georgia
Thanks, Elliot. And, yes, all my friends call me Chuck. When I finish the diorama, I will shoot it in gray tones. I must increase the contrast in subsequent photos because that is what we are accustomed to seeing with CW photos.

I'm still an infant with Photoshop.
 

cdavenport

Member
Sep 1, 2006
167
0
16
71
Athens,Georgia
There is an easy way to form the Brookes or any other kind of gun with a rotary (Dremel) tool.

Acquire a piece of brass rod the approximate diameter of the bore in whatever scale you are working and about 3/8" inch longer than the scale cannon. Using standard copy paper colored with a black permanent marker, cellophane tape the edge of the paper to the brass rod, lengthwise.

Once you have wound twice around the cellophane, continue winding paper sealing each wind with superglue until you wind to the diameter of the largest cross section of the gun.

Finish with superglue.

Chuck the bare end of the rod in your rotary tool. Then, with a set of needle files or sanding tools, taper the barrel to its final shape as the rotary tools spins, preferably at its lowest RPM.

Once you get down to the final shape, coat the piece with super glue and sand with fine grit paper to the final shape.

To remove the rod, drip some lacquer thinner down the rod. This will loose the adhesive on the tape. With a little bit of work, you can remove the tape, too.

That's why I use aluminum and brass for anything round. While you are making a lovely, seamless, perfectly contoured cannon out of paper, I can make a battery of the things out of metal!

But, give it try! Merry Christmas!