Copper Ridge Railway (version 2.0)

roryglasgow

Active Member
Jun 3, 2001
1,223
0
36
55
Huntsville, TX USA
web.wt.net
Greetings, everyone! I don't get around to posting as much as I used to (I still lurk when I get time). I've been very busy with various projects, but I have started construction on a new layout, the Copper Ridge Railway (version 2.0).

The CRRy 2.0 is the successor to the original Copper Ridge Railway, which was my not-even-halfway-finished previous layout that got the ax when we moved a little over a year ago.

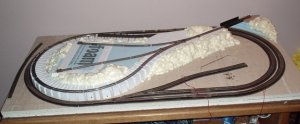
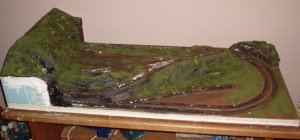
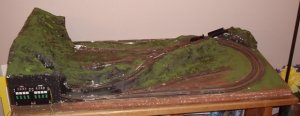
The new Copper Ridge will have basically the same theme--continous mainline, branchline that runs to a higher level, copper mine on the upper level, interchange where branch meets mainline. There will be some other industries, too, but I haven't fully decided on them. The main purpose of the layout is to give me a diversion--most of the fun for me is in the construction. So I'm not 100% serious about its operation. One day I might decide that a hopper car needs to be placed on a particular spur. The next day a stock car might live there. Who knows! :)

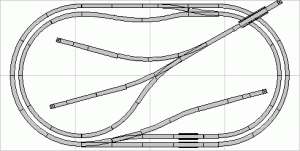
Below is a picture of the track plan. It is based on Mike Fischer's "Little Layout." The dimensions are 2' x 4'.
 

roryglasgow

Active Member
Jun 3, 2001
1,223
0
36
55
Huntsville, TX USA
web.wt.net
Below is a picture of the current state of the layout. I've laid most of the roadbed (Woodland Scenics). I used a combination of insulating foam, packing foam, packing foam peanuts, Great Stuff foam, a Woodland Scenics foam incline (3%), and a little piece of cardboard to construct the sub-roadbed for the branchline. I think that little bit of cardboard must feel lonely amongst all that foam.

The WS incline was worth the money. It was a lot easier to deal with than trying to create a custom incline like I did for the original Copper Ridge.

The layout "framework" is a sheet of hardboard that has two ceiling tiles glued to the top of it. This sits on top of an old computer desk. I used drywall screws (the type that have anchors that expand when you tighten the screw) as legs. This enables me to level the layout, which is important in my house because none of the surfaces, including the floor, are level.

After I finish laying the roadbed, I am going to put down some pieces of newspaper dipped in plaster of Paris over the Great Stuff hills to reduce the "bubbly" effect.

My Big Plan is to place a mountain on the left side. The mainline and branchline will run through tunnels. This was the only solution I could come up with to hide that ugly cliff on the left side. If anyone has any other ideas, I want to hear them!
 

Attachments

  • layout1.jpg
    layout1.jpg
    67.9 KB · Views: 331

roryglasgow

Active Member
Jun 3, 2001
1,223
0
36
55
Huntsville, TX USA
web.wt.net
Yeah, Judy, I kinda like the 2x4 module idea, myself. In fact, I have sort of a plan to expand the layout in the future, if I can obtain some more space. The little bumper in the upper-right corner can be removed and replaced with a connector to another 2x4 module. One idea I had was to continue the branchline upwards to a larger mining complex or maybe a town.

My old computer desk is made from a 2x4 sheet of plywood (with a moulding around three sides), so it's perfect for the layout.

BTW, the adjustable legs I mentioned earlier are installed on the hardboard, not the computer desk.

I'm still around, guys! Like I said, I've just been busy. I've been working on the plan for quite a while, trying out different things. That's one of the nice things about ceiling tiles: you can pin down a trackplan and try it out for a while, then pull it up and try something else pretty easily. In the end I decided on this plan because of the continuous loop/branchline theme. My only gripe is the close proximity between the mainline and branchline on the left. It just doesn't look nice unless it's covered somehow...
 

Papa Bear

Member
Dec 28, 2003
606
0
16
South Alabama
www.route29.com
Originally posted by roryglasgow
After I finish laying the roadbed, I am going to put down some pieces of newspaper dipped in plaster of Paris over the Great Stuff hills to reduce the "bubbly" effect.

Rory, I've had that problem, too. The newspaper strips should work pretty well. I have also tried filling in the gaps with Celluclay or trimming the "bubbles" with a kitchen knife. The Celluclay worked well, but took a few days to dry completely. Trimming with a knife gave good control over the finished contours, but the texture that you got after cutting the Great Stuff was hard to paint over. Looked good once the ground foam was added, though.

The layout looks great. :thumb: Having the branch on an upper level adds a lot of interest.

John
 

roryglasgow

Active Member
Jun 3, 2001
1,223
0
36
55
Huntsville, TX USA
web.wt.net
I've been working on the mountain. I hate tunnels because they can be a maintenance nightmare. I left a large access portal so I could get my hands in there to fix things. My next step is to cover the mountain and some of the surrounding area with strips of newspaper dipped in plaster.

The mountain subsurface is a grid of plastic mesh that you can get out of the craft section at Walmart. I think it's used for needlepoint or something like that. I had a little Great Stuff left, so I smeared some of that over the grid to give it a little more texture.
 

Attachments

  • mountain.jpg
    mountain.jpg
    67.9 KB · Views: 223

Drew1125

Active Member
Jan 28, 2001
2,975
0
36
ALL RIGHT!!
Shamus...er...I mean...RORY is building another layout!:cool:
Can't wait to watch this one come to life, Rory!
:cool: :thumb: :thumb: :cool:
 

roryglasgow

Active Member
Jun 3, 2001
1,223
0
36
55
Huntsville, TX USA
web.wt.net
Gee, Charlie! I'll take that as the highest of compliments! :):):) But seriously, I'm no Shamus! I certainly don't work at his speed, and my results aren't nearly that good.

Y'all give me a lot to aspire to!
 

Matthyro

Will always be re-membered
Dec 28, 2000
4,550
0
36
86
Georgetown, Ontario,Canada
From what we have seen of your work Rory, we know you do beautiful trees. Remember yours are N scale and they look equally as good as those ON30 ones do.
It's good to see how the Copper Ridge Railway is progressing. Looking forward to the sceniking stage too.
 

rcwatkins

Member
Jul 4, 2003
445
0
16
TN
Visit site
That looks familiar there, but its still in better shape than my layout. :(The reason is because I saw a similar one on a website somewhere. Looks good so far. :)
 

roryglasgow

Active Member
Jun 3, 2001
1,223
0
36
55
Huntsville, TX USA
web.wt.net
I guess the last photo I posted was lost. Here it is again. I'm going to try to get the track hooked up and get trains running this weekend, if I have time and energy.
 

Attachments

  • Scenery1.jpg
    Scenery1.jpg
    65.1 KB · Views: 78

roryglasgow

Active Member
Jun 3, 2001
1,223
0
36
55
Huntsville, TX USA
web.wt.net
I can run trains now! :):):)

I finished the wiring (all 6 blocks of it:D) and everything ran perfectly the first time 'round. I still have some tunnel clearance issues, though, but I'll deal with those later.

Here is a pic of the layout with the track in place. I put the control panel on the mountain on the left. Later, I will make a socket where I can plug in power packs. For now, though, the power pack is wired directly in.

My Bachmann 4-4-0 is on the upper level near the bridge (upper-right corner), to give you an idea of the scale.

Next, I plan to work on the ground cover. Everything is too dark. I got a little carried away with the black paint...
 

Attachments

  • Track1.jpg
    Track1.jpg
    61.3 KB · Views: 64