Copper Ridge Railway under construction

roryglasgow

Active Member
Jun 3, 2001
1,223
0
36
55
Huntsville, TX USA
web.wt.net
Errol,

Thanks for the kind words. I try to make my sites look nice because I sometimes refer people to them for...um...advertisement purposes. I like to do a few little things to show off. In this site, though, I've dispensed with trying to make it work for everybody and concentrated on features that only work in Internet Explorer. But when I have to make something work universally, I enjoy the challenge of coming up with a site that looks and works well in most browsers. For another example of my work, check out http://www.tbic.com. Unlike my personal website, which was created entirely "by hand" in a text editor, the TBIC site was created with FrontPage. They don't appear to have updated it since I left...

I'm pleased to here that my site is fast-loading! I've been having fits with my ISP for the past couple of weeks, and adjusting to dial-up speeds after having a cable modem for so long has been tough! I got too spoiled!
 

roryglasgow

Active Member
Jun 3, 2001
1,223
0
36
55
Huntsville, TX USA
web.wt.net
Tyson, I got the combine today. It's GREAT! I took it for a test run on the layout this evening. Here is a shot of it sitting at the station in town.

I have most of the foam in place. There are still some gaps in the back to fill in. Next I'm going to trim it down and put on the spackle.

I had fixed the leaning track in front of the town, but then I put in a very small bead of foam between the track and second level. I figured that such a small amount would certainly follow the path of least resistance while expanding...but that apparently wasn't the case. The track is leaning again!!!

Next time I use this stuff, I'm going to put down the foam first, then carve the inclines out of it. I might end up tearing up the track and carving the incline out of this section, too...
 

Attachments

  • foam1.jpg
    foam1.jpg
    51.5 KB · Views: 262

Tyson Rayles

Active Member
Sep 25, 2001
4,310
0
36
Poverty Acres, North Carolina
Visit site
Glad you like the combine. Beats me how I send you beat up rusted out junk and you are happy about it!!! :D 
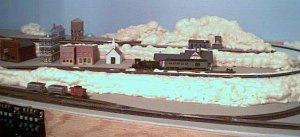
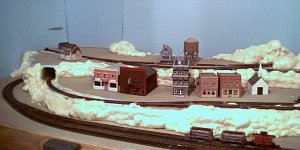
You are not the first to have the expanding problems with G.S., but it does the job quicker and easier than anything else I know of. It's really neat seeing the layout taking shape. :cool:
 

Drew1125

Active Member
Jan 28, 2001
2,975
0
36
Wow Shamus...er...I mean Rory...:D
The layout looks FANTASTIC!!
That is just some GREAT progress you've been making!
I'm really enjoying following along with this one!
Keep the pics coming, it's very inspirational for us professional procrastinators! :D
 

roryglasgow

Active Member
Jun 3, 2001
1,223
0
36
55
Huntsville, TX USA
web.wt.net
Well, I'm certainly no Shamus! If I worked at his pace I'd be done by now!

I try to do a little bit every day if I can. All I did today was put on a little more foam and cut out and spackle the cliff behind the town--maybe 15 minutes of work. Oh, and I've been experimenting with painting the rocks. I still haven't gotten that down yet...I'll keep trying.
 

roryglasgow

Active Member
Jun 3, 2001
1,223
0
36
55
Huntsville, TX USA
web.wt.net
One other note about the track problems. I've considered leaving the leaning track as-is... As long as I can run trains on it I can probably just explain the leaning and bad alignment as a property of a low-budget branchline.

And Tyson, if you have any more "beat up rusted out junk" please feel free to send it my way! :) I consider the things that you've sent me so far as being pretty fantastic! Thanks!
 

RI541

Member
Feb 20, 2002
634
0
16
Winchester N.H.
Visit site
Rory,

What kind of rocks are you making?

I'm going to start a thread in this section as soon as the batteries recharge in the camera, I'll be posting mostly my ledge work and hills as thats all I've got done on the new rebuild.
 

roryglasgow

Active Member
Jun 3, 2001
1,223
0
36
55
Huntsville, TX USA
web.wt.net
hehehehe I can certainly SIT like a rock!

I was thinking about just doing pretty much plain spackle in the areas that will be covered by buildings and trees (where one can't really see any good details) and plaster or plaster/foam rocks in the visible areas. My plan is to have gray limestone on the lower levels, and the reddish/pinkish/brownish rock nearer the mine.
 

roryglasgow

Active Member
Jun 3, 2001
1,223
0
36
55
Huntsville, TX USA
web.wt.net
I have three plans for the rocks:

1. In a few places, the bare foam will be painted.

2. In places where I have cut the foam, like cliff-sides, I'm going to use a combination of spackle and outcroppings from #3.

3. I'm experimenting with an idea I came up with today. I've poured a "slab" of plaster onto a sheet of foil. After it sets, I'm going to cut it into strips and stack them together (using spackle as mortar) to give the effect of layered limestone. This will mostly be used on the lower level of the layout.
 

Drew1125

Active Member
Jan 28, 2001
2,975
0
36
Rory,
Tin foil makes good molds for rock faces.
Also,
with whatever mold you use, spray it with some water mixed with a few drops of liquid detergent, before you pour in the plaster. This acts as a releasing agent.
 

Matthyro

Will always be re-membered
Dec 28, 2000
4,550
0
36
86
Georgetown, Ontario,Canada
Well Rory, to keep you going, I have used crushed up then partially flattened foil to mold rock cuts for interior of tunnels. The best mold release stuff I have found is a product sold in a spray can at the supermarket and it is called Pam. It sure works for me.
I haven't tried Charlies method yet.
 

Drew1125

Active Member
Jan 28, 2001
2,975
0
36
Don't sweat those rock castings, Rory...
Even if you break one getting it out of the mold, you can always piece it together with spackling, or ground foam, or be really radical & have a rock with a crack in it! :D
Remember too, that one mold can make several castings, by turning them upside down, etc...no one will know that it's all from the same mold.
Also, when painting rocks I always start with thinned black paint, or india ink, & then dry brush on gradually lighter shades of earth colors, browns, & whites.