Come along on our adventure

trainwhiz20

Member
Aug 9, 2004
198
0
16
34
Tampa, FL
Cabdriver--that looks awesome! Great job!

Wonderful technique, diluting and shaking the paint up like that. Intelligent use of plaster scraps. I think I just found my rocks... :D

Keep up the good work!
 

cabdriver

Member
Jan 23, 2005
207
0
16
68
TW,
I'm beginning to see that many of the most rewarding things on our layout are the ones that we scratch build or just figure out from our own imaginations. Scrap parts abound in our garage that I would never have thought had a place on our railroad. You've got to have the rail and the trains, but so much of the scenery can be interpreted with all sorts of inexpensive stuff. These rocks were so easy to do, and you can make hundreds of them with very little effort. We're going to experiment with other colors and see what looks the best.
-Cabdriver
 

cabdriver

Member
Jan 23, 2005
207
0
16
68
By the way, the use of plaster like this is certainly not our new idea -- several posts on the-gauge reference and discuss it. This is just our interpretation of it and extension of the concept. Want to give credit where credit is due. :D
 

spitfire

Active Member
Jul 28, 2002
3,448
0
36
75
Toronto, Canada
www.parkdaleyard.com
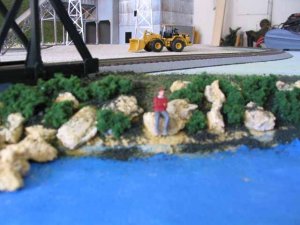
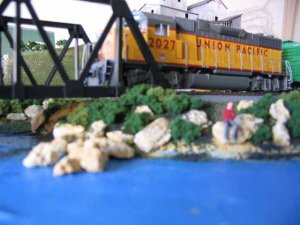
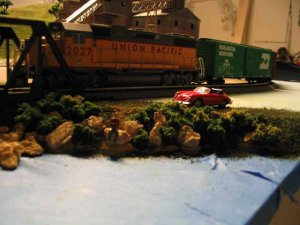
Those are great looking rocks Cabdriver!!!

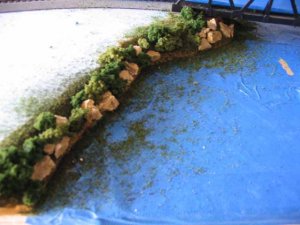
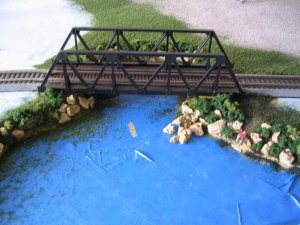
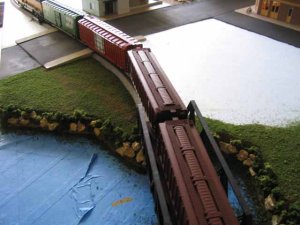
I hope you won't mind a little constructive criticism of your water. I'm not sure how much more you were planning to do on it, so if it's just roughed in, forgive me. However, I notice there is some wrinkling of the surfaces in both photos, that doesn't look like waves. The colour blue is not what people usually use for water either. Painting water is tricky, and it's a case of "paint what you see, not what you know". In other words we all think of water as blue, but a quick study of some photos shows that it is usually some other colour entirely - brown for muddy rivers to almost black for deep water.

There are all kinds of examples of water techniques here on the Gauge. Some are relatively complex, others more easy. The simplest way to get the look of still water is to paint the edges a colour that is several shades darker than your ground colour. This gives the illusion that it's wet. Then fade that colour into a much darker shade as you go away from the shore. This gives the illusion that the water is getting deeper.

Finally, cover the whole thing with a coat of something really shiny - varathane or similar. This gives the illusion that it's wet.

For waves, the process is a little more complicated. A lot of folks use Woodland Scenics "water effects".

Anyway, keep up the great work!!!!!!

Val
 

cabdriver

Member
Jan 23, 2005
207
0
16
68
Val,
Thanks for the tips on the water -- we'll need them shortly. :D You can't tell from the pictures, but the blue you see is simply drafting tape that I have placed over the plywood while we are working on the bank of the lake. Once we have finished the embankment, we'll be ready to pull up the tape and get to work on the water. And, we'll certainly need your suggestions.

Here's another picture (sorry a bit out of focus) with some landscaping done around the rocks. We're working on the rest of the bank, so hopefully I'll be able to post some pictures of the whole thing soon. As usual, I'm sitting around on something....this time taking a pensive minute on a rock near the, soon to be, lake. :D
 

Attachments

  • Sitting on bank.jpg
    Sitting on bank.jpg
    47.8 KB · Views: 51

Ralph

Remember...it's for fun!
Jun 18, 2002
5,134
0
36
64
St. Paul, MN
Visit site
Love the rocks and the bank of the lake. I use acrylic gloss medium to get the sheen of water. It has little or no noxious fumes which is a big plus! It does take several easy to paint on coats to get a look of wet depth.
Ralph
 

cabdriver

Member
Jan 23, 2005
207
0
16
68
Ok. Here are a couple more pictures of the lake embankment. We painted the bank, then put our "rocks" all along the edge, then added more ground cover. We haven't landscaped the areas beyond the lake bank, so you can still see the blue foam, but all in good time. :) The second picture is an overall shot of the area bridge area.
 

Attachments

  • Rocks on left bank.jpg
    Rocks on left bank.jpg
    45.2 KB · Views: 67
  • Lake bank overall.jpg
    Lake bank overall.jpg
    54 KB · Views: 63

cabdriver

Member
Jan 23, 2005
207
0
16
68
One last post of the same area with the mighty UP diesel entering the bridge. (I'm having a bit of trouble getting everything in focus in these pictures :rolleyes: -- seems the digital wants to focus on the loco and blur everything else. Can't say I blame the camera. ;) At least you can see the scale.
 

Attachments

  • Lake area with UP Loco.jpg
    Lake area with UP Loco.jpg
    47.6 KB · Views: 134

cabdriver

Member
Jan 23, 2005
207
0
16
68
:confused: Val, just one more note -- what probably threw you off is seeing the rocks in the lake area. I simply have placed them there to give the perspective of what the rocks would look like having been tumbled down the embankment into the water. Probably done by that bulldozer at the gravel pit. When we're ready to do the lake, I'll lift them up, remove the tape, place them back in, then do the water. By the way, I assume I should put the rocks in the lake area THEN do the water, not do the water then put in the rocks. Yes? :confused:

--Cabdriver
 

cabdriver

Member
Jan 23, 2005
207
0
16
68
We finished the ground coverage around the left side of the lake. :thumb: We also extended the road to the edge of the layout, sanded it, painted it, etc. Brought the ground cover up to and around the road area. Now all we need to do is plant some trees in the area. We tried to simulate a dirt walkway from the road to the lake area and over to the train bridge for those brave souls who want to walk across the trestle to get to the ledge of rock where they kids often go to fish or just sit and ponder the meaning of the universe. :D We'll have the dirt road meander through some trees. Here's one shot. More to come once we get the trees in.
 

Attachments

  • Lake Area 1.jpg
    Lake Area 1.jpg
    47.4 KB · Views: 68

spitfire

Active Member
Jul 28, 2002
3,448
0
36
75
Toronto, Canada
www.parkdaleyard.com
cabdriver said:
By the way, I assume I should put the rocks in the lake area THEN do the water, not do the water then put in the rocks. Yes? :confused:

--Cabdriver

It kind of depends on what method you use for the water. If you're using something that needs to be poured, you should be aware that surface tension can cause the material to "creep" up around things that are in the water. This is especially a problem with reeds and things like that.

On the other hand, if you're just applying a coat of something shiny, it would make more sense to put the rocks on after.

The first method allows you to see some of the underwater detail and is better for shallow water like a stream with a stony bed. The second method is a lot easier, but you can't see into it, so it's better for deep water like a harbour.

There are some very good threads on doing water here on the Gauge. If you do a search you should be able to find them. And then, I'd reccommend you do a couple of experiments first.

Val
 

cabdriver

Member
Jan 23, 2005
207
0
16
68
Val, et al,

We'll be using the Woodlands Scenics water effects. I had thought to paint the plywood base, blending the colors lighter to darker as you indicate, then pour the Woodland Scenics "water" over the entire area. I thought I would place the rocks directly on the plywood bed after I painted but before I poured so that the water effects would actually pool around the rocks, creating a kind of natural flow with some surface structure around the rocks. The alternative would be to pour the entire lake area, let dry, then place the rocks, then pour again?? or at least pour enough to add some ripple effects around the rocks. We thought the first method would be the best. Place the rocks, then pour. Thoughts? :confused: :confused:
 

cabdriver

Member
Jan 23, 2005
207
0
16
68
Here's another pic of me down by the lake -- pulled the other car up (yeah, I have a few sportsters) and then walked down to the lake for a moment of peace. My quiet was quickly interrupted by the local UP rambling down the track. Must be 7:00pm. Right on time. :)
 

Attachments

  • Evening at the lake.jpg
    Evening at the lake.jpg
    45.8 KB · Views: 76

NewGuy

New Member
Apr 30, 2005
29
0
6
50
Inland Northwest
Just wanted to say.... WOW!!!

Cabdriver,
I wanted to post something so that I would not be one of those "just looky, not talky" guys. I am still so new to this that I do not have any suggestions. I just wanted to let you know that it look great so far. And I probably will taking your idea of covering my entire benchwork with foam. Probably easier work with and mold, not to mention the uniformity of surface and color. Curious, what type did you go with? It is that stuff that is put on houses before siding? I would imagine one would want a fine foam interior not the course stuff that flakes away in large clumps.

BTW, I will be starting my story real soon of my layout railroad. Beginning with land acquisition (cleaning the spare bedroom out). :D

JD
 

emt49

Member
Jan 5, 2005
117
0
16
45
binghamton
I probably will taking your idea of covering my entire benchwork with foam. Probably easier work with and mold, not to mention the uniformity of surface and color. Curious, what type did you go with? It is that stuff that is put on houses before siding? I would imagine one would want a fine foam interior not the course stuff that flakes away in large clumps.

Hey newguy :wave:

i know i cant speak for cabdriver.

but i used the blue insulation foam board you can get at most hardware stores some use 2" but i used the 1" foam on my layout .
 

jpguest

New Member
May 12, 2005
3
0
1
50
Hi Cabdriver,

Great work, you have achieved a great deal. Do you have a website showing your work? Having only just started in the hobby I have found this thread valuable in the information provided.

I look forward to some more updates.
smile.gif


Regards,

Jason
 

cabdriver

Member
Jan 23, 2005
207
0
16
68
NewGuy,
We used the blue styrofoam material, made by Dow, called Residential Foam Sheathing Insulation. I know it also comes in a pink color. The blue stuff we bought comes in a 4x8 sheet and in various thicknesses. I used 1 inch, but if I had to do it over again, I'd DEFINITELY use 2 inches or at least bond two 1 inch sheets together to make 2 inches. You can bond them together or to benchwork with Liquid Nails for Projects and Foamboard. This particular adhesive won't corrode the foamboard and it works great. Just squeeze it out, trowel it a bit to smooth it out, then seal the piece to the table or to another piece of foam! :thumb:

The reason I would use 2 inches, is if you want to have a bridge, which we did, you can carve down into the foam to make a lake, stream, ravine, canyon, etc. With only 1 inch, there is not enough depth to do too much. 2 inches would give a much more realistic look and depth. You can see how our bridge and lake area looks in this thread. I'd have liked to have had a deeper lake bank.
Good luck with your project. We are certainly enjoying ours. :D
 

cabdriver

Member
Jan 23, 2005
207
0
16
68
JPguest,
No, I don't have another website -- we just put our progress here. Glad you are enjoying the thread. We'll hopefully be making some more significant progress here shortly and will post some new pics. :thumb:
 

cabdriver

Member
Jan 23, 2005
207
0
16
68
NewGuy,
I went out to the garage a took a pic of a scrap piece of the foamboard that shows the make, etc. Hope this helps.
 

Attachments

  • Styrofoam.jpg
    Styrofoam.jpg
    39.4 KB · Views: 34