cnw1961 challenge #1

cnw1961

Member
Jan 7, 2006
846
0
16
65
Germany
Jim, don’t be sad, enjoy the anticipation. BTW I can’t go on like I want to. I am still waitng for my Tichy Train detail parts to arrive. Until then I can’ do anything on the sides of the car, I need the doors first. I have to wait for at least another week, it is a long way from the US to Germany.

Lynn, I glued some big metal nuts to the floor before I assembled the roof. The car should be heavy enough.

Josh, I am glad it is not only me who sees a freight car, when looking at the pics :wave: .

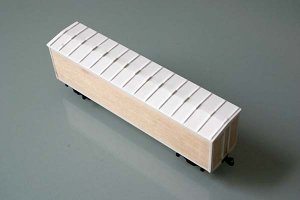
OK, here we go. I didn’ make much progress today (the job is always disturbing the really important things in life :D), I only prepared the roof for the roofwalk. I won’t install the roofwalk before I painted the roof, so it still has to wait.

Boxcar17.jpg
 

Nazgul

Active Member
Jan 22, 2006
992
0
36
63
Ohio
Kurt, That is awsome! I never really thought about scratch building anything (too busy trying to get the layout moving) but that boxcar already looks so superior to what comes out of a box that.....I W A N T O N E !!!!!!!!!! Very inspiring, can't wait to see more.
 

cnw1961

Member
Jan 7, 2006
846
0
16
65
Germany
Steve, thank you for your nice comment. It is a real challenge and fun to build this car. If you want to build one yourself, I can give you one advice: be patient (not one of my strenghts) and have a good supply of sanding paper. It is much more time consuming than I ever thought it could be and you spend most of the time sanding parts.

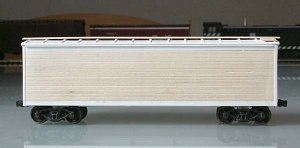
I don’t build this car to a specific prototype. When I planned to build this car, I looked at a lot of pictures of these old boxcars and not even two of the cars appeared to be the same: different roofs, doors, ladders etc. I decided to build a version that allows me the best result. Please, don’t count rivets. Ahh yes, rivets. Before I started, I thought of using the tiny .020 rivets made by Tichy’s. But then I calculated that I would need nearly 400 !! of them. It made me think about the deadline of this challenge and my mental health. No rivets – or maybe only a few.

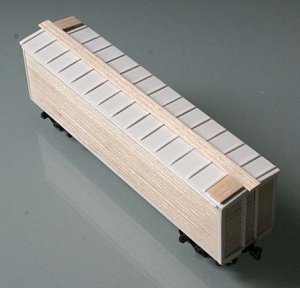
In my last post I said, that the roofwalk would have to wait. But I was too curious to wait. I built a wooden roofwalk today. It is only glued lightly to the roof. I can remove it easily and without causing damage before painting.

Boxcar18.jpg

Boxcar19.jpg
 

cnw1961

Member
Jan 7, 2006
846
0
16
65
Germany
Tobias, vielen Dank für Deine Grüße and your kind words about the car.

Lynn, I can’t tell, because I don’t know what india ink is. I still have to decide how to paint it. I would prefer to airbrush it with some matt paint, but when I want to apply decals, the surface has to be glossy. I think I have to carry out some tests before I can decide what to do. After all the work, I don’ want to spoil it in the end.
 

wickman

Member
Dec 8, 2005
546
0
16
62
Ontario canada
cnw1961 said:
Tobias, vielen Dank für Deine Grüße and your kind words about the car.

Lynn, I can’t tell, because I don’t know what india ink is. I still have to decide how to paint it. I would prefer to airbrush it with some matt paint, but when I want to apply decals, the surface has to be glossy. I think I have to carry out some tests before I can decide what to do. After all the work, I don’ want to spoil it in the end.
Well for wood you have a few different choices for washes one can be india ink ( walmart) a couple drops into alchol , black shoe die diluted the same way, or paint ( dip brush into say like a floquil then into thinner .
You'd be surprised the results if you have a scrap piece of wood you may wanna try it . The india ink would give a silver look . The shoe dye would give a darker look and paint well paint would be paint thinned down .
Here's a pic with samples with india ink and dye diluted 3 different mixtures

first shot out doors second shot in doors


Here's a pic of the mine I did the tipple bottom is done with india ink and the rest done with floquil boxcar red thinned with thinner on the brush


cnw1961

Member
Jan 7, 2006
846
0
16
65
Germany
Lynn, this india ink looks like a great way to give wood an old, weathered look. My problem is, that I have to paint the styrene and the wood the same color. When I see pics of prototypes, I can hardly tell the difference between the wood and metal parts of the cars. Another problem are the reporting marks. If I want to use decals like microscale’s, I need a glossy surface. Or are there any dry transfer decals available which I can apply to a matt surface?

Oh, BTW. Lynn, I followed the link to the thread about your layout. Don’t know, how it could pass me unnoticed. Great work :thumb: .
 

wickman

Member
Dec 8, 2005
546
0
16
62
Ontario canada
Now someone jump in and pull me back hereif I'm not quite correct but I'm sure you can just print your own then you get a piece of sand paper sanding the back down to a real thin piece and stick it on the side then you would just give it a wash as well. I've seen it done on the side of buildings on my darryl huffman dvd collection I would have to dig them out to review them.When I start again on doing my kit building I will be using the technique.:wave: I'm not quite sure on the styrene although I would think if you gave it a sanding to ruff it up it would take the paint better ...real good question though maybe others can share some knowledge hereannounce1 .(HELP)
You may also want to weather by first painting then drybrush over a the base colour maybe use some weathering powders. You 'll probably have to use like a course 40 grit sandpaper to get a grain look . Then finish with the india ink wash .
 

eightyeightfan1

Now I'm AMP'd
Jun 18, 2002
2,772
0
36
62
Torrington, Ct.
You can still use Microscale decals. First, spray the car with a gloss coat. Apply the decals, weather it(especially if your using chalks), then apply a couple coats of Testors Dullcoat. This will dull the finish as well as seal the weathering chalks.
Can't wait to see the finshed car.

BTW cnw1961, 20 years ago I was stationed at a place called Gieblestadt, about 18 clicks south of Wurzburg...About how far are you from there? The name of your "stadt" looks familar.
 

cnw1961

Member
Jan 7, 2006
846
0
16
65
Germany
Lynn, the method you described at the end of your post sounds interesting. I will try it on a scrap piece of wood. I have to see if I can get india ink at Wallmart here in Germany.

88, that’s exactly how I wanted to paint it, when using microscale decals. Würzburg is about 230 miles down to the south east from where I live. Might have seen you on the motorway, when we were passing those US trucks on our way to Italy.
 

MasonJar

It's not rocket surgery
Oct 31, 2002
5,362
0
36
Ottawa, Canada
Visit site
Kurt,

I would paint the whole car with boxcar red, or whatever you've decided it should be. Dry transfers work best with a matte finish, so you could apply those directly after painting if you can find some in a road you like. Then you can weather the car, and seal it with dull coat if you wish.

If you want to use decals instead, you will need a glossy surface to avoid "silvering" the decal. This is caused when tiny air bubbles are trapped under the decal, preventing it from adhering to the surface. You can get "gloss coat" to finish the painted surface before decalling. After everything is set (decal, weathering, etc), you can apply dull coat to re-establish the matte finish.

Andrew
 

cnw1961

Member
Jan 7, 2006
846
0
16
65
Germany
Thank you, guys. It is most likely that I use glossy paint and decals. I have to try it on some scrap wood first., because I don’t want the wood look like plastic after painting. I want to paint the car with boxcar red. Does anyone know if these old boxcars were painted cmpletely in boxcar red or if some parts like the underframe or brake parts were painted with a different color?
 

cnw1961

Member
Jan 7, 2006
846
0
16
65
Germany
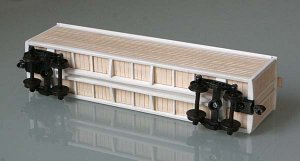
After building the roof, I turned to the bottom again. First I glued stripwood to the floor. Then I completed the underframe by adding strips of .040 x .040 styrene. Now I am at a point where I can’t go on without the detail parts (doors, brake and ladders) I ordered. I need to know the exact size of the doors and the door tracks before I can place the braces on both sides of the car. I hope the parts will be deliverd next week.

Boxcar20.jpg