Building Thunderchild's Shuttles with extras

bgt01

Exemplary Confidant
Jan 26, 2012
576
843
93
Ohio
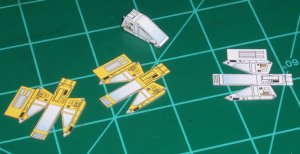
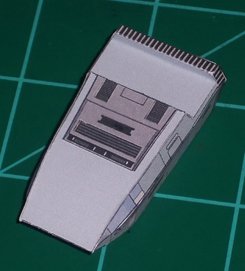
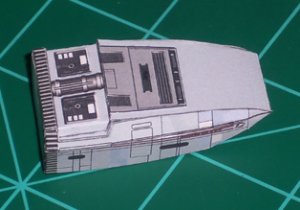
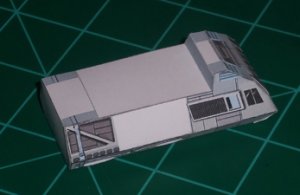
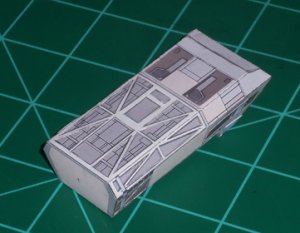
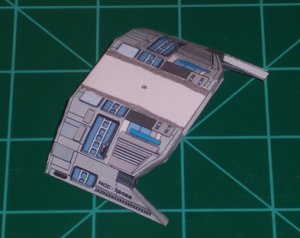
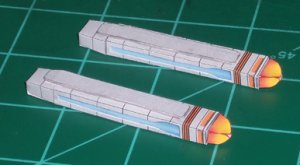
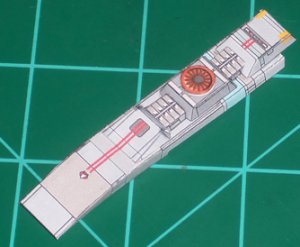
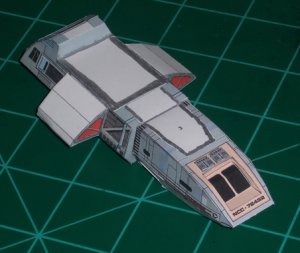
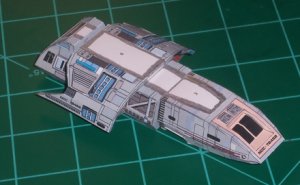
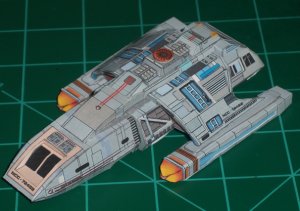
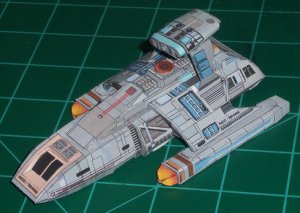
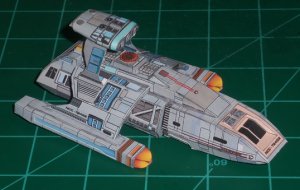
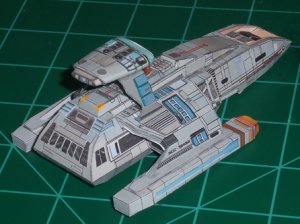
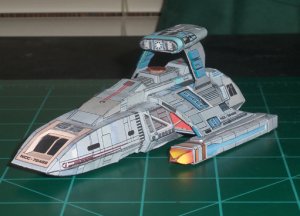
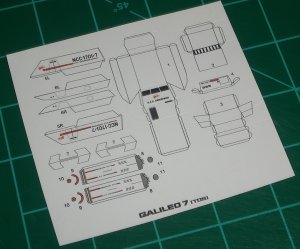
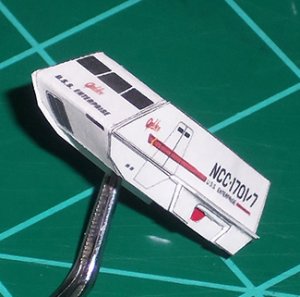
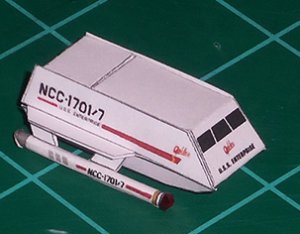
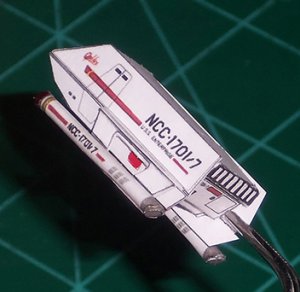
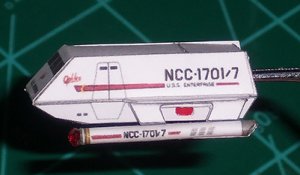
I promised myself I was going to finish all my in-progress builds before starting a new one…then I broke that promise and started assembling some of Thunderchild’s most excellent 1:200 scale shuttles. My reasoning was a lot of these are small and don’t have a lot of parts, so they should go quickly. That was before I started detailing. Oh well.

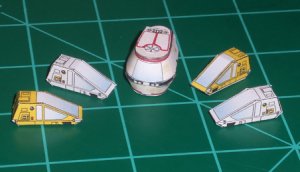
1. Work bees and Travel pod

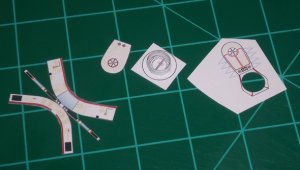
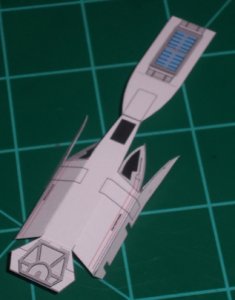
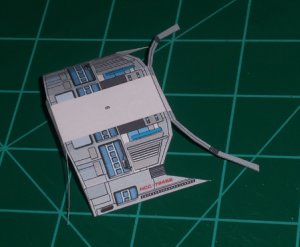
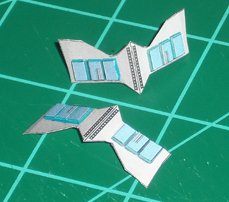
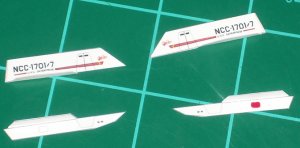
“Wait a minute,” you’re saying. “There are no work bees or travel pods in ThunderChild’s file.” Well, you are correct. However, there is a reason for these being here I’ll show later. These are a mix from the Rawen/Legal01 1:200 Enterprise and the original Rawen 1:400 Enterprise files. I thought it would be cool to have in-scale versions of these ancillary craft to go with Thunderchild’s shuttles.

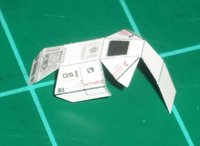
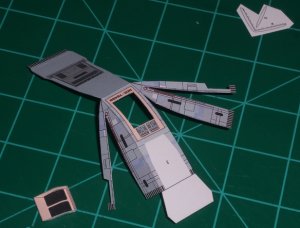
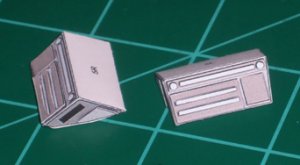
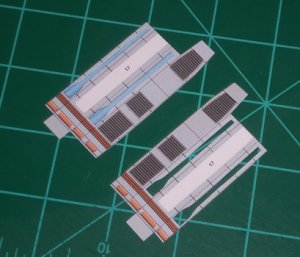
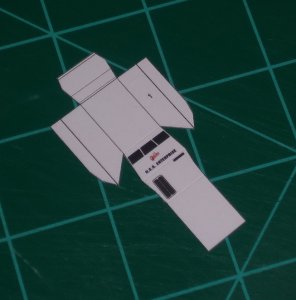
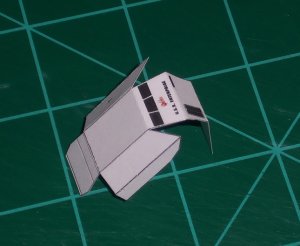
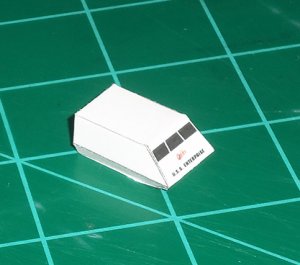
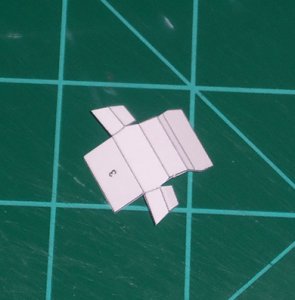
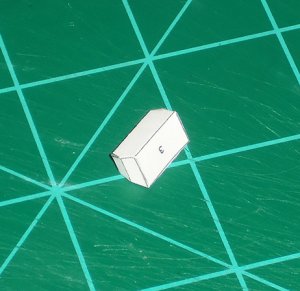
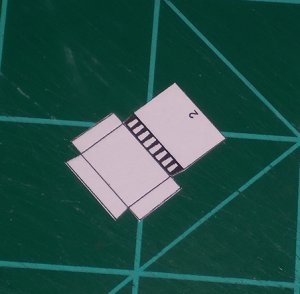
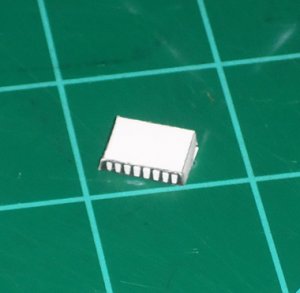
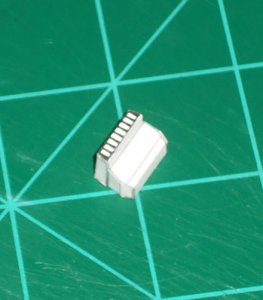
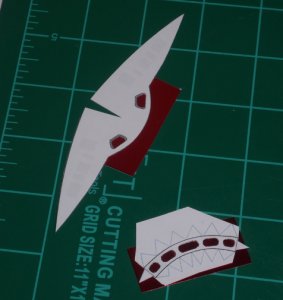
The work bees are simple score, cut and fold jobs. I cut off the tabs and edge glued them using Super
Glue gel applied with a sharpened toothpick. Oddly enough, it didn’t occur to me until right as I write this that I should have added some detailing to these. I’ll have to remedy that.

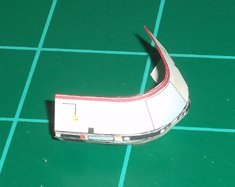
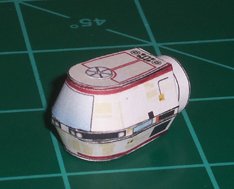
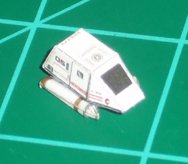
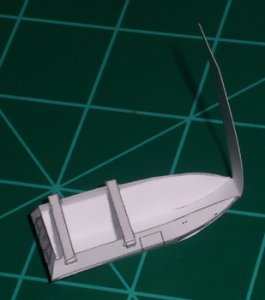
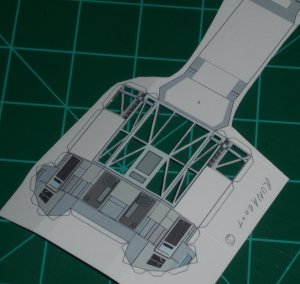
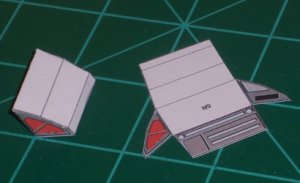
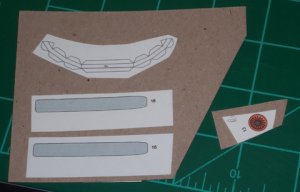
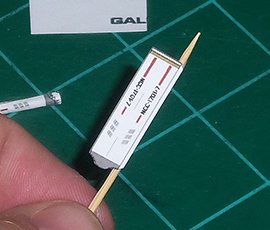
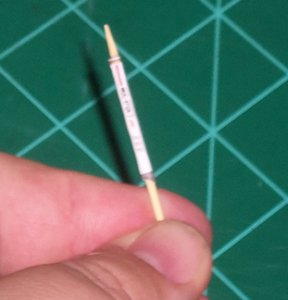
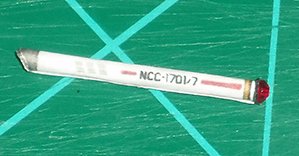
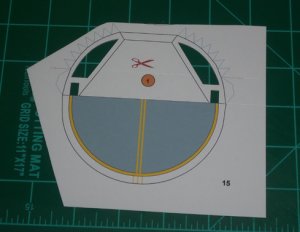
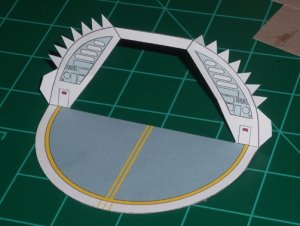
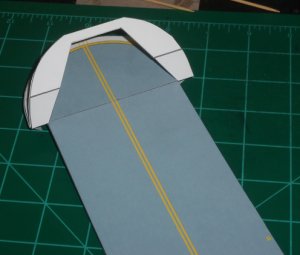
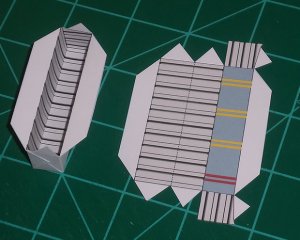
The travel pod is more complex with its curved body. No tabs used on this one either. I rounded the body by rolling my wooden dowel until I got the curves in, edge glued the center strip to the top part of the main hull, then worked the bottom part into place. I recessed the door at the rear and glued the top and bottom in place, along with the docking ring. I added some raised detailing, and I’ll probably add a little more to make it look more like the model. I might even make one more travel pod with Kirk and Scotty in the window.
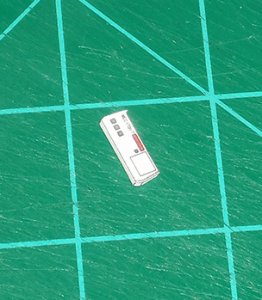
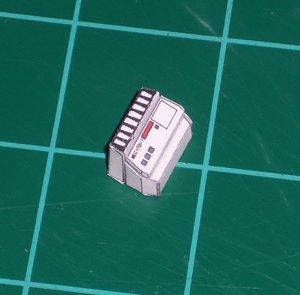
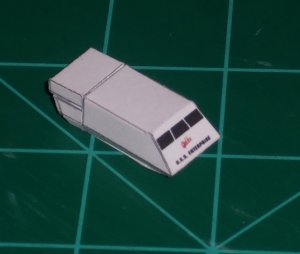
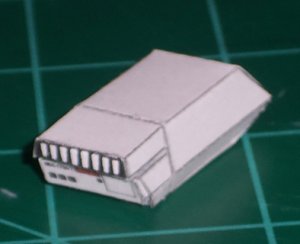
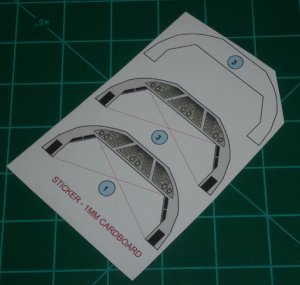
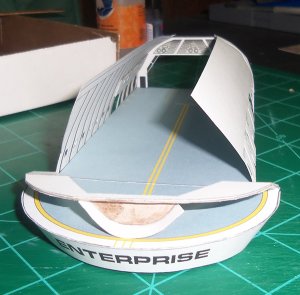
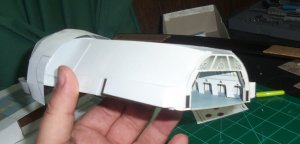
 

Attachments

  • a1.JPG
    a1.JPG
    172.8 KB · Views: 19
  • a2.JPG
    a2.JPG
    142.8 KB · Views: 18
  • a3.JPG
    a3.JPG
    38.4 KB · Views: 18
  • a4.JPG
    a4.JPG
    42.6 KB · Views: 20
  • a5.JPG
    a5.JPG
    104.1 KB · Views: 16

bgt01

Exemplary Confidant
Jan 26, 2012
576
843
93
Ohio
2. Shuttlepod El-Baz
On to the Thunderchild models. This is the Type 15 shuttle pod El-Baz from Star Trek: The Next Generation. It’s basically a one-man shuttle and man is it SMALL! I figured this would be the hardest for my man-hands to build, so I started here. It’s only 3 parts: a main hull and 2 engines. The body is another score, cut and fold. Again, no tabs and edge glued with Super Glue gel. The engines are a different story. Trying to build something so small was almost too much for me. I was finally able to use a toothpick to roll the engine tubes around. The pointed ends are mangled mess but they are on. I eventually rolled them around the tip of my metal pick enough to get them glued together. If anyone can build a nice version of this, please do so and show me how you did it.

This thing is so small my camera can’t focus on it to get a good picture. I thought it was too small for detailing, but I may go back and add some raised panels.
 

Attachments

  • b1.JPG
    b1.JPG
    29.8 KB · Views: 17
  • b2.JPG
    b2.JPG
    32.7 KB · Views: 18

bgt01

Exemplary Confidant
Jan 26, 2012
576
843
93
Ohio
3. Shuttlecraft Hawking
This is the Galileo type shuttle Hawking as seen in Star Trek: Generations. Its design is based on the Galileo from Star Trek V. The main difference is the addition of side windows at the front of the hull.

The main hull is all one piece, so score, cut, fold and edge glue is again the procedure. I started at the top and glued my way around until the bottom panel was left. It has to be left open to glue the engine struts in place. The struts are basically square bars. I dry fitted them and trimmed the holes they go in several time to make sure the bottom wouldn’t bulge when glued over them. The ends of the struts are angled to match the angle of the engines when attached, so make sure you don’t glue them in upside down. The engines are basically boxes, so take your time and they can come out pretty straight.

Without a doubt, the two hardest parts are the engine cowlings and the long pods above the engines. The pods are small and curved and hard to handle. I curled the sides some, glued the ends and then worked the sides with the end of my metal pick until I got it as close to the shape I needed as I could. Then I glued the outer cover at one end and slowly glued the cover into place. I worked it a little more with my fingers and spread some Super Glue on the inside to get it to hold its shape.

The engine cowlings are very thin at the front and fiddly. I wound up putting some regular paper gel glue on the edge and working the little black ends into place with my metal pick.
 

Attachments

  • c1.JPG
    c1.JPG
    85.1 KB · Views: 13
  • c2.JPG
    c2.JPG
    71.6 KB · Views: 13
  • c3.JPG
    c3.JPG
    50.2 KB · Views: 12

bgt01

Exemplary Confidant
Jan 26, 2012
576
843
93
Ohio
4. Runabout Rio Grande
This is the runabout Rio Grande from Star Trek: Deep Space Nine. It is one of the largest models with the most pieces in this set. It builds to a very nice model. Because it’s bigger, I put more effort into the detailing.

First up is the main hull. It is composed of several sections. Again, all edge gluing with no tabs. I started with the nose, which is another straightforward score, cut and fold. The front window assembly glues in from behind. I thought about recessing the black windows, but decided against it. For the bottom, I printed a second gray panel section, cut out the areas I wanted to be recessed and glued the new panel over the old one.
 

Attachments

  • d1.JPG
    d1.JPG
    186.1 KB · Views: 12
  • d2.JPG
    d2.JPG
    69.3 KB · Views: 13
  • d3.JPG
    d3.JPG
    54.9 KB · Views: 11
  • d4.JPG
    d4.JPG
    66.6 KB · Views: 12

bgt01

Exemplary Confidant
Jan 26, 2012
576
843
93
Ohio
Next is the center/rear section. I got ambitious with this and decided to have areas recessed to show off the framework. This took a lot of careful cutting with a sharp blade. My method is to never cut all the way to the end of the cut. I place the tip of the blade at the start of the cut, then stop short of the end. Then I turn the piece around and repeat this so the cut is completed in the middle of the line. This helps take stress off fragile cuts like this that can tear easily during cutting. I printed out a second piece to cut up for raised panels and to glue under the framework. I folded the area under the frame and slowly glued it using Super Glue gel for strength and to keep everything in place after folding. I still got a little twist and lift from the thin frame areas, but it was worth it because it gave a nice effect.
 

Attachments

  • d5.JPG
    d5.JPG
    197.2 KB · Views: 11
  • d6.JPG
    d6.JPG
    76.3 KB · Views: 11
  • d7.JPG
    d7.JPG
    59.5 KB · Views: 9
  • d8.JPG
    d8.JPG
    89.6 KB · Views: 12

bgt01

Exemplary Confidant
Jan 26, 2012
576
843
93
Ohio
Next is the impulse engines. They are simple score, cut and fold pieces to which I added some raised panels. Then comes the outer pylon wing section. I added more raised paneling. This is tricky because it needs to match the shape of the impulse engines and provide a flat, level surface on the ends to mount the warp engines. I glued the support piece to chipboard, but I decided to not use it, which may have been my mistake. I didn’t do too bad, but the ends didn’t come out level for some reason. I wound up trimming them level. Also, the starboard “NCC” number is printed in red instead of black. I cut one off a spare piece and glued it in place.
 

Attachments

  • e1.JPG
    e1.JPG
    80.5 KB · Views: 14
  • e2.JPG
    e2.JPG
    55.7 KB · Views: 12
  • e3.JPG
    e3.JPG
    120.1 KB · Views: 13
  • e4.JPG
    e4.JPG
    97.6 KB · Views: 13

bgt01

Exemplary Confidant
Jan 26, 2012
576
843
93
Ohio
Next are the warp engines. I recessed the warp grills and raised the vents on the landing side. I glued the top mounting panels to 1mm chipboard and edge painted it silver to more match the model. Their boxy shape made them easy to assemble.
 

Attachments

  • e5.JPG
    e5.JPG
    127.8 KB · Views: 15
  • e6.JPG
    e6.JPG
    39.6 KB · Views: 11
  • e7.JPG
    e7.JPG
    105 KB · Views: 12
  • e8.JPG
    e8.JPG
    76.4 KB · Views: 11

bgt01

Exemplary Confidant
Jan 26, 2012
576
843
93
Ohio
Next up; the engineering section. The base piece is another score, cut and fold part. Same with the small parts that go on top. I started at the front and glued my way to the back. I glued the round orange antimatter injector to 1mm chipboard and edge colored it with an orange marker.
 

Attachments

  • f1.JPG
    f1.JPG
    83.8 KB · Views: 12
  • f2.JPG
    f2.JPG
    122.8 KB · Views: 12
  • f3.JPG
    f3.JPG
    82.6 KB · Views: 11

bgt01

Exemplary Confidant
Jan 26, 2012
576
843
93
Ohio
Time for some assembly! The hull and impulse sections went together well. I edged around the white “glue here” areas with silver Sharpie. Next went the wing section. After several test fits I used Super Glue gel to lock this in place. I didn’t want it lifting off the impulse engines later on. Next came the engineering section. Something is off somewhere because it didn’t quite fit:arghh:. It’s narrower in the front than the white “glue here” area and it didn’t sit flush in the very rear. I don’t know if it’s the model or me (it’s probably me:mad:) but a little trimming got it to where it positions well. I used regular paper craft gel glue on it so I’d be able to shift it around some. Finally, the warp engines went on.
 

Attachments

  • f4.JPG
    f4.JPG
    131.8 KB · Views: 18
  • f5.JPG
    f5.JPG
    106.5 KB · Views: 16
  • f6.JPG
    f6.JPG
    211.9 KB · Views: 19

bgt01

Exemplary Confidant
Jan 26, 2012
576
843
93
Ohio
The final piece is the optional pod that goes on top. This wasn’t on all the runabouts because they used it as a way to tell them apart on screen. It was on Rio Grande, so on it went. I raised the blue areas on the pylons by gluing them to 1mm chipboard, but I shouldn’t have because that makes them too thick.

I shaped the pod body with a wood dowl and joined the edges by gluing a scrap of white card from behind. I then added raised details. I added raised details to the pod ends and assembled.
 

Attachments

  • g1.JPG
    g1.JPG
    52.9 KB · Views: 12
  • g2.JPG
    g2.JPG
    51.8 KB · Views: 13
  • g3.JPG
    g3.JPG
    33.9 KB · Views: 14
  • g4.JPG
    g4.JPG
    42.3 KB · Views: 13

bgt01

Exemplary Confidant
Jan 26, 2012
576
843
93
Ohio
I attached the pod to the hull and the Rio Grande is ready to depart DS9 for the wormhole! I didn’t get the angle of the pylons right so the pod is too high off the hull. I’ll likely go back and fix that, but for now she’s ready to go. The end result is a very nice sized model with great detail. Cudos to Thunderchild. I guess I should build a crashed version to honor the many times these things bit the dust. They were almost as bad as the Eagles on Space: 1999!:D
 

Attachments

  • g5.JPG
    g5.JPG
    157 KB · Views: 15
  • g6.JPG
    g6.JPG
    163.4 KB · Views: 18
  • g6.JPG
    g6.JPG
    163.4 KB · Views: 17
  • g7.JPG
    g7.JPG
    143.7 KB · Views: 15
  • g8.JPG
    g8.JPG
    170.8 KB · Views: 17
  • g9.JPG
    g9.JPG
    153.6 KB · Views: 16

Revell-Fan

Co-Administrator
Staff member
Administrator
Moderator
Aug 1, 2009
11,611
12,352
228
Vreden
WOOOOOOW!!!!! These ships are awesome!!!! You did a formidable job on them, especially in this small scale. Major kudos to a great job well done! :)
 

bgt01

Exemplary Confidant
Jan 26, 2012
576
843
93
Ohio
5. Shuttlecraft Galileo (TOS)
This is the shuttlecraft Galileo from the original Star Trek series. She is the first and most famous shuttlecraft in Trek history. This is a very nice model to build. It’s only flaws are in the paint scheme.

First up was the forward main hull. It’s a score, cut and fold piece. Again, I cut of the tabs and edge glued the parts. I glued the sides first, then the rear and finished with the bottom. Pretty simple. It also has paint problems #1: the front lower hull should have 2 small square ports just below the centerline to port. This has 1 solid black line. The 2 long black sections on the starboard side should be a square section with 3 rows of louvers. And the windows should be a little smaller and square instead of slanted on some sides. I didn’t try to correct any of this because at the time I was content to build as-is.
 

Attachments

  • h1.JPG
    h1.JPG
    387.5 KB · Views: 13
  • h2.JPG
    h2.JPG
    289 KB · Views: 13
  • h3.JPG
    h3.JPG
    258.9 KB · Views: 12
  • h4.JPG
    h4.JPG
    159.7 KB · Views: 12

bgt01

Exemplary Confidant
Jan 26, 2012
576
843
93
Ohio
Next was the rear hull. The lower rear section is another box-like structure that is just score, cut and fold. The upper section is the same box-like construction. They both glue together as shown. The rear hatch area is another box-like section, but it has some very small sides that have to be glued very carefully. This part completes the rear section. Then the two main pieces glue together to complete the main hull.
 

Attachments

  • i1.JPG
    i1.JPG
    152.1 KB · Views: 11
  • i2.JPG
    i2.JPG
    214 KB · Views: 12
  • i3.JPG
    i3.JPG
    174.5 KB · Views: 11
  • i4.JPG
    i4.JPG
    129.4 KB · Views: 13
  • i5.JPG
    i5.JPG
    192.6 KB · Views: 11
  • i6.JPG
    i6.JPG
    157.2 KB · Views: 12
  • i7.JPG
    i7.JPG
    174 KB · Views: 12
  • i8.JPG
    i8.JPG
    179.9 KB · Views: 11
  • i9.JPG
    i9.JPG
    118 KB · Views: 12
  • Like
Reactions: Revell-Fan

bgt01

Exemplary Confidant
Jan 26, 2012
576
843
93
Ohio
Next are the engines. Paint problems #2: they are incorrectly marked “U.S.S. ENTERPRISE” when they should say “NCC-1701/7.” They are also marked on both sides of each engine when only the outboard side should be marked. I changed the markings to be correct, but forgot to remove the inboard ones. By the time I realized I’d glued on engine in place, so I left it.

The engines are VERY small (I hate small:mad:) and hard to curl. I didn’t have anything on hand that was the same diameter as the finished engines, so I made something by shaving down a toothpick. Once I got it to size I glued the engine to the pick at the glue tab and rolled it around in my fingers until it went into place. Then I glued the edge and trimmed the toothpick flush with the paper. It’s not perfect, but it kept me from squashing the paper and gave the model a firm base. There was no way I was going to get that tiny bussard collector built, so I went to my trusty stash of Glamour Glitz rhinestones and glued 2 12ss rubies into place, which look just fine. I used the small gray end caps, but I shouldn’t have. They look bad. I colored the ends of the toothpick with silver Sharpie and they looked much better, but I wanted to use all the parts.
 

Attachments

  • j1.JPG
    j1.JPG
    103.6 KB · Views: 13
  • j2.JPG
    j2.JPG
    120 KB · Views: 10
  • j3.JPG
    j3.JPG
    95.5 KB · Views: 11

bgt01

Exemplary Confidant
Jan 26, 2012
576
843
93
Ohio
Next was the outer hull skins and struts. Paint problems #3: The small square on the lower port side should be red. I changed this with a red marker. The 2 black squares don’t belong there, but I left them. There should also be a tiny red square by the door just below the centerline that says “Push,” but I didn’t ad it. At this point I was still building as-is. But, I had to change due to the starboard side. It’s a mirror of the port, so it has a door where the real Galileo didn’t. That had to go, so I managed to recreate that side correctly. With all that done the skins glued straight to the hull. I was going to cut the wings off, recut them out of thick cover stock and glue them back on, but I went back to my as-is plan.

The engine struts are made to be cut, folded over and glued. That usually make a wavy, weak part. So I glued the parts to 67 lb. uncoated cover scrap and cut it out. That gave me to nice, thick pylons. I cut the center section out thicker at the top, otherwise it was too narrow and I would have destroyed it and the part would have been really weak.

On go the engines and the Galileo is ready to check out quasars, give giant space tapeworms indigestion, evade blobby alien lifeforms or transport space hippies to acid-filled paradises. Claphands
 

Attachments

  • j4.JPG
    j4.JPG
    206.1 KB · Views: 17
  • j5.JPG
    j5.JPG
    145.1 KB · Views: 15
  • j6.JPG
    j6.JPG
    118.1 KB · Views: 18
  • j7.JPG
    j7.JPG
    146.2 KB · Views: 16
  • j8.JPG
    j8.JPG
    121.3 KB · Views: 19

bgt01

Exemplary Confidant
Jan 26, 2012
576
843
93
Ohio
6. Enterprise Shuttlebay/Cargo Bay Display
Before I started building the shuttles, I had the idea to build the various shuttle bays from the big Rawen Enterprise model as stand-alone pieces. When Thunderchild’s shuttles and Legal01’s 1:200 Enterprise redraw came along, they seemed like a perfect mix for a cool display. The shuttle bay is mostly a straight build, but I have made some significant modifications to make it closer to the movie version.

FANTAIL
Since I needed this to be a sturdy free-standing piece, I did away with the internal formers from the model. I glued most of the straight parts to 1mm chipboard for support. I used pieces of chipboard to make supports as needed. I started at the fantail. I glued chipboard under the landing deck area. I recessed the doors and the blue areas to the sides of the bay doors. I added raised detail to the blue areas for depth. I glued the interior deck to chipboard and used the model formers for support around the door area. I cut and curled the rear part of the outer skin and glued it in place. I cut out the red light areas above the bay doors and glued heavy metallic card in place. This wasn’t a great choice because the card doesn’t curl and glue won’t stick will to the colored side. It took a lot of fiddling to get it in place. Metallic wrapping paper or something pliable would have been easier.
 

Attachments

  • a1.JPG
    a1.JPG
    121.4 KB · Views: 6
  • a2.JPG
    a2.JPG
    149.8 KB · Views: 7
  • a3.JPG
    a3.JPG
    135.3 KB · Views: 7
  • a4.JPG
    a4.JPG
    167.8 KB · Views: 8
  • a5.JPG
    a5.JPG
    154.3 KB · Views: 8
  • a6.JPG
    a6.JPG
    70.7 KB · Views: 4
  • Like
Reactions: Rhaven Blaack

bgt01

Exemplary Confidant
Jan 26, 2012
576
843
93
Ohio
SHUTTLEBAY WALLS
Since I wanted to look into the bay I cut the walls off toward the roof line. The walls curve in so no chipboard here. I layered the wall “ribs” that go up and down and cut out all the hanger doors. I cut out the windows on the walls and the observation areas and glued some of the crew figures from the kit in place. For empty windows I glued black paper in place. This makes the bay look more lively. I used the TMP crew figures since that’s the movie we see this bay in, and I felt it was one of the few times the “pajama” uniforms would see use in a model.

I cut out the work bee areas and glued them into their box shapes. However, I realized the hexagon areas next to the work bees didn’t have a backing area. So I made some by modifying the work bee area in Photoshop.

I glued the gray internal frame pieces to chipboard and layered the details. I glued the walls and fantail pieces in place.
 

Attachments

  • b1.JPG
    b1.JPG
    129.8 KB · Views: 12
  • b2.JPG
    b2.JPG
    506.3 KB · Views: 16
  • b3.JPG
    b3.JPG
    285.7 KB · Views: 14
  • b4.JPG
    b4.JPG
    276.2 KB · Views: 11
  • b5.JPG
    b5.JPG
    138.9 KB · Views: 13
  • b6.JPG
    b6.JPG
    307.6 KB · Views: 14
  • b7.JPG
    b7.JPG
    218.4 KB · Views: 13
  • b8.JPG
    b8.JPG
    462.7 KB · Views: 14
  • b9.JPG
    b9.JPG
    661.9 KB · Views: 12