Building the GPM ME262 Schwalbe

Status
Not open for further replies.

exzealot

Member
Jul 3, 2007
142
0
16
67
Lake Orion, MI
Hello fellow paper modelers!

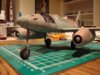
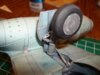
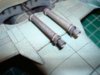
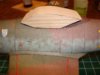
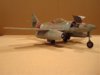
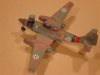
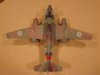
I thought I would start my first build thread. Actually I am well underway with this project, but I waited until I knew I would be successful before embarrassing myself with an aborted attempt.

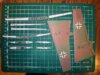
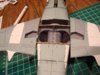
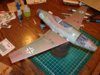
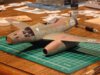
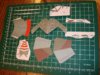
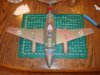
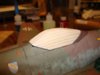
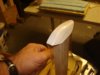
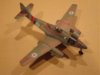
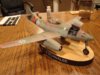
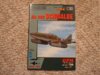
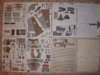
The kit cover, the publish date of 2004, and the small number of pages should not fool anyone into thinking this is a quick and painless kit. I will describe the problems that I encountered as I go along.
 

Attachments

  • DSC00043.jpg
    DSC00043.jpg
    244.4 KB · Views: 29
  • DSC00046.jpg
    DSC00046.jpg
    224.7 KB · Views: 25

exzealot

Member
Jul 3, 2007
142
0
16
67
Lake Orion, MI
This installment shows the cockpit and gunbay assemblies. One of the problems I found almost immediately is that the build instructions are extremely vague and inadequate. Note in the gunbay that the ammunition chutes are backwards per the build sheet (1 sheet).

The fuselage went together very well. Any glitches shown in the picture are a result of my lack of experience and a new digital camera that picks up every grain in the paper.
 

Attachments

  • DSC00048.jpg
    DSC00048.jpg
    184.3 KB · Views: 24
  • DSC00050.jpg
    DSC00050.jpg
    227.2 KB · Views: 22

dansls1

Member
May 7, 2007
155
0
16
Looks like an excellent start. I've always liked this plane and have this kit on my wish list ;)
 

Dragos

Active Member
Jun 8, 2006
415
0
36
41
Romania
The model looks very good so far. I think is a good ideea to make a building thread with a unperfect model. I'm waiting to see how you've manage with the problems.
 

exzealot

Member
Jul 3, 2007
142
0
16
67
Lake Orion, MI
For some reason, I can't seem to upload the fuselage. Oh well... The next few pictures show the wing assemblies. These went together very well, but again, the instructions do not even give a hint that the inner structure of the wings need to be swept back to match the outer skin. I just guessed at where I thought the bend should be, and went for it.
 

Attachments

  • DSC00060.jpg
    DSC00060.jpg
    248.9 KB · Views: 24
  • DSC00064.jpg
    DSC00064.jpg
    190.7 KB · Views: 15

exzealot

Member
Jul 3, 2007
142
0
16
67
Lake Orion, MI
How about the engine pods... The pods themselves went together without much agony. But when it came time to mount them onto the wings, that was another story. The problem is that there are no marks on the leading edges of the wing to indicate where the engines are to be glued. This is extremely important since the engines must line up in 3 locations; the leading edge, the rear fairing, and the whited-out areas under the wings. I did the best I could, but the engines are a bit pigeon-toed in the bottom view. This is because I glued the leading edge first, then had to twist the engines to line up at the rear fairings. This is not noticable, BUT I KNOW IT's THERE!. Also note the wing root fairings - always a PITA, but this went rather smooth this time.
 

Attachments

  • DSC00065.jpg
    DSC00065.jpg
    263.2 KB · Views: 21
  • DSC00075.jpg
    DSC00075.jpg
    207 KB · Views: 27

exzealot

Member
Jul 3, 2007
142
0
16
67
Lake Orion, MI
Now for the tail section. Take a look at the second picture. The red bands of paper are not correct. This is a design glitch - not me. Fortunately, I was able to repaint and overcome this one. The third picture shows how it is supposed to look. The last picture is just to show progress.
 

Attachments

  • DSC00078.jpg
    DSC00078.jpg
    244.8 KB · Views: 19
  • DSC00079.jpg
    DSC00079.jpg
    145.5 KB · Views: 19
  • DSC00080.jpg
    DSC00080.jpg
    183.3 KB · Views: 21
  • DSC00081.jpg
    DSC00081.jpg
    253.2 KB · Views: 20

exzealot

Member
Jul 3, 2007
142
0
16
67
Lake Orion, MI
Here I show an excellent way to form petals that make up ends of bombs, blimps etc. I learned this trick of using progressively smaller and smaller diameters in a drafting hole template from someone here on Zealot! GREAT TIP! Once these parts are painted and mounted in the engine intakes, they look good.

Now on to the wingtips. Here is the point where we go from minor glitches and annoyances to just plain unforgivable. Notice in the picture that the wing tips are about 15 percent too short! The only explanation I have for this is that this kit is a computerized repaint of an old GPM model, and somehow the scale got out of whack. Obviously, nobody test built this version before marketing it.

Oh well, as you can see, I scanned the tips and made them about 15 percent bigger. I glued them onto the wings, gave them a manuicure, and then painted them. They now look acceptable.
 

Attachments

  • DSC00082.jpg
    DSC00082.jpg
    180.9 KB · Views: 18
  • DSC00083.jpg
    DSC00083.jpg
    264.8 KB · Views: 17
  • DSC00084.jpg
    DSC00084.jpg
    194.9 KB · Views: 14
  • DSC00085.jpg
    DSC00085.jpg
    221.6 KB · Views: 14
  • DSC00087.jpg
    DSC00087.jpg
    275.2 KB · Views: 23

Elliott

Senior Member
Jul 18, 2006
645
1
36
Your build thread is quite good. Great pictures snd good explanations with solutions/workarounds. I like this one!

Elliott
 

dansls1

Member
May 7, 2007
155
0
16
Your build is great, although I find the comments about the kit to be highly dissappointing. As I stated above, I had this one on my want list. But I've currently not tried to scan any kits and build them from the original book. Given the issues with the wing-tips and the mis-alignment of the red stripe - that would make this kit pretty much unbuildable as is.
I honestly don't understand how errors of that magnitude make it into print.
 

exzealot

Member
Jul 3, 2007
142
0
16
67
Lake Orion, MI
Here are pictures of the wheels and landing gear. The wheels were turned on a dremel. I read about this on Zealot, but never tried it. WORKS GREAT! The aircraft is starting to look like a real plane. The last shot shows what I believe to be takeoff assist rockets. Almost there....
 

Attachments

  • DSC00089.jpg
    DSC00089.jpg
    304 KB · Views: 20
  • DSC00095.jpg
    DSC00095.jpg
    180.8 KB · Views: 19
  • DSC00098.jpg
    DSC00098.jpg
    184.9 KB · Views: 18
  • DSC00099.jpg
    DSC00099.jpg
    209.6 KB · Views: 24

exzealot

Member
Jul 3, 2007
142
0
16
67
Lake Orion, MI
Now we will make a canopy; or should I say "can-of-worms"... The pictures speak for themselves. I started out making a block (out of a piece of 2x4) that matches the side-view profile of the final shape. My disc sander came in real handy for this. Basically, I just kept grinding and sanding until it fit perfectly, and symmetrical in all views. Notice that the wood form is undersized by the thickness of the formed canopy.

The plastic you see was the packaging from my son's x-box controller! No, it's not my birthday, but I did make a wish that the canopy turns out good before blowing them out. I heated the plastic over the candles and then pulled it down over the form. The form was stuck to the wood post with clay. I waited until cooled, and then glued the paper to the canopy (before removing the forms). This retains the shape and allows for trimming the plastic.
 

Attachments

  • DSC00101.jpg
    DSC00101.jpg
    193.4 KB · Views: 22
  • DSC00102.jpg
    DSC00102.jpg
    143.7 KB · Views: 17
  • DSC00104.jpg
    DSC00104.jpg
    107.4 KB · Views: 15
  • DSC00103.jpg
    DSC00103.jpg
    139.7 KB · Views: 18
  • DSC00105.jpg
    DSC00105.jpg
    123.7 KB · Views: 16
  • DSC00106.jpg
    DSC00106.jpg
    122.1 KB · Views: 24

exzealot

Member
Jul 3, 2007
142
0
16
67
Lake Orion, MI
And now, the final episide of the schwalbe build.

Summary: As I mentioned earlier, this kit is an electronic repaint of an older GPM offering. Here are some of the pros and cons as I saw them.

Pros:

The graphics are very good and realistic
The proportions are close to the real aircraft.
Relatively few parts compared to many other kits.

Cons:

Instructions are extremely vague.
The wing tips were unusable (too small)
Design flaw at the red banding on the fuselage.
Requires additional reference materials in order to assemble the model.

While not perfect, overall, I am very happy with how this model turned out. In spite of the challenges, I would still recommend this model for anyone wanting a good 262. If you like to be challenged (and I believe most paper modelers do), then this one is for you. Just beware of the above-mentioned flaws.

ENJOY THE PICTURES!!!!!

Ken
 

Attachments

  • DSC00111.jpg
    DSC00111.jpg
    122.6 KB · Views: 43
  • DSC00113.jpg
    DSC00113.jpg
    116 KB · Views: 29
  • DSC00114.jpg
    DSC00114.jpg
    127 KB · Views: 36
  • DSC00115.jpg
    DSC00115.jpg
    141.3 KB · Views: 27
  • DSC00116.jpg
    DSC00116.jpg
    126.8 KB · Views: 29
  • DSC00118.jpg
    DSC00118.jpg
    131 KB · Views: 28

Lex

Dollmaker
Dec 1, 2006
645
1
36
Oxford, UK
Nice!! That Vacformed canopy is really an eye-catcher, and the internal structures of the cannons too ^^
 

rlwhitt

Active Member
Aug 25, 2006
196
0
36
63
Clemmons, NC, USA
Great job! And that was REALLY fast! Thanks for the tip about the circle template for petal forming. I hate petal parts and always struggle with them. I'm sure I can make use of this tip! I've often stood at the craft store staring at various drafting tools (templates, erasing shields, etc) wondering what use I could make of them. Now I know - Thanks!
 
Status
Not open for further replies.