

Buck Rogers Thunderfighter mods
- Thread starter Revell-Fan
- Start date
You are using an out of date browser. It may not display this or other websites correctly.
You should upgrade or use an alternative browser.
You should upgrade or use an alternative browser.
Z
Zathros
I would make a repainting tutorial a sticky , with credit given in big letters to the tutor(s), if someone or a few do it from beginning to end. I would love to see that done. I know it takes much effort. It would be greatly appreciated. ")
I suggest making a pdf tutorial which enables me to arrange the pics better for illustration, then have it uploaded to the download section and start a new thread on this to answer any questions you might have.
Z
Zathros
I suggest making a pdf tutorial which enables me to arrange the pics better for illustration, then have it uploaded to the download section and start a new thread on this to answer any questions you might have.
That sounds PERFECT!!! :thumb:
I have Adobe Acrobat and have done this type of thing before for other subjects (like fletching arrows). If you'd like help in that regard, let me know.
Z
Zathros
Fletching Arrows? Isn't that where you put the little rudder thingys on arrows, or has that phrase but taken up in illustration somehow, you got me there!!
Also, any kind of tutorial you would want to write up would be welcomed by so many in the community. My main experience mostly stems from my machinist/tool and dye/ CNC programming days. I found Rhino very intuitive and was able to transfer knowledge to that. I have Photoshop CS3 but the only thing I can do is basic recoloring and rearranging of parts, if I want to scale a model up.
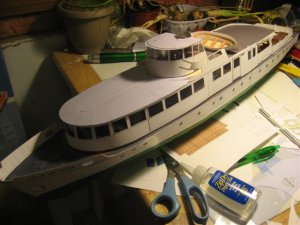
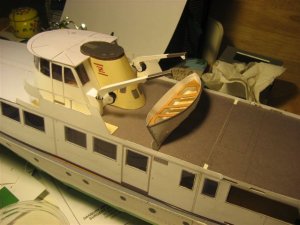
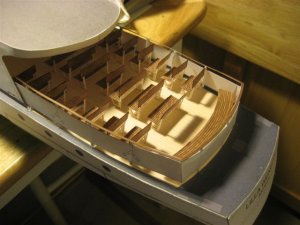
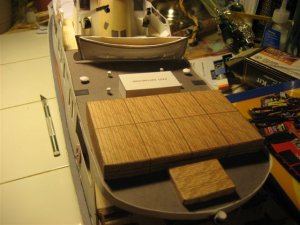
I scaled up Lilla Weneda 200% of her original size, (the boat is now around 26" inches long) but that's about it. To be honest, I do it so little, it seems as if I have to relearn it each time! I attached a pictures of the boat, (I did actually build models once!), that 2 page model was around 26 pages after doubling the size!
Also, any kind of tutorial you would want to write up would be welcomed by so many in the community. My main experience mostly stems from my machinist/tool and dye/ CNC programming days. I found Rhino very intuitive and was able to transfer knowledge to that. I have Photoshop CS3 but the only thing I can do is basic recoloring and rearranging of parts, if I want to scale a model up.
I scaled up Lilla Weneda 200% of her original size, (the boat is now around 26" inches long) but that's about it. To be honest, I do it so little, it seems as if I have to relearn it each time! I attached a pictures of the boat, (I did actually build models once!), that 2 page model was around 26 pages after doubling the size!
Attachments
If you want, you can send me the step-by-step directions and the pictures, and I can do all the layout.
Nice boat, by the way.
And you're right, fletching is attaching the feathers to the arrows (or atlatl darts, in my case). I still have the tutorial somewhere on this machine.
Nice boat, by the way.
And you're right, fletching is attaching the feathers to the arrows (or atlatl darts, in my case). I still have the tutorial somewhere on this machine.
Hi, fans!
I'd like to warm up this thread a bit with this:
https://www.youtube.com/watch?v=ESqRObuQBG4
[YOUTUBE]?v=ESqRObuQBG4[/YOUTUBE]
Okay it's not one of our mods, but IT REALLY FLIES!!!
Enjoy!
I'd like to warm up this thread a bit with this:
https://www.youtube.com/watch?v=ESqRObuQBG4
[YOUTUBE]?v=ESqRObuQBG4[/YOUTUBE]
Okay it's not one of our mods, but IT REALLY FLIES!!!
Enjoy!
Tf cockpit interior 2.0
Greetings Ladies and gentlemen,
I have been working on a new project. It is called TF cockpit interior 2.0.
After seeing Tirick's figurines (which can be found here: http://tcfgaming.com/), I decided to see if they would fit in the current cockpit interior. Unfortunately they did not. So that was what inspired me to work on this project.
There were quite a few changes that I had to make. I even added a few extra components.
I started off with using two screen shots that Silveroxide sent me (Thank you Silveroxide.)
![am-25_display[1].jpg](https://www.zealot.com/data/attachments/94/94904-d32f439aaa9314faa9f731d84ce663b3.jpg "am-25_display[1].jpg")
![am-25_display2[1].jpg](https://www.zealot.com/data/attachments/94/94905-f292e9f7b7b1bdcdfafbf03af99b62da.jpg "am-25_display2[1].jpg")
I also used a diagram that Alan Sinclair sent me. (You can find his work here: http://www.angelfire.com/scifi2/wizardofflight/Thunderfighter.html Thank you Alan.)

I had to lengthen the tub by about 5 mm.

Here is a close-up view of the tub.

Greetings Ladies and gentlemen,
I have been working on a new project. It is called TF cockpit interior 2.0.
After seeing Tirick's figurines (which can be found here: http://tcfgaming.com/), I decided to see if they would fit in the current cockpit interior. Unfortunately they did not. So that was what inspired me to work on this project.
There were quite a few changes that I had to make. I even added a few extra components.
I started off with using two screen shots that Silveroxide sent me (Thank you Silveroxide.)
I also used a diagram that Alan Sinclair sent me. (You can find his work here: http://www.angelfire.com/scifi2/wizardofflight/Thunderfighter.html Thank you Alan.)
I had to lengthen the tub by about 5 mm.
Here is a close-up view of the tub.
New Seats
With a new cockpit interior comes new seats. I attempted to make them a bit closer to canon.
This seat is the same size as the original, but the top angled corners are smaller.

Then base of the seat is assembled.

This is the spacer for the headrest.

Spacer attached.

Here is the headrest.

Headrest assembled.

With a new cockpit interior comes new seats. I attempted to make them a bit closer to canon.
This seat is the same size as the original, but the top angled corners are smaller.
Then base of the seat is assembled.
This is the spacer for the headrest.
Spacer attached.
Here is the headrest.
Headrest assembled.
Great to see you're giving some fresh blood to this thread! :thumb:
I was going to start a new thread, but decided that this build belongs here.
Compared to the first set this one will be at least business class (with the other being economy class :mrgreen: ). RB made a terrific job in revising the firts design.
I'll be revising the new parts and will prepare new plans for everyone to enjoy.
I don't want to hijack this thread, but I have just started the first post in the "Advanced Viper Development Project". Take a look at it:
http://www.zealot.com/forum/showthread.php?t=173938
I'll be revising the new parts and will prepare new plans for everyone to enjoy.
I don't want to hijack this thread, but I have just started the first post in the "Advanced Viper Development Project". Take a look at it:
http://www.zealot.com/forum/showthread.php?t=173938
Great idea! Then everything is kept together! :thumb:I was going to start a new thread, but decided that this build belongs here.
Headrest is attached and seat texture added.

Comparing both the old and new seats.

One of Tiricks figurines used to test the seat.

Both seats are finished.

Comparing both the old and new seats.
One of Tiricks figurines used to test the seat.
Both seats are finished.
Compared to the first set this one will be at least business class (with the other being economy class :mrgreen: ). RB made a terrific job in revising the firts design.
I'll be revising the new parts and will prepare new plans for everyone to enjoy.
I don't want to hijack this thread, but I have just started the first post in the "Advanced Viper Development Project". Take a look at it:
http://www.zealot.com/forum/showthread.php?t=173938
Well this new cockpit interior MEANS BUSINESS ALL THE WAY!!! :thumb::drag1:
Once I get the revised parts, I will post a build of it as well.
Adding components to the tub
Since i extended the tub by 5mm, I had to add an extension to the joystick mount/lower console.

Joystick mount/lower console attached.

Close-up of the joystick mount/lower console.

Front and rear seat in place.


Added a 5mm high side panel to help lower the tub and make it more canon.

Since i extended the tub by 5mm, I had to add an extension to the joystick mount/lower console.
Joystick mount/lower console attached.
Close-up of the joystick mount/lower console.
Front and rear seat in place.
Added a 5mm high side panel to help lower the tub and make it more canon.


Rear console.
Here is the rear console.

The rear console is in place, but there is a 5mm gap between the side panels and the console.

I designed two side components to fill in the gaps.

Side components in place.

Here is a close-up of the components that I used for such.

Here is the rear console.
The rear console is in place, but there is a 5mm gap between the side panels and the console.
I designed two side components to fill in the gaps.
Side components in place.
Here is a close-up of the components that I used for such.