Betty 1/144 build up & 1/700 experimental

gilgamesch

Active Member
Nov 10, 2014
142
210
40
I've started the beautiful model from Vger1981:

The smugglership BETTY from the 4th Alien movie. I love the the design of the ship and Vger1981 done a wonderful template out of - THANKS!

I have planned a simple "out of the box" build (so far)
Starting with the cockpit and engine inlet - quit easy:
P1100710.jpg P1100708.jpg

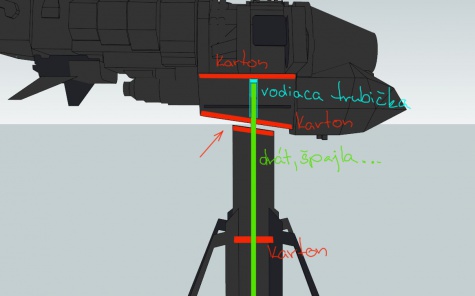
The central part of the body was reinforced at the bottom with cardboard. (because of the stand)
P1100714.jpg P1100713.jpg

P1100711.jpg
 

gilgamesch

Active Member
Nov 10, 2014
142
210
40
Thanks. Not much progress today. But I decided to built a second Betty just a little smaller… 1/700 - to match the Sulaco:)
Here are some pix so you can see what I'm talking about:
P1100715.jpg P1100719.jpg P1100720.jpg P1100721.jpg P1100722.jpg
 
  • Like
Reactions: Rhaven Blaack

Rhaven Blaack

!!!THE MAN BEHIND THE CURTAIN!!!
Staff member
Administrator
Moderator
Jun 12, 2009
12,493
9,855
228
Oregon
www.deviantart.com
So you are doing two projects at one time?
Granted, they may be the same model, but this will be interesting to watch and follow. BEST OF LUCK!!! thumbsup
 

Vger1981

Active Member
Jan 6, 2009
141
219
48
Slovakia
Wow, this is crazy! :D Well, it looks that you are the first oficial builder of the final version, I can only wish you a good luck! :D Anyway, just for the record, try to reinforce as much of the central parts as you can, you will have to calculate all the weight of the tail, wings, etc.
Also, I hope this will help, it's in Slovak, but I think you can figure it out easily..

 
  • Like
Reactions: Rhaven Blaack

gilgamesch

Active Member
Nov 10, 2014
142
210
40
…and the small one:
I laminated the hinges for the engines on cardboard (half of the end thickness) to enforce them.

P1100728.jpg
And cut them out - without the side surfaces.

P1100731.jpg P1100730.jpg
… and glued them together

P1100733.jpg

Then cut the side surface out of the 80g paper.
I colored all edges with a pen.

P1100738.jpg P1100739.jpg
side surfaces covered:

P1100734.jpg P1100735.jpg

And the Part at place:

P1100743.jpg P1100741.jpg
 

skoda

Genius Designer Master Builder
Sep 2, 2008
942
1,335
93
48
bravo super jobClaphandsClaphands:Bravo:
 

gilgamesch

Active Member
Nov 10, 2014
142
210
40
Started with the cargo section.

P1100778.jpg P1100775.jpg P1100779.jpg

Unfortunately I can not find the correct installation height at the machine section…
P1100780.jpg

maybe I should wait until I 've finished the thruster tubes.
 
  • Like
Reactions: Rhaven Blaack

zathros

*****SENIOR ADMINISTRATOR*****
Staff member
Administrator
Moderator
Apr 5, 2013
13,499
9,551
228
The greeblin' really sets this model off, great job! :)